Introduction
Congratulations! With The Bridge
™
you
are entering the new world of listening
enjoyment made possible by combin-
ing the incredible storage capacity and
playback flexibility of an iPod
®
(not
included) with the sonic power of your
Harman Kardon receiver.
With a single, simple connection, your
iPod is connected, and from there all
you need to do is use your remote
control and you are ready to go!
Features
• Single connection to any The Bridge-
ready Harman Kardon receiver
• Plays audio from an iPod through
your Harman Kardon receiver
• Controls your iPod using the
Harman Kardon remote
• Easy track selection with on-screen
navigation
• Charges the iPod
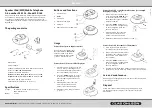
Selecting the Correct iPod Insert
Each iPod model is a slightly different
size, making it necessary to use an
insert that matches your specific iPod
to The Bridge. The Bridge is shipped
with the insert for the color screen and
photo models already installed; if you
own one of those models, no further
changes are needed.
If you own a different iPod, first select
the insert that matches your model.
The model identification is printed on
the back of each of the four extra
inserts supplied with The Bridge. Note
that the insert marked “Universal”
should not be used alone. It is
designed for use with future iPod
models that are not accommodated
by the current inserts. For more
information or updates, visit
The Bridge section of our Web
site at www.harmankardon.com.
Use the following as a guide to
determine which insert is correct
for your iPod model:
• For any iPod with a color screen,
including all iPod photo models, use
the insert with “COLOR/PHOTO” on
the back. This insert is already
installed in The Bridge.
• For 20GB or 30GB iPod photo
models
only
, remove the insert
marked “COLOR/PHOTO” and
attach the two included foam pads
to the rear inside wall in the well of
the insert before replacing it.
• For iPods with a black and white
screen and a 10GB, 15GB or 20GB
hard drive, use the insert with
“10GB/15GB/20GB” on the back.
• For iPods with a black and white
screen and a 30GB or 40GB
hard drive, use the insert with
“30GB/40GB” on the back.
• Use the insert with “mini” on the
back for
all
iPod mini models.
• Use the insert with “Universal” on
the back for iPod models that come
with a special insert.
To remove the 30GB iPod photo
insert, or if you need to replace the
insert at a later time when you change
iPod models, hold The Bridge with one
hand and grab the edges of the insert
in The Bridge and pull straight up.
Once you have selected the correct
insert, place it over the well in the
center of The Bridge and gently press
it down so that it snaps into place.
NOTE:
Do not place an iPod in
The Bridge unless an insert is
installed; otherwise, the iPod will be
prevented from properly connecting,
and damage will be caused to The
Bridge or your iPod that is not covered
by the warranty for either product.
Connecting The Bridge to
Your Receiver
Before connecting The Bridge, turn
your receiver off using its
Master
Power Switch
. You will know that
the power is off when the front-panel
Power Indicator
(normally amber
when the unit is in the Standby mode)
goes out. Depending on your receiver
model, the Master Power Switch is
located above the Power Indicator or
behind the front-panel door.
With the receiver off, press the button
on each side of the connector at the
end of The Bridge cable and insert this
plug into The Bridge/DMP port on the
receiver’s rear panel. If the port is hor-
izontal, insert the connector with the
flat side up. If the port is vertical, insert
the connector with the flat side to the
right. In all cases, the connector will
only go in one way. If you inadvertently
try to plug the connector in the wrong
way, do not force it. Simply reverse
the connector and try again.
2