background image

Exception F200 Wood Insert

8

Like all fine equipment, your Exception requires

some routine maintenance and inspection.  Follow the
guidelines in this section to guarantee safe, efficient
operation.

The Insert

Surface

The insert’s exterior surface should be dusted

periodically with a soft cloth.  For more thorough clean-
ing, wait until the insert is cool before using a damp cloth
to clean any blemishes.

The Door

The gold plated front door should never be buffed

or polished.  Abrasive cleaners and metal polishes will
remove the plating and therefore should never be used. If
the door needs to be cleaned, wait until the insert is com-
pletely cool, then use a sponge, soap and water to gently
remove dirt and stains.  Before relighting the insert, re-
move all soap residue and wipe dry.

Controls

To avoid a rust buildup on the inner surfaces of

the  controls, work  the  controls  back and  forth  several
times, during the summer, or any prolonged period when
you are not using your insert.

The Fire Chamber

The inside of the fire chamber should be exam-

ined for damage to the refractory lining  material, After-
burner hood and  Afterburner glass.  If any of these parts
have been damaged, replace them with Harman  Stove
Company replacement parts.

Glass - Replacement

If the insert’s glass is cracked or broken, you must

replace it before operating your insert.  Remove pieces
carefully.  Replace glass only with Harman Insert Com-
pany replacement glass panels; do not use substitutes.

To replace the glass panel(s),  you will need to

remove the door.  To do this, open the door,  lift it straight
up and place it on a soft surface.

Carefully remove damaged glass, gasket material,

and hold down clips (set aside).

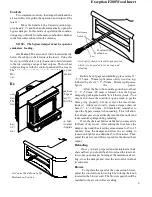
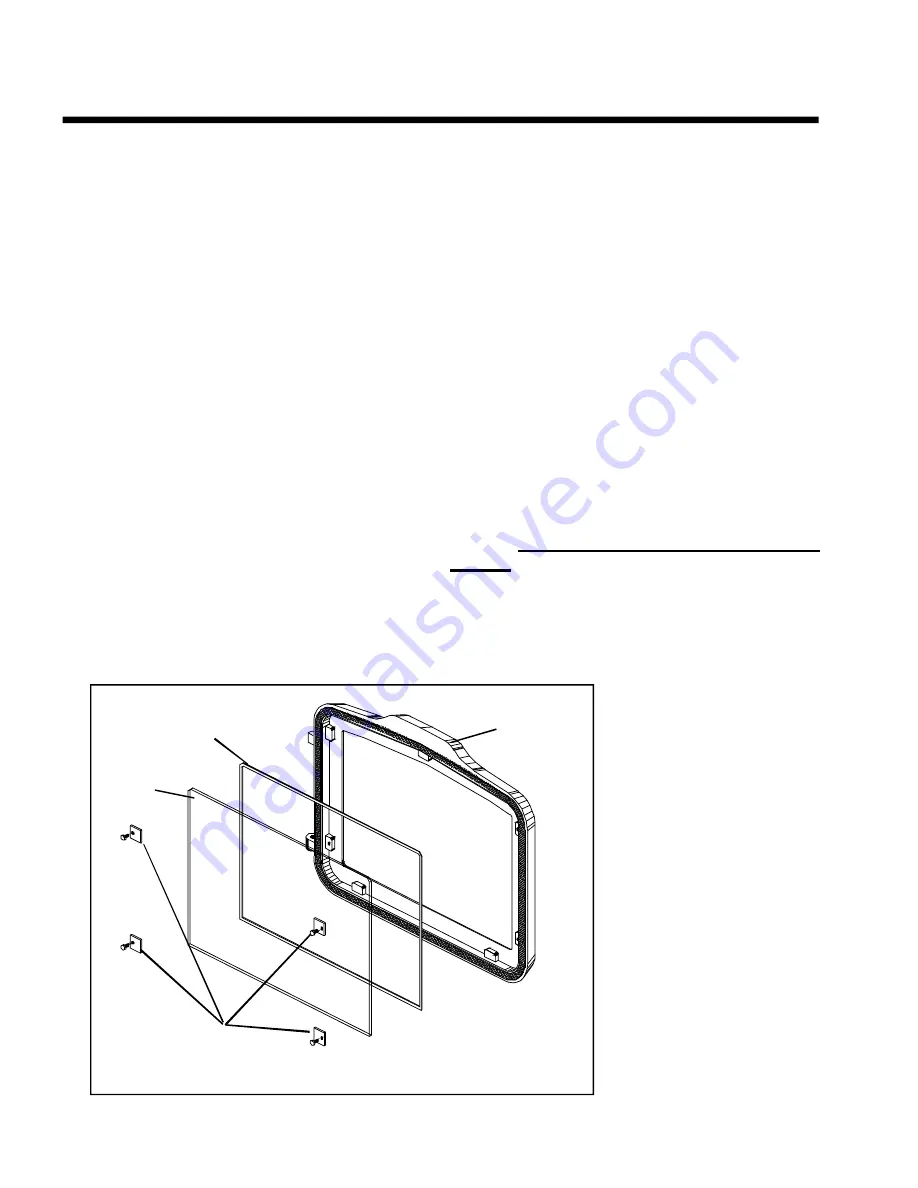
Referring to the diagram, note how the various com-

ponents  of the  door  system fit  together.    Lay the  load
door face down on the soft surface, and install the self
adhesive 1/4"” gasket material around the front face of
the glass. Note: This  glass has  a special  IR coating  on
one side. This coating must be to the outside of the in-
sert. The coated side has a label on it. Do not remove the
label  before installing  the  glass.   Remove  label  before
burning the unit.

 Set the glass pane and gasket gently onto the door.

Install the hold down clips and tighten with bolts as shown.

Reinstall door on insert.

Glass - Cleaning

Sometime it will be nec-

essary to clean accumulated ash
from the glass surface; allowing
this  ash to  remain  on the  glass

for  long  periods  can  result  in
“etching” due to the acidity of the
ash.  The  creosote  which  accu-
mulates on the glass should burn
off during your hot fires.

Never  clean  the  glass

while  it  is hot,  and  do not use
abrasive substances.  Wash the
surface  with  cool  water,  and
rinse thoroughly.  You may wish

to use a nonabrasive cleaner spe-
cifically designed for use on in-
sert glass.  In any case, dry thor-
oughly before relighting your in-
sert.

Maintenance

Door

Glass Gasket

Glass

Hold Down  Clips
and Bolts

Evaluation notes were added to the output document. To get rid of these notes, please order your copy of ePrint IV now.

Summary of Contents for Exception F200

Page 1: ...ETY FOLLOW INSTALLATIONDIRECTIONS CONTACT LOCAL BUILDING OR FIRE OFFICIALSABOUT RESTRICTIONSAND INSTALLATION INSPECTION REQUIREMENTS INYOUR AREA CONTACT YOUR LOCAL AUTHORITY SUCH AS MUNICIPAL BUILDING DEPARTMENT FIRE DEPARTMENT FIRE PREVENTION BUREAU ETC TO DETERMINE THENEED FORA PERMIT CETTEGUIDE D UTILISATIONEST DISPONIBLEENFRANCAIS CHEZ VOTRECONCESSIONNAIRE DEHARMANST OVE COMPANY SAVE THESE INS...

Page 2: ...ood burning insert Failure to follow instructions may result in property damage bodily injury or even death SAVE THESE INSTRUCTIONS Harman Stove Company 352 MountainHouse Road Halifax PA 17032 INDEX Specifications 3 Operation 4 Building a Fire 6 Maintenance 8 Installation 10 Parts Diagram 14 Warranty 16 ...

Page 3: ...ODINSERT ISNOTPROPERLY INSTALLED AHOUSEFIREMAYRESULT FORYOURSAFETY FOLLOWTHEINSTALLATIONDIRECTIONS CONTACTLOCAL BUILDINGORFIREOFFICIALS ABOUTRESTRICTIONS ANDINSTALLATION INSPECTIONREQUIREMENTSINYOURAREA Weight 425 lbs Flue Size 6 inch Log Length Recommended 18 with 20 Max Heating Capacity 1500 to 2000 sq ft Average Emissions 4 4 Grams Per Hr Emissionson Low 2 25 Grams Per Hr Blower Size 100 cfm va...

Page 4: ...t hearth The Insert Doors Your insert has a large glass paneled door for loading and fireviewing To open the glassdoor turn the handles clockwise and pull out to closethe door return the handles to an open 9 o clock closed 6 o clock and push in to engage the latch while turning the handles counterclockwise If the latch on your Exception door needs adjust ment follow the instructions given in the M...

Page 5: ...nitialevaporation stage where mois ture is released from the wood a stage where volatile gases containing much of the wood s heating capacity are released and burned and a charcoal stage where the remaining charcoal burns to release the additional heat available What is left after this final stage is ash Within the firebox two or more of these stages are gen erally occurring at once Cetteguided ut...

Page 6: ...use Build a bed of paper and kindling place several 1 2 25 mm 50 mm split pieces of dry wood on top followed by a few 2 3 50 mm 80 mm split pieces Ignite the paper Allow the fire to burn until a good charcoal bed 2 3 50 mm 80 mm is formed close the bypass damperby pushing the handle in all theway back You may need to leave the load door open a crack to get the blaze going properly but never leave ...

Page 7: ...h Wood ash can be added to your garden or compost When the air setting is low the blower should always be at the minimum setting corresponding to a blower speed of 750 RPM At higher settings above firstnotch the blower may be set to your desired comfort level Be sure that the blower cord does not run under over above or in front of the insert The following guidelines for air settings can be used f...

Page 8: ...e pieces carefully Replace glass only with Harman Insert Com pany replacement glass panels do not use substitutes To replace the glass panel s you will need to remove thedoor To do this open the door liftit straight up and place it on a soft surface Carefully remove damaged glass gasket material and hold down clips set aside Referring to thediagram notehow the various com ponents of the door syste...

Page 9: ...t once every two months during the heating season to seeif any creosote buildup has occurred Checking your chimney and chimney connector more frequently especially while you are getting used to your insert is recommended To inspect this system let the insert cool Using a flashlight and mirror check the interior of the chimney connector and the chimney itself If a significant layer of creosote or s...

Page 10: ...left and right side wings with 1 4 20 button head bolts Nextinstall top wing use the same size bolts Install andirons with 5 16 bolts and washers Install the corner panels using an 5 32 allen wrench and a 1 4 20 button head bolts The left corner panel must slide overthe damper rod Installthe damper handle after the left corner panel has been fastened DamperRod Installation Assembly Parts To Be Ass...

Page 11: ...g authority for informa tion if you are interested in reducing clearance distances other than those presented here From the front of the insert clearance to combus tible materials such as furniture curtains fuel etc is 48 1215 mm in the U S and 60 1525 mm in Canada The clearance to combustibles from the top of the unit to the mantel must be 24 610 mm if using the op tional hood and at least 36 900...

Page 12: ... method used a chimney cap is recommended to prevent the fiberglass from being exposed to the rain If the masonry chimney flue cross sectional area is greater than 3 times that of the insert which is 28 27 sq in it is recommended that a positive connect installation be used Steel Plate Tile Liner Masonry Positive Connect Installation Thismethod is recommended when the tilelinner is damaged beyond ...

Page 13: ...heway tothe top 6 The smokeshelf internalbaffles damperand glass ormetaldoors may be removedas necessary 7 Internalparts suchasrefractorylinings firebricks insulation fireboxwalls ordoorframesmaynotbe removedoraltered Zero ClearanceFireplace Installation The first step is to take careful measurements to be sure the insert will fit into fireplace It is required that zero clearance installations be ...

Page 14: ...ELBOW 3 40 00121 21 SSS 5 16 18 X 1 4 3 30 2931180252 22 WOODEN HANDLE 3 40 00122 23 RPH MS 1 4 20 X 2 1 2 3 30 625202501 24 GOLD DOOR W ROPE 1 10 05165 CAST DOOR W ROPE 1 10 08159A 25 GLASS WITH GASKET 1 10 08056 26 3 8 X 1 7 8 DOOR PIN 4 30 00138 2 27 GLASS CLIPS 2 00 05202 GLASS BOLTS 3 30 5110240382 28 ASH LIP TRIM 3 43 34001 29 ASH LIP 2 00 34105 30 FRONT BASE COVER 2 00 34122 31 BLOWER 3 21 ...

Page 15: ...ecifieda certainmaterialaminimum ofoneinchthickthatis appropriate foruse as a hearth extension with theirfireplace system The k valuefor that materialis 84 You decide to use commonbrick forhearth extensionprotection insteadof thatspecified material Howthick mustthe common brickhearth extension be to be equivalentwith thatwhich themanufacturerspecifies Common brickhas a K valueof 5 Usingthegiven fo...

Page 16: ... not limited to fire lightning acts of God power failures and or surges rust corrosion and venting problems are not covered Damage and or repairs including but not limited to remote controls filters fuses knobs glass ceramic brick panels ceramic fiber afterburners door packing tile ceramic log sets paint batteries or battery back up and related duct work are not covered Also excluded from this war...

Reviews: