background image

32

INSTALLATION   (Options)

Only For Qualified Installers

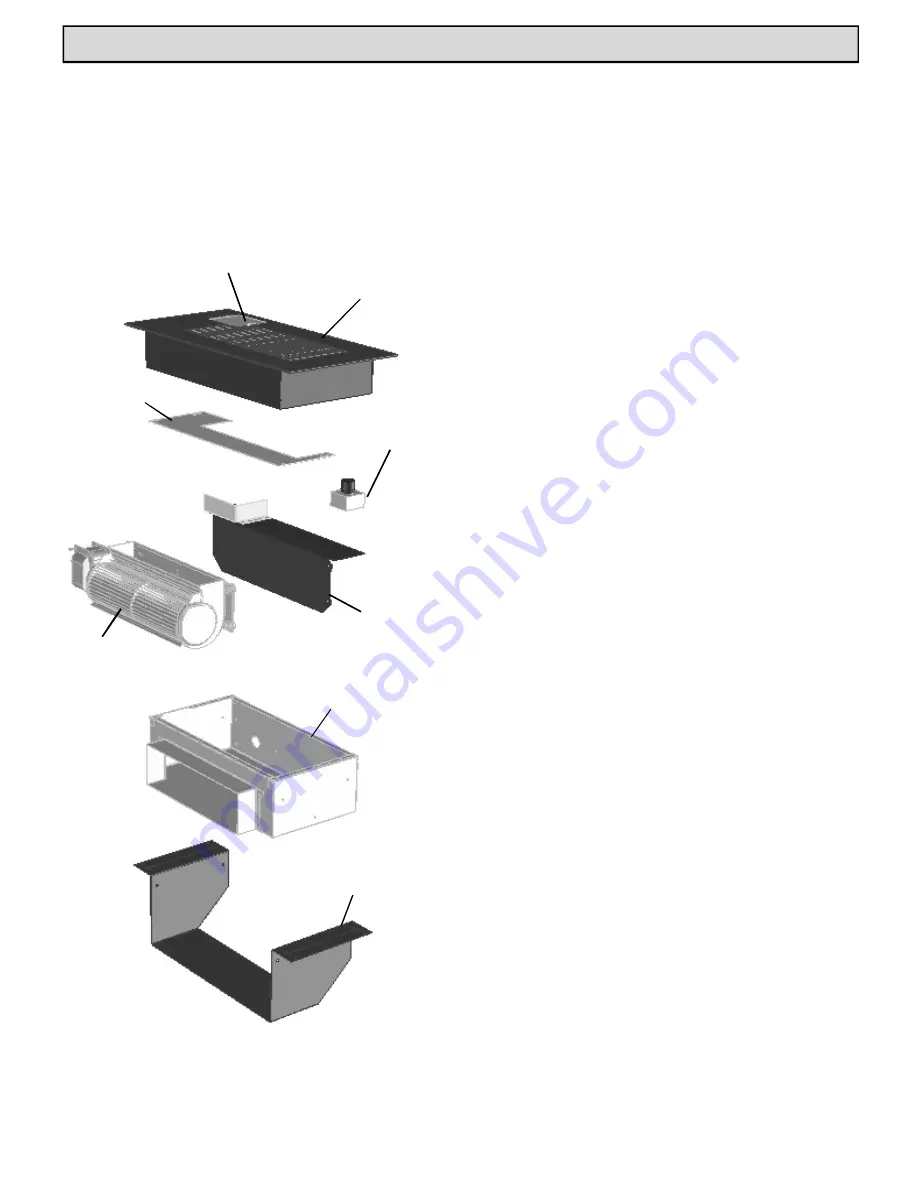
Floor Register

Blower Cover

Speed Control

Blower Mount

Blower Assembly

Blower Box

Floor Mounting
Bracket

Speed Control
Access  Door

Floor  Register  Installation

The  difference  between  the  wall  register  and

floor register is the register itself and the mounting
brackets. The wall register mounts on the wall with
two screws.  The floor  register mounts  in the  floor
and is held in place by gravity. The floor register has
a small door to access the blower speed control.

Summary of Contents for HB 38 DV

Page 1: ... SUITABLE FOR INSTALLATION IN MOBILE HOMES IF THIS HARMAN STOVE IS NOT PROPERLYINSTALLED AHOUSEFIRE MAYRESULT FORYOURSAFETY FOLLOW INSTALLATIONDIRECTIONS CONTACT LOCAL BUILDING OR FIRE OFFICIALSABOUT RESTRICTIONSAND INSTALLATION INSPECTION REQUIREMENTS INYOUR AREA CONTACT YOUR LOCAL AUTHORITY SUCH AS MUNICIPAL BUILDING DEPARTMENT FIRE DEPARTMENT FIRE PREVENTION BUREAU ETC TO DETERMINE THENEED FORA...

Page 2: ...er appliance FORYOUR SAFETY WHATTO DOIFYOU SMELL GAS Do not try to light any appliance Open windows Extinguish any open flame Do not touch any electrical switch do not use any phone in your building Immediately call your gas supplier from a neighbor s phone Follow the gas supplier s instructions If you cannot reach your gas supplier call the fire department Installation and service must be perform...

Page 3: ...e 16 Venting 20 Damper Settings 24 Changing toLP 25 Log Placement 27 Option Installation Thermostat 28 Remote Control 28 Remote Register Kit 29 Maintainence 35 Wiring Diagram 37 Trouble Shooting 41 Warranty 46 Manufactured by The Harman Stove Company 352 Mountain House Rd Halifax PA 17032 M PM65 FILES MANUALS HBF hb38dvR6 p65 ...

Page 4: ...ssed whenselectinga suitablelocation foryourSerenityIIIGasFireplace Ob servingrequiredclearancesto combustiblematerials the proximityto asafe chimneyorventingsystem location and theaccessibility ofthegasandelectricalsupplymust allbe considered In addition selectinga location that takes advantage ofthebuilding s naturalairflowis also desirable tomaximize the heating effectiveness ofthe fireplace In...

Page 5: ...xchanger producing two to three times more air than other brands of gas fireplaces Blower Off Blower On Air Gate Blower System Typically in gas fireplaces the blower which is usually an option is placed to blow air up the back of the firebox without any method to keep the air pressure from being lost This method allows air to flow freely around the blower when the blower is off but gives up a larg...

Page 6: ... the center log 10 Push the control knob fully down and hold Immediately push the red piezo ignitor button to light the pilot It is normal to have to push the red button several times before the pilot ignites Continue to hold the control knob in for about one 1 minute after the pilot is lit Release the knob and it will pop back up Pilot should remain lit If it goes out repeat steps 5 through 9 If ...

Page 7: ...n 4 Push in the gas control knob slightly and turn it clockwise to OFF NOTE The knob cannot be turned from PILOT to OFF unless it is pushed in slightly Do not force it FLAME HEIGHT ADJUSTMENT There are separate adjusters for the front and rear burners These adjusters can be accessed by reaching to the left side of the control panel and to the backofthe unit Turn the adjusters counterclock wise up ...

Page 8: ...1375 m 43500 43500 41500 41400 Min Input Rating Btu hr 0 4500 ft 0 1375 m 23300 23800 22800 23400 Orifices DMS front rear 0 4500 ft 0 1375 m 31 51 52 59 32 51 52 60 Manifold Pressure in w c kPa 3 5 0 87 10 0 2 49 3 5 087 10 0 2 49 Min Manifold Pressure in w c kPa 1 7 0 42 6 3 1 6 1 7 0 42 6 3 1 55 Min Inlet Pressure in w c kPa 5 0 1 25 11 0 2 74 5 0 1 25 11 0 2 74 Max Output Btu hr 0 4500 ft 0 137...

Page 9: ...hes Optional Arch Hood This fireplace may be placed on a wood floor Hearth is not required in front of the fireplace MINIMUM CLEARANCES FROM COMBUSTIBLE CONSTRUCTION Unit to floor 0 in Face to side wall 7 in Unit to top stand offs 0 in Unit to side stand offs 0 in Unit to rear stand offs 0 in Top of Glass to 7 Mantel 26in Electrical Rating 120 Volts 60 Hs 2 75 AMP Must be Noncombustible ...

Page 10: ...10 SPECIFICATIONS Rear Vent Corner 70 Gas In Elictrical Hook up 1 1 ...

Page 11: ...11 SPECIFICATIONS Corner 64 Top Vent Gas In Elictrical Hook up ...

Page 12: ...e way to install this fireplace This is why it is important to have a qualified installer do the installation The Serenity III can be laid in stone brick or other masonry products For this purpose a special template face part 1 00 4238231 is available We also offer a line of Harman Built mantels mantel cabinets and corner mantel cabinets Shown is the M2 Mantel Cabinet with marble finish facing rai...

Page 13: ...or raised with no hearth 4 One two or no remote duct kits 5 Thermostat position 6 Gas line hook up is on the right side 7 Electrical hook up is on the left side This appliance mustbe electricallyconnected and grounded in accordance with local codes or in the absense of local codes with the current edition of NFPA 70 National Electric Code or CSA C22 1 Canadian Electrical Code This unit shall not b...

Page 14: ...tible material may be used in front of the Dura rock The total thicknes for all layers of facing material may not exceed one inch A one inch space under the front edge of the fireplace allows room for hearth material Hearth material that is thicker must be compensated for by raising the fireplace the proper amount 1 inch thick Installing fireplace in a wall with an arch face ceramic tile facing an...

Page 15: ...ottom rear of the face into the hook slots on the fireplace Next with the top latches handles in the horizontal position push the face against the fire place and swing the latches straight down causing them to enter the top face slots Removing The Arch Face To remove the face unlatch the top latches tilt the top of the face away from the fireplace and lift the face out of the bottom slots ...

Page 16: ...te into the slots on the left pillar 4 Place the Left hinge pin of the top grill door into the round hole in the pillar 5 Place the left hinge pin of the bottom grill door into the round hole in the bottom of the pillar 6 Place the right pillar over the studs on the right side of the mantel face while simultaneously placing right ends of the doors and breast plate into their slots on the right pil...

Page 17: ...top of the stand offs with two screws 2 Place the fireplace into the framed opening so the two ends of the drywall bracket rest against the framing This will position the face of the fireplace 1 2 inch back from the face of the framing 3 Nail or screw the drywall bracket fast to the framing 4 Install and finish drywall as desired Drywall shall not extend below the drywall bracket on the top and no...

Page 18: ...bolts loose 2 Place the face on the fireplace starting at the bottom 3 Slide the face into place and install the four bolts as shown at left 4 Slide the sealing angle against the fireplace and tighten the mounting bolts Note The face will have a one inch space under it for hearth material This must be considered when planning the installation Complete Face Mounted ...

Page 19: ...EST ALL JOINTS FOR LEAKS BEFORE OPERATING Gas Pressure Requirements Correct gas pressure and the use of a properly sized gas supply line are essential for the safe and efficient performance of this appliance Make sure that the plumber or gas supplier checks the gas sup ply line and gas pressure at installation NOTE Improper gas pressure can affect heater performance flame color or cause pilot outa...

Page 20: ...n 36 982 1282 Snorkel Termination 14 984 1284 Horizontal Square Termination 980 1280 Vertical Termination 991 1291 Vertical Termination High Wind 950 1250 Vinyl Siding Standoff 1222D Only available from Harman 8 x 5 to 6 5 8 x 4 Adaptor Part Numbers for SimpsonDura Vent Pipe and Fittings Use Only Approved Venting This appliance has been tested and is listed for installation with Simpson Duravent G...

Page 21: ...8 x 5 Pipe A combination of one 900 elbow and two 450 elbows is allowed Subtract three feet of total horizontal pipe length for each 450 elbow used Vent termination must remain within the shaded area regardless of configuration This appliance must not be connected to a chimney flue serving a separate solid fuel burning appliance Maximum horizontal rear vent run is 24 inches Vertical venting of the...

Page 22: ...one 900 elbow and two 450 elbows is allowed Subtract three feet of total horizontal pipe length for each 450 elbow used Vent termination must remain within the shaded area regardless of configuration Use Adaptor Part No 1222D to reduce to 6 5 8 x 4 vent pipe For theSerenity DirectVent Fireplace the vent air intake termination clearances above the high side of an angled roof are as follows Roof Pit...

Page 23: ...hen measured fromthe horizontalcenter line ofthe regulator 1 I The clearance to service regulator vent outlet mustbe aminimum of6feet 1 8m 1 J The clearance to a non mechanicalair supply inlet to the buildingorthe combustion air inletto any otherappliance must be aminimum of12 inches 30 cm 1 K The clearance to amechanicalairsupply inlet mustbe aminimum of6feet 1 8m 1 L The clearance above a paved ...

Page 24: ...A vent damper is provided on top vent models to allow fine tuning of the draft Too little draft will cause flames to be too long with black tips and too much draft will cause flames to be short and blue To adjust the damper burn theunit on high with both burners for 10minutes ormore Adjustthe vent damper to a position in the ranges listed below that produces the most desirable flame pattern Note 1...

Page 25: ...embly can then be removed Remove Rear Burner by sliding to the left 1 2 3 5 4 6 7 8 Top Vent LP Kit Part No 1 00 08770 Rear Vent LP Kit Part No 1 00 08771 LP Orifice Box Cover LP Conversion label LP Pilot Orifice LP Front Orifice 52 LP Rear Orifice 60 Rear Flue 59 Top Flue LP Valve Conversion Module LP Conversion Instructions These kits are only for use in the Serenity series fireplaces Note The d...

Page 26: ...Remove two screws and place Control Panel to the left 11 12 13 Read instructions packed with LP Change over Kit Place conversion sticker provided in Kit on bottom of valve This is to permanently mark the valve that it has been converted to LP This label is important in the event that the valve is ever removed and mixed in with other valves 14 Mark the proper box on the control panel with a permane...

Page 27: ...r log down over the two pins to locate the log Place the front log down over the pin shown above The front of the log should be parallel with the grate bar Place the side log as shown with the notch in the log behind the angled grate bar Find the two holes in the bottom of the top log Place the log down over the pins on top of the front and rear logs Log Placement 4 ...

Page 28: ...led and maintained a mil livolt control system should give many years of trouble free service It is important to use wire of a gauge proper for the length of the wire RECOMMENDED WIRE GAUGES Maximum Wire Length Gauge 100 14 60 16 40 18 25 20 15 22 Thermostat Remote Control The front button on the remote control can be used to turn the front burner on and off The rear button is used to turn the rea...

Page 29: ...to 3 x 10 Transition Remote Register Box With Blower Speed Control 3 x 10 Duct not part of kit Register Kit Includes remote register box with blower speed control two 8 foot sec tions of 6 flex pipe 6 round to 3 x 10 transition and automatic damper assembly Floor Kit Includes floor register and floor mounting bracket for blower box Floor Register Floor Mounting Bracket Wall Mounting Brackets Wall ...

Page 30: ...are installing the damper assembly 2 Cut the yellow insulation around the edge of the opening Discard the cutout 3 Remove bottom cover by removing the screw in the angle at the bottom of the hole After the screw is removed remove the white insulation and the angle Lift the bottom cover up through the hole Note The cover must be turned the proper direction 4 Locate the six tabs at the bottom of the...

Page 31: ...wall cavity as a duct Run wires to blower as shown in wiring diagram on page 36 Mount blower assembly in box as shown Test blower Note Blower will not run until fireplace is hot Mount blower cover as shown Install and finish drywall as desired Mount register after drywall and painting are finished Install wall mounting brackets to side of blower box with three screws Wall Mounting Brackets Blower ...

Page 32: ... Speed Control Access Door Floor Register Installation The difference between the wall register and floor register is the register itself and the mounting brackets The wall register mounts on the wall with two screws The floor register mounts in the floor and is held in place by gravity The floor register has a small door to access the blower speed control ...

Page 33: ...ing floor 1 Cut a 71 2 x 137 8 hole in the floor at the proper location The hole must be perpendicular to the floor joists 2 Place the mounting bracket in the hole as shown The tapered end of the bracket must be opposite to the side where the air will enter the blower box 3 Place the blower box with blower assembly removed down into the bracket angling it as shown Slide the blower box down into th...

Page 34: ...the opening Make sure the speed control door is over the speed control The register is designed to allow for a variation in floor thickness 9 Turn on electrical power and test Operation Note A temperature switch on the fireplace will not allow the register blower to start if the fireplace is not warm enough to blow hot air This same switch will turn the blower off if the fireplace is turned off an...

Page 35: ...nnerand outer pipes of the venting system should be made during the annual service appointment They must have no blockage and be in good repair The vent manufacturer s instructions may provide specific suggestions or details on vent inspection Any sec tions that are taken apart for the inspection must be reassembled and sealed as required Cleaning the Log Set and Firebox During the annual inspecti...

Page 36: ... unobstructed Use a small drill or wire to clean any obstructed holes Remove any rust or other buildup that may have accumulated Replace burners in reverse order Lubrication The Serenity Fireplace does not require lubri cation other than the blower One or two drops of lightoil may be put in thetwo oilholes on the blower motor This is not critical and should only be done every year or two Too much ...

Page 37: ...37 MAINTENANCE ...

Page 38: ...controls Wiring errors can cause improper and dangerous operation Verify proper operation after servicing Attention Au moment de l entretien des commandes etiquetez tous les fils avant le debranchement Des erreurs de cablage peuvent entraium fonctionnement inadequat et dangereux ...

Page 39: ...in Input Rating Btu hr 0 4500 ft 0 1375 m 23300 23800 22800 23400 Orifices DMS front rear 0 4500 ft 0 1375 m 31 51 52 59 32 51 52 60 Manifold Pressure in w c kPa 3 5 0 87 10 0 2 49 3 5 087 10 0 2 49 Min Manifold Pressure in w c kPa 1 7 0 42 6 3 1 6 1 7 0 42 6 3 1 55 Min Inlet Pressure in w c kPa 5 0 1 25 11 0 2 74 5 0 1 25 11 0 2 74 Max Output Btu hr 0 4500 ft 0 1375 m Blower Off 31500 32000 31000...

Page 40: ...ER FLUE COLLAR 1 3 40 08788 8 OUTER FLUE COLLAR 1 3 40 08795 SOLENOID 1 3 40 08906 THERMOCOUPLE 1 3 40 196326 19 5 8 X 32 5 8 GLASS 1 3 40 820628 NG VALVE 1 3 40 907202 VALVE CONVERSION LP 1 3 40 971157 014 ORIFICE FOR LP PILOT 1 3 44 00539 TADPOLE GASKET FOR GLASS 9 3 44 08405 AIR DROP GASKET 1 3 44 08714 EXPLOSION GASKET 2 3 44 08786 FLUE COLLAR GASKET 1 Replacement Parts ...

Page 41: ...BLE SHOOTING Only For Qualified Installers Manifold Pressure 10 inches Inlet Pressure 11 to 13 inches Manifold Pressure 3 5 inches Inlet Pressure 5 to 7 inches Natural Gas Propane Pilot Adjuster Pilot Adjuster ...

Page 42: ...econnect or replace Ignitor wire Yes No Bad OK OK Bad No Yes Turn on gas valve Is gas turned on Yes OK Purge gas line to stove No Replenish supply Bad OK Replace Pirzo Ignitor Check Piezi Ignitor to make sure the small wire on the mounting flange is grounded Clean paint or rust from around mounting hole Replace Check pilot orfice and pilot line for blockage Is there gas in tank LP or line NG Check...

Page 43: ...od Check Milivolt output of thermocouple Should be 10 or more MV Check inlet pressure Bad Adjust pilot adjustment to achieve proper flame Replace Thermocouple Bad Replace Valve Pilot does not stay lit Check size of pilot flames Bad Correct inlet pressure Good ...

Page 44: ...n position Is Pilot lit no Light pilot Yes Check Thermopile voltage at terminals marked TP on valve Should be approximately 200 mv with switch on and approximately 400 mv with switch off too low Replace Thermopile Check switch wires and wiring connectors Correct problem Replace valve OK OK bad ...

Page 45: ... batteries Bad Repair any loose connections Replace switch Bad Replace solinoid Check wire connections Bad Install new batteries Good Rear burner does not light Do you hear a click sound when you move the rear burner switch back and forth from off to on No Yes Check rear orifice for blockage ...

Page 46: ...REPAIR AND OR REPLACEMENT AT HARMAN BUILT FIREPLACES OPTION AND EXCLUDES ANY INCIDENTAL AND CONSEQUENTIAL DAMAGES CONNECTED THEREWITH WARRANTYEXCLUSIONS Failure due but not limited to fire lightning acts of God power failures and or surges rust corrosion and venting problems are not covered Damage and or repairs to cabinets and all exterior components including but not limited to remote controls f...

Reviews: