11
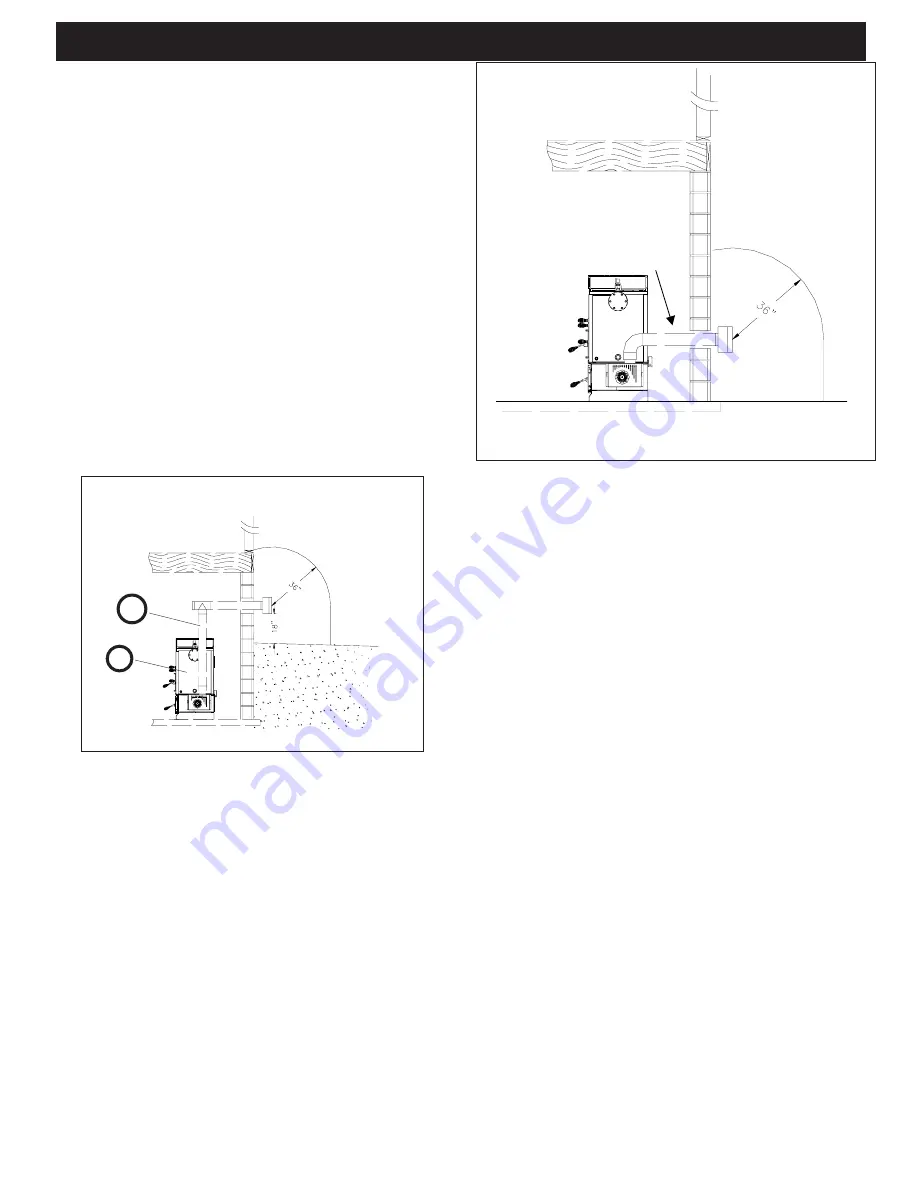
The minimum vent configuration is a 90
o
or Tee on a
starter collar and a 24” length horizontal through an exterior
wall. A cap or other bird screen on the end should direct
the flue gasses down and away from the structure. See Fig.
5.
The maximum horizontal length is 18 feet. The mini-
mum termination height above the exterior grade is 18”. The
maximum total length of any configuration is 30 feet*.
* ( see venting graph on page 9 for exceptions )
NOTE: Cleanout Tee’s should always be used on the
transitions to horizontal pipe to allow easy access for
cleaning.
The venting graph allows for (one) 90 deg. or Tee fit-
ting in any configuration.
If more 90’s, T’s, or 45’s are needed the total length
must be adjusted to allow for the added restriction.
Up to four (4) additional 90’s, Tee’s, or equivalent
45’s can be added as long as the overall length is adjusted
in accordance with the values listed below.
( See the venting graph on page 9.)
Each Vertical ---- 90 deg. or T subtract 2.5 feet
Each Vertical ---- 45 deg. subtract 1.5 feet
Each Horizontal - 90 deg. or T subtract 5.0 feet
Each Horizontal - 45 deg. subtract 2.5 feet
Any exterior venting (vent pipe exposed to out-
side ambiant temperatures) should be kept to a mini-
mum, due to potential condensation problems.
This is especially important in high humidity cold
weather climates, such as maritime areas, lake shores, and
low river valleys.
Venting
Venting
4” Type “L” or
“PL” Vent pipe
This is the minimum venting configuration.
Fig. 5
Venting
Use 4” pellet vent pipe to vent your PB105.
A combustion blower is used to extract the combustion
gases from the firebox. This creates a negative pressure in
the firebox and a positive pressure in the venting system as
shown in Fig. 4. The longer the vent pipe and more elbows
used in the system, the greater the flow resistance. Because
of these facts we recommend using as few elbows as pos-
sible and 30 feet or less of vent pipe. The maximum horizon-
tal run should not exceed 18 feet.
Be sure to use wall and ceiling pass through fit-
tings (which are approved for pellet vent pipe ) when
going through combustible materials. Be sure to use a
starting collar to attach the venting system to the stove. The
starting collar must be sealed to the stove flue collar
with high temp silicone caulking or aluminum tape, and
screwed into the stove flue collar at least three (3)
places.
-
Fig. 4
+
Vent Pipe
4” pellet vent pipe (also known as PL vent) is constructed
of two layers with air space between the layers. This air space
acts as an insulator and reduces the outside surface tempera-
ture to allow a minimum clearance to combustibles of 1 inch.
In Canada the minimum clearance to combustibles is 3 inches.
The sections of pipe lock together to form an air tight
seal in most cases; however, in some cases a perfect seal is
not achieved. For this reason and the fact that the PB105
operates with a positive vent pressure, we specify that all
joints within the structure should also be sealed with
clear silicone.
NOTE:Use only 4” diameter type “L” or “PL” venting
system. Be sure to inspect and clean exhaust venting
system frequently.
Summary of Contents for PB 105
Page 2: ......
Page 10: ...10 Venting Fig 3 ...
Page 15: ...15 Installing Duct Installation ...
Page 17: ...17 Installation ...
Page 18: ...18 Installation ...
Page 19: ...19 Installation ...
Page 33: ...33 Feeder Parts ...
Page 35: ...35 Wiring Diagram Wiring Diagram ...
Page 38: ...Testing Label 38 ...
Page 39: ...NOTES 39 ...


