Harman® • Allure50 Owner’s Manual_R24 • 2016 -___ • 03/21
15
3-90-888000c
Caring for your Glass-
The glass used in your stove is manufactured to exact
standards to withstand the high heat of the fire, but like all
glass, it must be treated with common sense and care. Never
abuse the glass by slamming the door shut or striking the
glass with a heavy object. If the glass is broken or damaged,
do not operate the stove until it has been replaced.
Glass - Replacement:
If the stove’s glass is cracked or broken, you must replace
it before operating your stove. Remove pieces carefully.
Replace glass only with Harman® replacement glass;
do
not use substitutes.
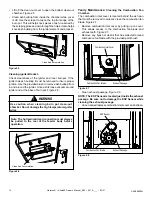
Carefully remove damaged glass, gasket material, and glass
clips (set aside). Figure 2.9.
Install the self adhesive 1/4” gasket material around the front
face of the glass. Set the glass panel and gasket gently onto
the door. Install the glass clips and 1/4-20 X 3/8” screws.
Note:
1/4-20 X 3/8” screws only need to be snug fit. Do not
overtighten.
Glass - Cleaning:
Sometimes it will be necessary to clean accumulated ash
from the glass surface; allowing this ash to remain on the
glass for long periods can result in “etching” due to the acidity
of the ash. Never clean the glass while it is hot, and
do not
use abrasive substances. Wash the surface with cool water
and rinse thoroughly. You may wish to use a non-abrasive
cleaner specifically designed for use on stove glass. In any
case, dry thoroughly before relighting your stove.
Inspect all Gaskets-
While the unit is cool, inspect all door gaskets to insure proper
seal. The gasket should be continuous without frays or tears;
having plyable gasket means having a correct seal for proper
operation. Figure 2.9.
Glass Gasket
Replace glass only with high
temperature ceramic glass.
Inspect door gasket during
cleaning and inspection
(2) Glass Clips
(4) 1/4-20 X 3/8”
Button Head Screw
Figure 2.9
Distribution Blower-
Checking the distribution blowers yearly is a good habit to
get into. Dust, animal hair or anything else that can make
its way into that area can drastically cut down on the air
movement throughout the unit ultimately causing less of a
heating efficiency.
Once the unit is shut down and cooled, unplug the unit from
its power supply. Remove the left and right rear panels. Once
removed, you will have access to the distribution blowers.
Figure 2.10.
Once access is gained to the rear of the unit, thoroughly
vacuum around the Distribution Blowers. Figure 2.10.
Remove Left & Right Rear Access Panels
Figure 2.10
Distribution Blowers
Cleaning Venting System-
Its is recommend that a certified chimney sweep perform
service and inspection to your chimney system to insure
your unit is vented safely and in accordance to local code.


