background image

20   

Drum Set Session I 

Description

Merci d’avoir choisi un produit AKG. 

Lisez attentivement et intégralement le 

mode d’emploi

 avant d’utiliser l’appareil. Conservez le mode d’emploi en lieu 

sûr pour pouvoir vous y reporter à tout moment. Nous vous souhaitons beaucoup 

d’amusement

x

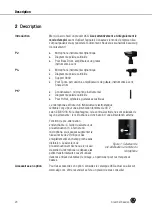
Microphone instrumental dynamique

x

Diagramme polaire cardioïde

x

Pour Bass Drum, amplificateur de graves,

instruments à vent

x

Microphone instrumental dynamique

x

Diagramme polaire cardioïde

x

Support H440

x

Pour Toms, percussions, amplificateurs de guitare, instruments à vent,

Snare Drum

x

Condensateur - microphone instrumental

x

Diagramme polaire cardioïde

x

Pour Hi-Hat, cymbales, guitares acoustiques

Le microphone est doté d’un transducteur électrostatique 

véritable conçu pour une alimentation fantôme de 48

selon CEI

61938. Ni le diaphragme, ni la contre-électrode ne sont polarisés de 

façon permanente

; le microphone a donc besoin d’une alimentation externe. 

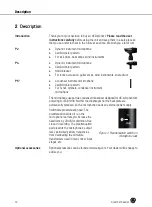
Fonction de pré-atténuation 
enclenchable

 :

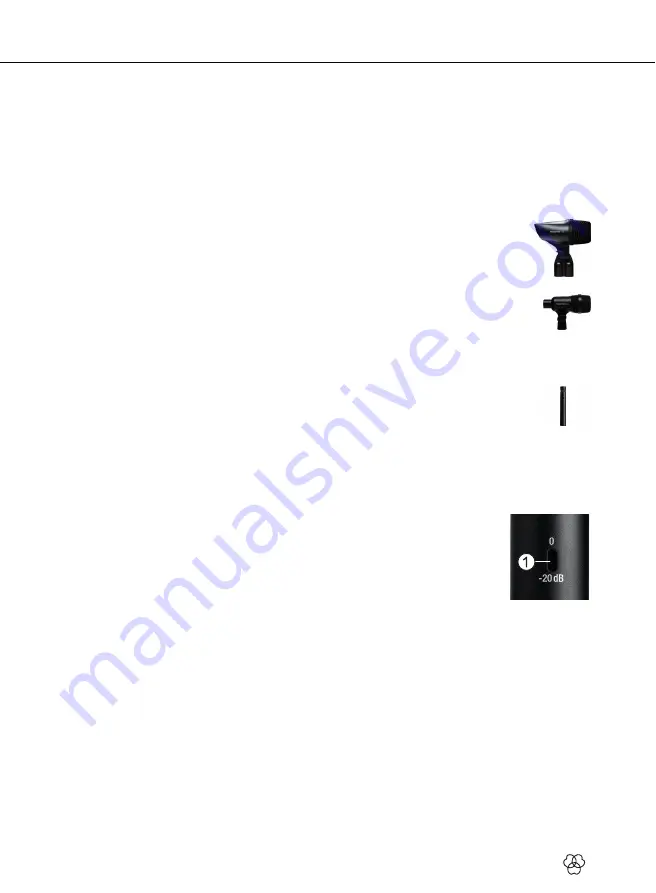
 A l’aide du sélecteur de 

pré-atténuation (1) à l’arrière du 
microphone, vous pouvez augmenter le 

niveau limite de 20

dB pour des 

enregistrements en champ proche sans 
distorsion. Le sélecteur de 

pré-atténuation empêche que le niveau 
de sortie du microphone ne dépasse les 
petits transformateurs souvent utilisés 

dans les entrées des tables de mixage, en particulier pour les fréquences 
basses. 

Pour les accessoires en option, consultez le catalogue AKG actuel ou allez sur 

www.akg.com. Votre revendeur se fera un plaisir de vous conseiller.

2

Description 

Introduction 

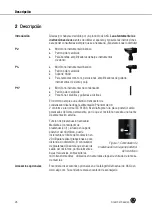
P2 

P4 

P17 

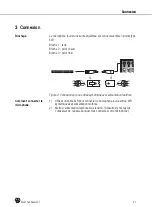
Figure 1: Sélecteur de 

pré-atténuation à l’arrière du 

microphone 

Accessoires en option 

Summary of Contents for AKG Drum Set Session I

Page 1: ...or Inbetriebnahme des Ger tes lesen USER INSTRUCTIONS 10 Please read the manual before using the equipment MODE D EMPLOI 18 Veuillez lire cette notice avant d utiliser le syst me MODO DE EMPLEO 26 Sir...

Page 2: ...schreibung 4 Einleitung 4 P2 4 P4 4 P17 4 Optionales Zubeh r 4 3 Anschluss an Audioger te 5 Anschlussbelegung 5 Anschlie en des Mikrofons 5 4 Anwendung 6 5 Reinigung 7 Mikrofon 7 Innen Windschutz P2 P...

Page 3: ...mmungen entspricht und mit einer Sicherheitserdung versehen ist x Am Ende der Lebensdauer des Produkts trennen Sie Geh use Elektronik und Kabel voneinander und entsorgen Sie alle Komponenten gem den d...

Page 4: ...ren Das Mikrofon verwendet einen Kondensatorwandler der f r 48 Volt Phantomspeisung nach IEC 61938 geeignet ist Weder die Membran noch die r ckseitige Elektrode sind dauerhaft polarisiert Daher ben ti...

Page 5: ...2 Anschluss an einen symmetrischen Eingang mit Phantomspeisung 1 Verwenden Sie ein XLR Kabel um das Mikrofon zu einem symmetrischen XLR Eingang mit Phantomspeisung zu verbinden 2 Schalten Sie die Pha...

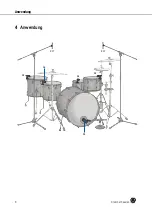
Page 6: ...6 Drum Set Session I Anwendung 4 Anwendung P P P P P P 4 4 2 4 4 17 P17...

Page 7: ...des Mikrofons gegen den Uhrzeigersinn ab 2 Nehmen Sie den Windschutz aus der Gitterkappe heraus und reinigen Sie den Windschutz mit Seifenwasser 3 Lassen Sie den Windschutz ber Nacht trocknen 4 Legen...

Page 8: ...en Mikrofon nicht an Mischpult oder Verst rker angeschlossen Mikrofon an Mischpult oder Verst rker anschlie en Kabelstecker nicht richtig angesteckt Kabelstecker nochmals anstecken Kabel defekt Kabel...

Page 9: ...ndlichkeit 2 5 mV Pa Grenzschalldruck f r 0 5 Klirrfaktor 152 dB SPL Typ 1 2 Membran Kondensatormikrofon Druckgradientenempf nger Richtcharakteristik Niere Frequenzgang 20 Hz bis 20 kHz Empfohlene Las...

Page 10: ...ription 12 Introduction 12 P2 12 P4 12 P17 12 Optional accessories 12 3 Connecting to Audio Equipment 13 Pinout 13 Connecting the Microphone 13 4 Operation 14 5 Cleaning 15 Microphone 15 Internal Wind...

Page 11: ...force in your country and is fitted with a ground lead x At the end of the lifetime of the product disconnect the housing electronics and cable from each other and discard all components according to...

Page 12: ...ondenser instrument microphone The microphone uses a true condenser transducer designed for 48 volt phantom powering to IEC 61938 Neither the diaphragm nor the backplate are permanently polarized so t...

Page 13: ...in 2 hot Pin 3 cold Figure 2 Connecting to a balanced input with phantom power 1 Use an XLR cable to connect the microphone to a balanced XLR input with phantom power 2 Switch the phantom power on Ref...

Page 14: ...14 Drum Set Session I Operation 4 Operation P P P P P P 4 4 2 4 4 17 P17...

Page 15: ...y 1 Unscrew the front grill from the microphone CCW 2 Remove the windscreen from the front grill and wash the windscreen in soap suds 3 Allow the windscreen to dry overnight 4 Replace the windscreen i...

Page 16: ...nected to mixer or amplifier Connect microphone to mixer or amplifier Cable connectors are seated loosely Check cable connectors for secure seat Cable is defective Check cable and replace if damaged D...

Page 17: ...ohms Sensitivity 2 5 mV Pa Max SPL for 0 5 THD 152 dB SPL Type 1 2 diaphragm true condenser pressure gradient microphone Polar pattern cardioid Frequency response 20 Hz to 20 kHz Recommended load imp...

Page 18: ...Introduction 20 P2 20 P4 20 P17 20 Accessoires en option 20 3 Connexion 21 Brochage 21 Comment connecter le microphone 21 4 Application 22 5 Nettoyage 23 Microphone 23 Bonnette anti vent interne P2 P...

Page 19: ...urit en vigueur et poss de une prise de terre de s curit x En fin de dur e de vie du produit d montez et s parez le bo tier le syst me lectronique et les c bles et liminez chacun de ces l ments confor...

Page 20: ...ur lectrostatique v ritable con u pour une alimentation fant me de 48 V selon CEI 61938 Ni le diaphragme ni la contre lectrode ne sont polaris s de fa on permanente le microphone a donc besoin d une a...

Page 21: ...id Figure 2 Connexion sur une entr e sym trique avec alimentation fant me 1 Utilisez un c ble XLR pour connecter le microphone une entr e XLR sym trique avec alimentation fant me 2 Mettez l alimentati...

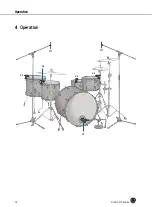
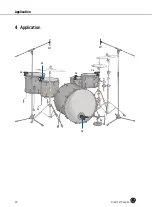
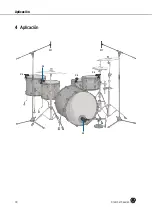
Page 22: ...22 Drum Set Session I Application 4 Application P P P P P P 4 4 2 4 4 17 P17...

Page 23: ...en le tournant dans le sens antihoraire 2 Retirez la bonnette anti vent du capuchon grillag puis nettoyez la l eau savonneuse 3 Laissez s cher la bonnette anti vent durant la nuit 4 Placez la bonnett...

Page 24: ...d connect de la table de mixage ou de l amplificateur Connecter le microphone la table de mixage ou l amplificateur Fiche du c ble mal connect e Reconnecter la fiche du c ble C ble d fectueux Contr le...

Page 25: ...00 ohms Sensibilit 2 5 mV Pa Niveau maxi de pression sonore d t h 0 5 152 dB SPL Type 1 2 diaphragme microphone lectrostatique polarisation externe Diagramme polaire cardio de R ponse en fr quence de...

Page 26: ...ipci n 28 Introducci n 28 P2 28 P4 28 P17 28 Accesorios opcionales 28 3 Conexi n 29 Conexiones 29 Conexi n del micr fono 29 4 Aplicaci n 30 5 Limpieza 31 Micr fono 31 Pantalla antiviento interna P2 P4...

Page 27: ...ones de seguridad vigentes y tenga una conexi n a tierra x Al final de la vida til del producto separe la carcasa componentes electr nicos y cables y elimine cada uno de los componentes seg n las norm...

Page 28: ...se ado para alimentaci n Phantom de 48 V conforme a la norma IEC 61938 Ni el diafragma ni la placa posterior est n polarizados de forma permanente por lo que el micr fono necesita una fuente de alimen...

Page 29: ...Se al Figura 2 Conexi n a una entrada balanceada con alimentaci n Phantom 1 Use un cable XLR para conectar el micr fono a una entrada XLR balanceada con alimentaci n Phantom 2 Active la alimentaci n...

Page 30: ...30 Drum Set Session I Aplicaci n 4 Aplicaci n P P P P P P 4 4 2 4 4 17 P17...

Page 31: ...trario a las agujas del reloj 2 Retire la pantalla antiviento interna de la rejilla y limpie la pantalla antiviento con agua jabonosa 3 Deje secar la pantalla antiviento durante toda la noche 4 Coloqu...

Page 32: ...mezclas o al amplificador Conecte el micr fono a la mesa de mezclas o al amplificador El conector del cable no est conectado correctamente Vuelva a conectar el conector del cable Cable defectuoso Rev...

Page 33: ...mV Pa Nivel m ximo de presi n ac stica D A T 0 5 152 dB SPL Tipo aut ntico micr fono de condensador de gradiente de presi n con diafragma de Patr n polar cardioide Respuesta en frecuencia de 20 Hz a...

Page 34: ...less Microphones Wireless Headphones Headsets Electroacoustical Components Microphones Casques HiFi Microphones sans fil Casques sans fil Micros casques Composants acoustiques Microfoni Cuffie HiFi Mi...

Reviews: