background image

SOUNDBAR PLACEMENT

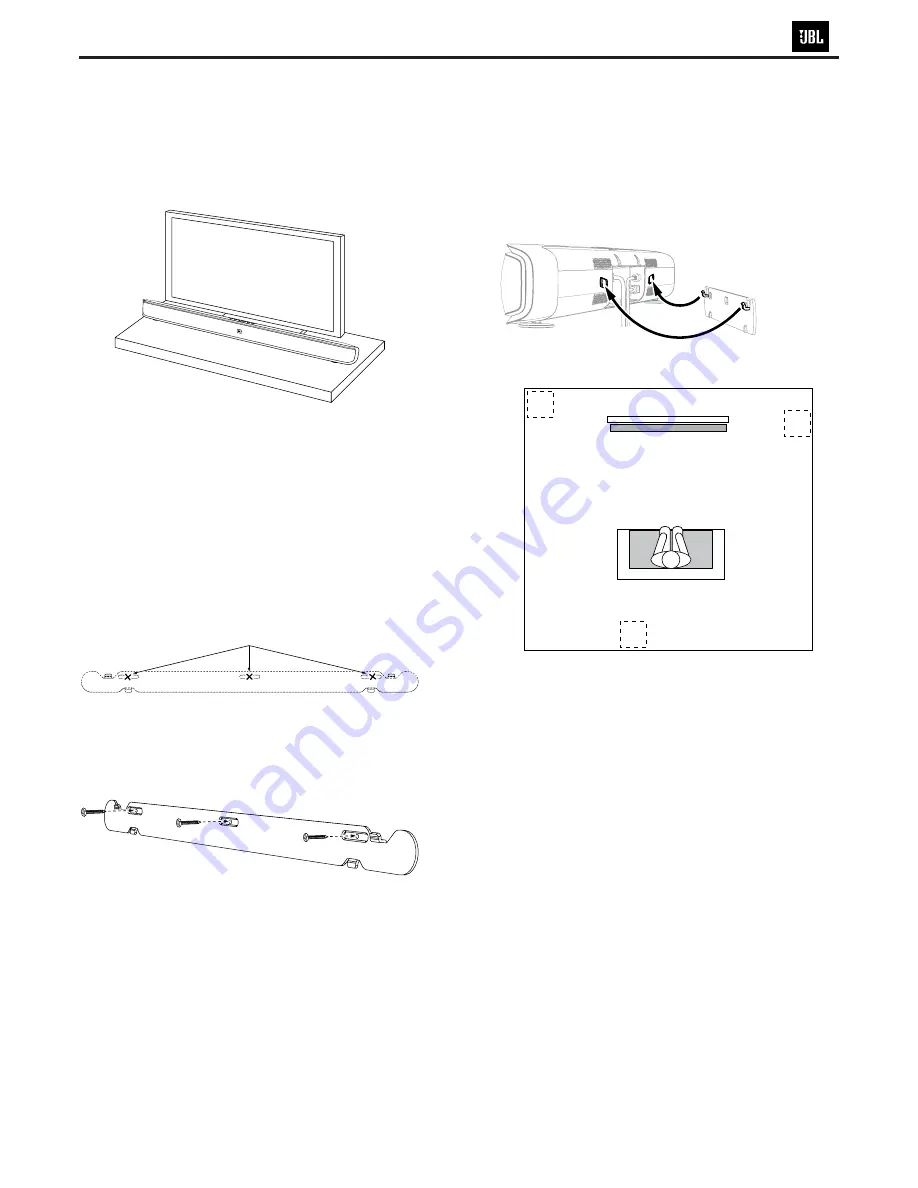
PLACING THE SOUNDBAR ON A TABLE 

If your TV is placed on a table, you can place the soundbar on the table 
directly in front of the TV stand, centered with the TV screen. As long as 
the surface of the table is flat, the soundbar will rest on its metal feet .

q2DSSGDRNTMCA@QR$0RVHSBGHMSGDf3@AKDtONRHSHNM2DD

Soundbar 

Rear-Panel Controls and Connections,

 on page 2.

WALL-MOUNTING THE SOUNDBAR

If your TV is attached to a wall, you can use the included wall-mount 
bracket to mount the soundbar on the wall directly below the TV 
screen.

1. Determine the location for the soundbar on the wall. Make sure that 

the top of the soundbar will not block your view of the TV screen 
when it is mounted on the wall.

2. Hold the bracket against the wall as a template and mark the 

locations of the soundbar wall-mount bracket holes on the wall. The 
three holes should be evenly spaced 7-1/16" (18cm) apart, and the 
bracket slots are designed to accept 4mm screws. Make sure that 
the holes are at the same height. See the illustration below.

Mark Three Bracket Hole Locations

7-1/16" (18cm) Apart

3. Making sure that the bracket’s flat side is against the wall, attach 

the wall-mount bracket to the wall at the locations you marked, 
using hardware that is appropriate for the wall’s construction and 
materials. Note that the soundbar weighs 7.3 lb (3.3kg). Be sure to 
use hardware that can support this weight.

4. After reading the 

Connections

 section on page 5, connect all cables

to the soundbar.

IMPORTANT: Do NOT plug the soundbar’s power cord into an AC 
outlet at this time.

q2DSSGDRNTMCA@QR$0RVHSBGHMSGDf6@KKtONRHSHNM@MCRDSSGD

soundbar’s Power switch in the “On” position. See 

Soundbar Rear-

Panel Controls and Connections,

 on page 2.

5. Attach the soundbar to the bracket by sliding the bracket’s upper 

tabs into the slots on the back of the soundbar. The soundbar’s slots 
allow you to adjust the soundbar’s angle on the wall to ensure that it 
is level.

Insert Tabs on Bracket
into Grooves in Soundbar

SUBWOOFER PLACEMENT

1

2

3

The performance of a subwoofer is directly related to its placement in 
the listening room and its physical position relative to the other speakers 
in the system. While it is true that in general our ears do not hear 
directional sounds at the low frequencies where subwoofers operate, 

VGDMHMRS@KKHMF@RTAVNNEDQVHSGHMSGDKHLHSDCBNMjMDRNE@QNNLSGD
QDkDBSHNMRRS@MCHMFV@UDR@MC@ARNQOSHNMRFDMDQ@SDCVHSGHMSGDQNNL
VHKKRSQNMFKXHMkTDMBDSGDODQENQL@MBDNE@MXRTAVNNEDQRXRSDL R@
QDRTKSSGDRODBHjBKNB@SHNMNESGDRTAVNNEDQHMSGDQNNLCNDRADBNLD

important to the amount and quality of bass that is produced.

For example, placing the subwoofer next to a wall generally will increase 
the amount of bass in the room; placing it in a corner (1) generally will 
maximize amount of bass in the room. However, corner placement 
can also increase the destructive effect of standing waves on bass 
performance. This effect can vary depending on the listening position – 
some listening positions may yield very good results while others may 
have far too much (or too little) bass at certain frequencies.

In many rooms, placing the subwoofer along the same plane as the 
soundbar (2) can produce the best integration between the sound 
of the subwoofer and that of the soundbar. In some rooms, the best 
performance could even result from placing the subwoofer behind the 
listening position (3).

We strongly recommend that you experiment with placement before 
choosing a final location for your subwoofer. One way you can 
determine the best location for the subwoofer is by temporarily placing 
it in the listening position and playing music with strong bass content. 
Move around to various locations in the room while the system is 
playing (putting your ears where the subwoofer would be placed), and 
listen until you find the location where the bass performance is best. 
Place the subwoofer in that location.

CINEMA SB400

Summary of Contents for JBL CINEMA SB400

Page 1: ...TESTING 4 CONTROLS AND CONNECTIONS 5 SETUP AND OPERATION 9 SPECIFICATIONS 12 CENTER EXPLODED VIEW 13 SUBWOOFER EXPLODED VIEW 14 PARTS AND ACCESORIES 15 PCB DRAWINGS 16 SEMICONDUCTOR PINOUTS 22 BLOCK D...

Page 2: ...ent and Warning Canada Only This Class B digital apparatus complies with Canadian ICES 003 Cet appareil num rique de la classe B est conforme la norme NMB 003 du Canada For Canadian Model This Class B...

Page 3: ...prior to applying power to the unit under test 2 After removing an electrical assembly equipped with ES devices place the assembly on a conductive surface such as aluminum foil to prevent electrostat...

Page 4: ...metal overlays control shaft etc Plug the AC line cord of the appliance directly into a 120V AC 60Hz outlet and turn the AC power switch on Any current measured must not exceed o 5mA ANY MEASUREMENTS...

Page 5: ...ther connections If you will not be using the soundbar for an extended period for instance if you re going on vacation set the Power switch to the 0 off position SOUNDBAR TOP PANEL CONTROLS AND REMOTE...

Page 6: ...ith the speakers in the soundbar If the subwoofer were to play out of phase with the soundbar speakers some of the sound waves produced by the subwoofer or soundbar could be canceled reducing bass per...

Page 7: ...bar s slots allow you to adjust the soundbar s angle on the wall to ensure that it is level Insert Tabs on Bracket into Grooves in Soundbar SUBWOOFER PLACEMENT 1 2 3 The performance of a subwoofer is...

Page 8: ...HDMI In 1 2 3 If any of your source devices have HDMI connectors connect them to the soundbar s HDMI In 1 2 3 connectors for the best possible video and audio performance quality Since the HDMI cable...

Page 9: ...d period of time or if you will not be using the system for an extended period set the subwoofer s Power switch to the Off position PAIRING THE UNITS FOR WIRELESS OPERATION After turning the soundbar...

Page 10: ...h etc The remote has an individual selector button for each source except Bluetooth The active source s Source Indicator LED will illuminate HDMI TV HDMI1 HDMI2 HDMI3 OPTICAL AUX IN BLUETOOTH Source B...

Page 11: ...control setting SUBWOOFER PHASE SWITCH PHASE This switch determines whether the subwoofer s piston like action moves in and out in phase with the speakers in the soundbar If the subwoofer were to play...

Page 12: ...tton 3 When you re finished press and hold the soundbar s Surround button until the button stops flashing amber The soundbar will now respond to your TV remote s volume and mute commands SPECIFICATION...

Page 13: ...CINEMA SB400...

Page 14: ...CINEMA SB400...

Page 15: ...0WEAVE10100 2 PCB for the tweeter PCB for the tweeter 10 ASA4SB4003010 1 SB400 HDMI PCBA SB400 HDMI PCBA 11 MB0149001010 1 panel black ABS V0 flame plating 12 ZJ0040012010 2 foot for Sound bar gray HI...

Page 16: ...CINEMA SB400...

Page 17: ...CINEMA SB400...

Page 18: ...CINEMA SB400...

Page 19: ...CINEMA SB400...

Page 20: ...CINEMA SB400...

Page 21: ...CINEMA SB400...

Page 22: ...WKDW LV FDSDEOH RI GHOLYHULQJ RI RXWSXW FXUUHQW ZKLOH DFKLHYLQJ SHDN HIILFLHQF RI 8QGHU OLJKW ORDG FRQGLWLRQV WKH 7 6 RSHUDWHV LQ D SURSULHWDU SXOVH VNLSSLQJ PRGH WKDW FRQVXPHV MXVW X RI VXSSO FXUUHQ...

Page 23: ...rol of the Reset pin is desired a series diode must be used to guarantee the input voltage does not exceed the 1 8V max Figure 1 XPD Pinout Customers can purchase an XPD Programming Module and ribbon...

Page 24: ...OS Input Chip Select For Synchronous Serial Interface Active Low 28 SPI_MISO CMOS Output Serial Peripheral Interface Data Output 29 SPI_CLK CMOS Input Serial Peripheral Interface Clock 30 SPI_MOSI CMO...

Page 25: ...Product Specification Spec BM153 V4 3 Page 4 of 7 www sunitec com tw Recommended Layout patterns...

Page 26: ...VDD_2 VSS_2 NC PA 13 PA 12 PA 11 PA 10 PA 9 PA 8 PC9 PC8 PC7 PC6 PD15 PD14 PD13 PD12 PD11 PD10 PD9 PD8 PB15 PB14 PB13 PB12 PA3 VSS_4 VDD_4 PA4 PA5 PA6 PA7 PC4 PC5 PB0 PB1 PB2 PE7 PE8 PE9 PE10 PE11 PE1...

Page 27: ...19 20 21 22 23 24 29 30 31 32 25 26 27 28 1 2 3 4 5 6 7 8 9 10 11 12 13 14 15 16 VBAT PC13 TAMPER RTC PC14 OSC32_IN PC15 OSC32_OUT PD0 OSC_IN PD1 OSC_OUT NRST PC0 PC1 PC2 PC3 VSSA VDDA PA0 WKUP PA1 P...

Page 28: ...High normal operation FAULTZ Low fault condition 4 RINP I Positive audio input for right channel Biased at 3 V 5 RINN I Negative audio input for right channel Biased at 3 V 6 PLIMIT I Power limit lev...

Page 29: ...nnel output 22 GND G Ground 23 OUTPL PO Positive left channel output 24 BSPL BST Boot strap for positive left channel output connect to 220 nF X7R ceramic cap to OUTNL 25 GND G Ground 26 BSNR BST Boot...

Page 30: ...3 D AC Volume Control L_W CH TPA3116D2 Power amp L_T CH L_Woofer Class D 8 Ohm 4 Ohm 15W 20W R_W CH TPA3116D2 Power amp R_T CH R_Woofer Class D 8 Ohm 4 Ohm 15W 20W L_Tweeter R_Tweeter M C U LED Temp 5...

Page 31: ...CINEMA SB400...

Page 32: ...2 FB607 220 C633 10U 10V C630 104 C634 104 TDVDD12 C635 4U7 FB606 220 TXC TXC TX0 TX0 TX1 TX1 TX2 TX2 I1 1 I2 2 GND 3 I4 4 I5 5 O5 6 O4 7 GND 8 O2 9 O1 10 U604 LXES2TBBB4 I1 1 I2 2 GND 3 I4 4 I5 5 O5...

Page 33: ...C534 105 50V R510 NC C550 330 C539 102 C547 102 C551 102 R511 0 C549 684 LS501 L W_SPEAKER 4 OHM 1 2 3 4 CP502 30W C530 105 L508 22UH 4A R517 22 C546 330 C545 684 L507 22UH 4A R516 22 C552 104 C542 3...

Reviews: