background image

3 EN

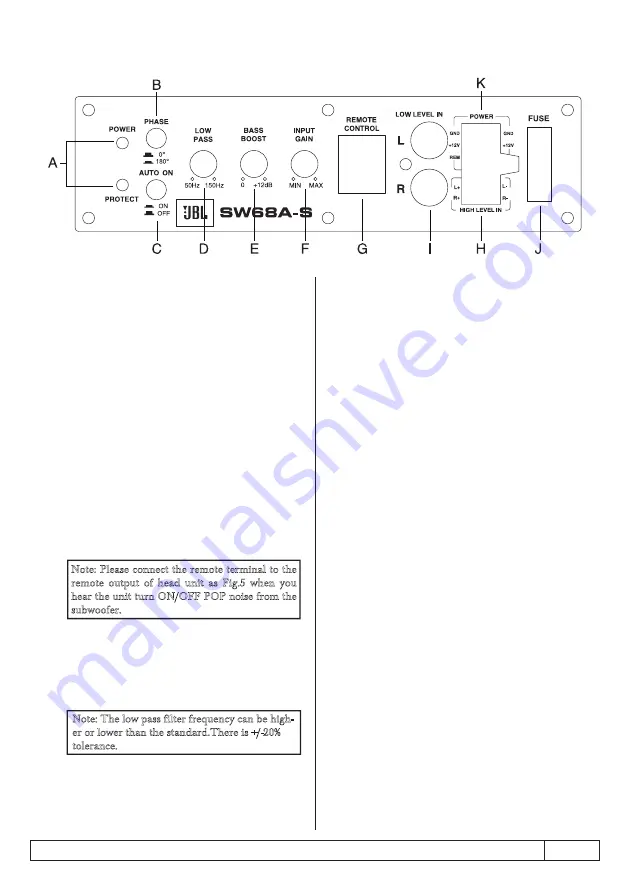
PANEL CONTROLS AND FEATURES

C. AUTO POWER ON

H. HIGH LEVEL INPUT

I. LOW LEVEL RCA INPUTS

J. FUSE

K. POWER INPUT TERMINAL

This bi-color LED glows green when power is on  

and no problems are present. If one of the protect-

ion circuits comes on, it will change to red.

Turn the head unit on (and the subwoofer will turn 

on via the remote connection). Turn the head unit 

volume to about 2/3 full level.

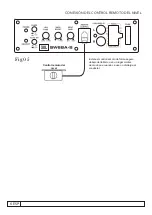
Attach the included remote level control to control 

the volume level of the subwooer independently.

If your head unit does not have RCA outputs you

Low level inputs are the recommended way to intro-

duce the audio signal to the subwoofer if RCA out-

puts are present on your head unit or other signal 

source (such as a sound processor).

Do not use a fuse with a different value and NEVER 

replace the fuse with a wire or coin.

Slowly turn up the subwoofer input gain control

until you hear a small amount of distortion. Then

reduce the level until the distortion is completely

gone. Level the control at this setting.

The AUTO POWER ON(ON/OFF) is for high le-

vel (speaker-level) connections. When the switch is

in  the  “ON”  position,  the  subwoofer  will  AUTO 

POWER  ON  when  there  is  signal  input.  If  the 

amplifier detects no signal input, the amplifier will 

auto power off. If you prefer to use the remote turn

on/off connection, leave switch in the “OFF” position.

This control permits you to define the frequency 

range you want the subwoofer amplifier to receive. 

The subwoofer will reproduce all sound BELOW 

the frequency you set.

Use this switch to help compensate for time align-

ment problems in the system. Such problems usu-

ally result from having the subwoofer at a different 

distance from the listener than the other speakers 

in the system.

Note: Please connect the remote terminal to the 

remote  output  of  head  unit  as  Fig.5  when  you 

hear the unit turn ON/OFF POP noise from the 

subwoofer.

Note: The low pass filter frequency can be high-

er or lower than the standard.There is +/-20% 

tolerance.

A. POWER STATUS LED

G. REMOTE LEVEL CONTROL PORTAL

B. PHASE SHIFT

D. LOW PASS FILTER

E. BASS BOOST

The BASS BOOST feature will increase the sound

level in the bass frequencies.

F. INPUT GAIN CONTROL

After you have installed your system, turn this con-
trol to minimum.  

can use the speaker outputs for the audio source for
the subwoofer. Use the supplied cable and wire har-
ness and connect the outputs properly as shown in
the connection diagram in this manual.

Summary of Contents for JBL SW68A-S

Page 1: ...L S O D A C I F I L P M A 8 X 6 R E F O O W B U S R E F O O W B U S M I L S D E I F I L P M A 8 X 6 SUBWOOFER DELGADO 6X8 AMPLIFICADO MANUAL DO PROPRIET RIO MANUAL DEL PROPIETARIO L A U N A M S R E N...

Page 2: ...da baixo n vel 300mV Filtro low pass 50Hz 150Hz Bass Boost 12dB Filtro subs nico 20Hz Pot ncia do fus vel 15A Subwoofer 6X8 polegadas 4ohm Dimens es L x P x A mm 290 x 210 x 72 2 PT Estes produtos pod...

Page 3: ...ia de 20 E BASS BOOST O recurso BASS BOOST aumentar o n vel de som nas frequ ncias baixas Ligue a unidade principal e o subwoofer ir ligar atrav s da conex o remota Ajuste o volume da unidade principa...

Page 4: ...eu receptor CONEX ES DE ENTRADA DE ALTO N VEL A s entrada s de alto n vel s devem ser utilizadas quando o receptor n o possui sa das RCA Se n o existirem sa das RCA conecte as sa das do alto falante d...

Page 5: ...ou mais grossa Conecte um suporte para fus vel vazio a 16 40 cm da bateria do carro e utilize um cabo de bitola 8 ou mais no painel traseiro do subwoofer Fig 03 Fig 04 NOTA Nesta conex o o interrupto...

Page 6: ...ONTROLE DO N VEL REMOTO Fig 05 Controle de N vel Remoto Instale o controle remoto de maneira segura sob o painel de instrumentos ou em um local semelhante de modo que ao utiliz lo este n o gere distra...

Page 7: ...de n vel Ru do alto no som Desconecte todas as entradas RCA da alimenta o do painel de controle do dor e retire suas entradas Se o ru do desaparecer neste momento continue com o procedimento at que o...

Page 8: ...0 4 90dB 20Hz 150Hz 1 0V 300mV 50Hz 150Hz 12dB SUB 20Hz SPECIFICATIONS MODEL SW68A S Power output THD Signal to Noise Ratio Frequency Response Input Sensitivity high level Input Sensitivity low level...

Page 9: ...ion the subwoofer will AUTO POWER ON when there is signal input If the amplifier detects no signal input the amplifier will auto power off If you prefer to use the remote turn on off connection leave...

Page 10: ...r to the high level input connector of the amplifier Be sure to observe polarity to avoid audio phase problems NOTE Do not connect BOTH the high level and low level inputs from your receiver to your a...

Page 11: ...thin 16 40 cm of the car battery and run 8 gauge or heavier cable from this fuse to the amplifier location Then connect the fuse holder to the BATT 12V connec tion on the subwoofer rear panel Fig 03 F...

Page 12: ...REMOTE LEVEL CONTROL CONNECTION 6 EN Fig 05 Install the remote control securely under the dash or in a similar location where using it will not distract the driver Remote Level Control...

Page 13: ...nit is properly grounded Check that the Remote Input Turn On has at least 5VDC Check that the RCA audio cables are plugged into the proper inputs Reset the Level Control Check the Crossover Control se...

Page 14: ...alida THD 0 4 Relaci n se al a ruido 90dB Respuesta de frecuencia 20Hz 150Hz Sensibilidad de entrada nivel alto 1 0V Sensibilidad de entrada nivel bajo 300mV Filtro de paso bajo 50Hz 150Hz Acentuaci n...

Page 15: ...raves aumentar el nivel de sonido en la frecuencia de oajos Encienda la unidad central y el subwoofer se encender a trav s de la conexi n remota Ponga el volumen de la unidad central a aproximadamente...

Page 16: ...ENTRADA mismo tiempo CABLEADO DE ENTRADA DE NIVEL ALTO La s entrada s de nivel alto debe n ser usada s solamente cuando su receptor no tiene salidas RCA Si no hay salidas RCA conecte las salidas de lo...

Page 17: ...o a una distancia de 16 40 cm desde la bater a del coche y extienda un cable conecte el portafusibles a la conexi n BATT 12V en el panel trasero del subwoofer Fig 03 Fig 04 NOTA en esta conexi n el i...

Page 18: ...CONEXI N DEL CONTROL REMOTO DEL NIVEL Fig 05 Instale el control remoto de forma segura debajo del tablero o en un lugar similar de modo que cuando se use no distraiga al conductor Control remoto del...

Page 19: ...Bajo rendimiento Silbido alto en el sonido Desconecte todas las entradas RCA del panel de control de potencia del del componente y desconecte sus entradas Si el silbido desaparece en este momento con...

Page 20: ...airro Distrito Industrial Manaus AM CNPJ 88 315 379 0001 70 www harman com brasil CEP 69075 060 Ind stria brasileira Made in Brazil Hecho en Brasil Impresso na China Printed in China HARMAN DA AMAZ NI...

Reviews: