background image

13

DO NOT BURN WET COAL

Do not burn any fuel other than coal. Never use highly 

volatile  substances  in  your  stove,  such  as  gasoline, 

which could cause an explosion.

When solid fuels are burned completely, they produce 

water  and  carbon  dioxide.  However,  in  long  slow 

burns, a substantial amount of carbon monoxide may 

be produced.  If allowed to build up, carbon monoxide 

(which is odorless) can prove fatally poisonous. Proper 

ventilation and draft will prevent this from happening. 

If you smell smoke, thoroughly ventilate your dwelling. 

Contact your dealer to arrange for a draft test.

Other  causes  of  poor  ventilation  or  draft  are  icing, 

exhaust  fans,  a  blocked  outside  air  inlet,  and  room 

air starvation.  If your stove is sluggish and you get 

occasional odor, check these possibilities and increase 

the air flow in your home.

Installing to a Prefabricated Chimney

When  venting  your  stove  using  a  prefabricated 

chimney,  be  sure  to  contact  local  building  code 

authorities, and to follow the manufacturer’s instructions 

exactly

. Use only the manufacturer’s parts; do not use 

makeshift  installation  techniques.   All  prefabricated 

chimneys must be tested to either the U.S. or Canadian 

high-temperature standards, UL 103 or ULC S629.

Do not connect to any air distribution 

duct or system

Existing masonry Chimneys

If you plan on using a pre-existing masonry chimney, 

have it thoroughly inspected and cleaned. Any faults 

which make the chimney unsafe and unusable must 

be repaired prior to use. These can include improper 

height,  structural  defects,  blockages,  inadequate 

clearance  to  combustibles,  unsealed  openings  into 

other rooms of the house, signs of creosote or smoke 

leakage, a loose or absent clean-out door, or absence 

of a liner.

venting to a masonry Chimney

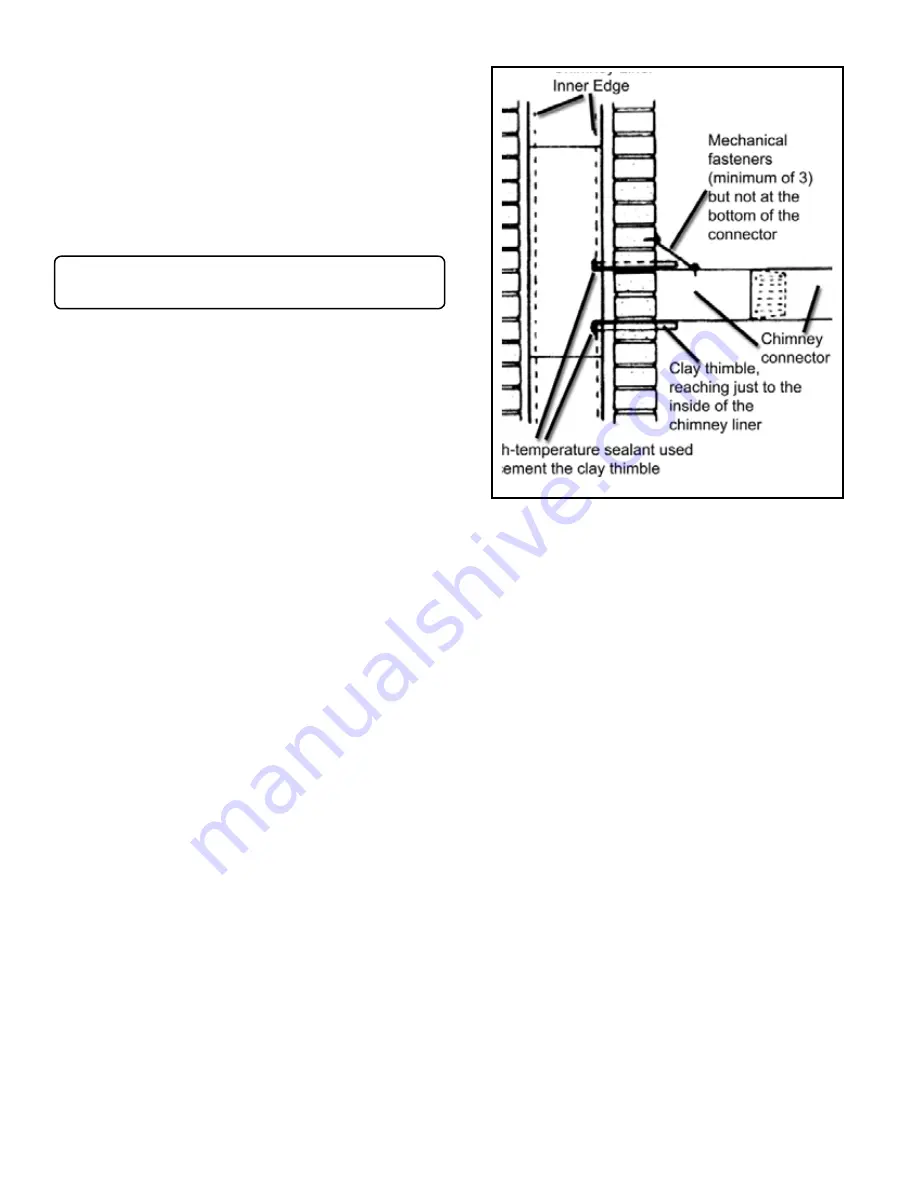
When  connecting  to  a  masonry  chimney,  several 

provisions are standard.  First, whether the chimney 

connector is vented to the chimney through a thimble 

or a breech pipe, neither must pass beyond the inner 

surface of the chimney liner, and both must be firmly 

cemented in place with refractory cement. (A thimble is 

a masonry pipe which is inserted through the chimney 

wall, and is frequently the preferred method; a breech 

pipe is a piece of steel pipe used the same way.) In 

Canada, a breech pipe has ridges or protrusions to lock 

it firmly into the refractory cement. In either case, the 

chimney connector vents to the chimney through the 

thimble or breech pipe.

Using  a  thimble,  the  connector  slides  completely 

inside the masonry to the inner edge of the flue liner, 

and may be easily removed for chimney and connector 

inspection. A breech pipe must extend at least 2" (50 

mm) into the room, so the connector can be attached 

with sheetmetal screws.

venting to a masonry Fireplace Chimney

In some situations, a code compliant chimney originally 

used for a masonry fireplace may be used to install 

your stove. In addition to the requirements found in the 

previous paragraphs, it is important to be aware that 

all clearances must be met, including those from the 

chimney connector to combustibles.  Do not forget to 

include floor protection in your plans.  (See Clearances 

and  Floor  Protection  in  this  section.)    Since  many 

fireplaces  have  exposed  wooden  mantels  and  trim, 

pay special attention to the clearances necessary to 

these materials.

If your fireplace chimney is behind a combustible wall, 

you must use an approved wall pass-through system 

to gain access to the masonry chimney. The chimney 

connector must enter the chimney at a place where it is 

lined, and the fireplace must be made inoperable. For 

example, you might remove the damper, replacing it with 

a secure, airtight, noncombustible seal (removable for 

inspection); this also satisfies the requirement that no 

room air must be allowed to enter the chimney.

Summary of Contents for Magnum Stoker

Page 1: ...YOUR SAFETY FOLLOW INSTALLATION DIRECTIONS CONTACT LOCAL BUILDING OR FIRE OFFICIALS ABOUT RESTRICTIONS AND INSTALLATION INSPECTION REQUIREMENTS IN YOUR AREA Contact your local authority such as munici...

Page 2: ...uction 3 Warnings 3 Packing List 5 Assembly 6 Installation 10 Verti Flow Stoker Control 14 Operation 15 Maintenance 18 Trouble Shooting 21 Wiring Diagram 23 Feeder Parts 24 Domestic Hot Water Coil 25...

Page 3: ...at can turn on the stoker at any time The pilot or maintenance mode is controlled by a timer box The on and off time can be changed to provide more or less heat duringthemaintenancecycle andtoadjustfo...

Page 4: ...f it s the only coal you have it is better to burn it than freeze If you must burn wet coal the feed rate must be increased in order to get the same size fire As the wet coal in the hopper dries out t...

Page 5: ...5 DO NOT BURN WET COAL PACKING LIST...

Page 6: ...eading with the stoker burning This reading should be recorded on the warranty coupon when you activate your warranty Feeder Begin assembly by sliding the pusher block with the adjuster rod from the f...

Page 7: ...ower into place on the bottom rear of the stove NOTE The bolt holes on the blowers are not used Control Box Installthecontrolboxonmountingpadprovidedon the side of the stoker with 4 8 32 bolts NOTE Th...

Page 8: ...older 2 grate inserts and grate angle The grate angle is bolted to the grate holder with 2 3 8 X 1 1 4 bolts Before installing the grate holder the 3 8 round gasket must be checked in the groove on th...

Page 9: ...making sure that it is completely down in the frame Now lay the door onto the frame and secure it using four 1 4 20 flange head bolts With the assembled door still lying face down slide the door top t...

Page 10: ...mneywithabarometric damper Secure all pipe joints with sheet metal screws Plug power cord into a 120 volt receptacle Refertothesectiononoperationtolightafire With the stove burning and stabilized set...

Page 11: ...ze of the flue collar opening Do not use makeshift components No part of the chimney connector may pass through an attic or roof space closet or other concealed space or through a floor or ceiling Whe...

Page 12: ...us the 3 foot 2 foot 10 foot rule 3ft Above roof exit point 2ft Higher than anything within 10ft of the chimney NOTE The restriction of not venting more than one appliance to the same flue applies to...

Page 13: ...ry chimney several provisions are standard First whether the chimney connector is vented to the chimney through a thimble or a breech pipe neither must pass beyond the inner surface of the chimney lin...

Page 14: ...blowermotor Thus theplugfromthecombustionblower should be inserted into this receptacle The bottom receptacle provides power for the distribution blower motor Thus this final receptacle should be used...

Page 15: ...inactive state Once the room temperature reaches the thermostat set point temperature the combustion blower and coal feeder will turn off but the distribution blower will still operate At this point t...

Page 16: ...ng across the grates and allow for easy lighting of the fire Once the fire has been established move the switch to the on position How to Operate the Stoker Control Therearefouroperatorinterfacesonthe...

Page 17: ...rning the feed motor can be turned on and the coal fire will continue to get larger Fresh coal will continue to be pushed onto the grate and ashes will be pushed off the grate The feed rate must be ad...

Page 18: ...causes the dust to fall into the ashpan Every 3 Months The grate clean out slide should be opened and re closed as shown in drawings at left In the closed position be sure the grate clean out slide i...

Page 19: ...the pusher block slides and coat with a rust inhibiting product To remove pusher block Remove cover remove wing nut adjuster and adjuster tube Remove motor mount with motor in place and cord still att...

Page 20: ...ory trained to correct any problem on initialstart up Afterproperinstallation manyyears of trouble free operation can be expected Stoker Control Trouble Shooting This trouble shooting guide is designe...

Page 21: ...21 DO NOT BURN WET COAL 37 5 25 40 5 31 5 36 5 SPECIFICATIONS...

Page 22: ...00 98187 Y 3 Spring Handle 1 4 Gold Heat Exchanger Handle 1 00 01004 Spring Handle 1 2 Gold Load Ash Door Handle Pkg of 3 3 40 00086 3 3 Door Handle Cast Qty 2 req 4 00 00042 Y Door Latch 4 Sets 1 00...

Page 23: ...0 00053P Y 9 8 Fines Tray 2 00 00055 Y 9 9 Feed Indicator Hardware 1 00 00056 Y Capacitor Holder Kit uses 3 AMP Slow Blow Fuse 3 20 36533 9 10 Feeder Body Weldment 1 10 00687 Y 9 11 Clean Out Slide 2...

Page 24: ...9 X 4 1 2 x 1 1 4 Pkg of 7 1 00 900450125 Y Set of cut Brick 2 00 00688 Y Duct Cover Plate 1 10 00004 Starting Collar w Gasket 1 00 01021 Gasket Round White HD 1 for Starting Collar 5 Ft 1 00 00100 Y...

Page 25: ...saw where shown Install coil with hardware provided Hook up as shown above If the distance betweentheunitandthetankislessthan10 feet the circulator pump and aquastat are not needed The aquastat is to...

Page 26: ...lt located in the top of the firebox A 3 4 wrench will fit the bolt Remove the plate from the front by using the small handle on the plate Turn bolt all the way in and tighten Next block off the front...

Page 27: ...truction warranty coverage begins on the date of first occupancy of the dwelling or six months after the sale of the product by an independent authorized HHT dealer distributor whichever occurs earlie...

Page 28: ...t of normal use As a heating appliance some changes in color of interior and exterior surface finishes may occur This is not a flaw and is not covered under warranty Damage to printed plated or enamel...

Page 29: ...29 DO NOT BURN WET COAL Service Maintenance Log Date Of Service Performed By Description Of Service...

Page 30: ...30 DO NOT BURN WET COAL Service Maintenance Log Date Of Service Performed By Description Of Service...

Page 31: ...NOTES...

Page 32: ......

Reviews: