background image

Dry Seasoned Wood Only!

Oakwood Woodburning Stove

Harman®  •  Oakwood Owner's Manual_R34  •  2004 -___  •  09/15

25

3-90-08327

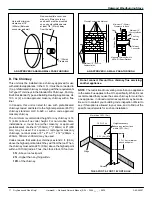
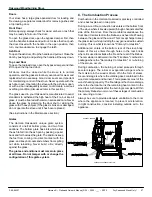
E. Bottom Heat Shield

Part #1-00-797058 recommended to be installed whenever 

the Oakwood is installed on a protected combustible floor. 

The shield installs on four bolts that are located on the side 

of  the  base  of  the  stove  body.  Slide  the  shield  under  the 

stove from the back. Lift into place and install bolts through 

the holes in the shield.

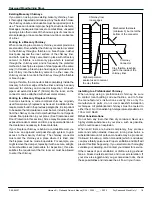
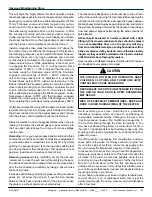
D. Optional Rear Shield

The rear heat shield,(Top Vent #1-00-02492 - Rear Vent #1-

00-02493), will allow you to install your Oakwood closer to 

the wall. Please note there are two different shields based 

on whether the unit is rear or top vented.

Slide heat shield in from 

the rear of the unit 

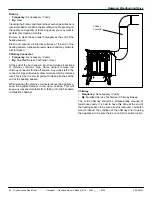
F. Optional Cozy Screen

This appliance has been tested and approved for burning as 

an open fireplace. To do so, a spark screen (Harman part# 

3-40-06960; Cozy Screen) must be installed over the front 

door opening. The by-pass damper must be kept in the open 

position. 
The Cozy Screen can be used from the start of a fire or can 

be used with an existing one. When starting a fire with the 

Cozy Screen, smoke spillage may occur until it develops a 

draft strong enough to pull all smoke back into the flue.
DO  NOT  LEAVE THE APPLIANCE  UNATTENDED  WITH 

THE DOOR OPEN!
Load only small amounts of wood at a time.

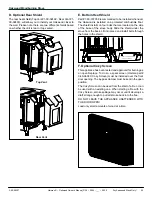
Top Vent

Rear Vent

Summary of Contents for Oakwood Wood Stove

Page 1: ...r to installation Installation MUST comply with local regional state and national codes and regulations Contact local building or fire officials about restrictions and installation inspection requirem...

Page 2: ...in USA Refer to manufacturer s instructions and local codes for precautions required for passing chimney through a combustible wall or ceiling This wood heater needs periodic inspection and repair fo...

Page 3: ...Installation and Location 6 B Fire Safety 6 C Component Locator 7 D Flue Direction Conversion 7 E Pre Use Checklist 8 4 Dimensions Clearances A Appliance Dimensions 9 B Clearances to Combustibles 10...

Page 4: ...rning Type STANDARD s UL 1482 1996 UL 737 1996 ULC S627 00 EPA Method 28 5G EPA Certification Number 558 EPA Certified Emissions 2 3 g hr LHV Tested Efficiency 63 HHV Tested Efficiency 70 9 EPA BTU Ou...

Page 5: ...ase ventilation by opening windows or doors 2 Make sure the stove doors and lid are closed and latched 3 Check stove for smoking or puffing condition Open by pass and increase air flow to firebox if n...

Page 6: ...in the designated clearances to combustibles Insulation must not touch the chimney You must maintain the designated air space around the chimney This space around a chimney is necessary to allow natur...

Page 7: ...through the firebox and the open bypass damper loosen the retainer bolts on each of the flue collar and the cast iron plate With the bolts loosened turn the retainer to allow the piece to come free o...

Page 8: ...bels and hang tags have been removed from the glass 11 All plated surfaces have been wiped clean if applicable There are two brick clips located in the Owner s manual bag With the bricks in place inst...

Page 9: ...od Woodburning Stove Harman Oakwood Owner s Manual_R34 2004 ___ 09 15 9 3 90 08327 A Appliance Dimensions 4 Dimensions Clearances 24 15 16 18 1 16 21 24 75 24 3 4 26 1 4 21 7 1 2 30 1 4 30 1 2 To cent...

Page 10: ...mbustibles For clearance reduction methods refer to NFPA 211 or Local Codes Follow NFPA 211 Table 13 6 1 Clearances for Solid Fuel Burning Appliances for clearance from the top of the unit to ceiling...

Page 11: ...clearance reduction methods refer to NFPA 211 or Local Codes Follow NFPA 211 Table 13 6 1 Clearances for Solid Fuel Burning Appliances for clearance from the top of the unit to ceiling This unit was n...

Page 12: ...clearance reduction methods refer to NFPA 211 or Local Codes Follow NFPA 211 Table 13 6 1 Clearances for Solid Fuel Burning Appliances for clearance from the top of the unit to ceiling This unit was n...

Page 13: ...clearance reduction methods refer to NFPA 211 or Local Codes Follow NFPA 211 Table 13 6 1 Clearances for Solid Fuel Burning Appliances for clearance from the top of the unit to ceiling This unit was n...

Page 14: ...ea is designed to take the maximum weight of the stove The Oakwood loaded with wood weighs approximately 500 pounds 250kg Combustible Material Side Wall 37 940mm 22 559mm 16 406 5mm 2 75 70mm 26 660 5...

Page 15: ...e are parallel to the walls behind and to the side of the stove A corner installation is one in which the back of the stove is positioned diagonally across a corner of the room Each installation requi...

Page 16: ...s through an attic or roof space closet or other concealed space or through a floor or ceiling Whenever possible avoid passing the connector through a combustible wall if you must use an approved wall...

Page 17: ...a 10 ft 3m radius Thus the 3 foot 2 foot 10 foot rule 3ft Above roof exit point 2ft Higher than anything within 10ft of the chimney NOTE The restriction of not venting more than one appliance to the s...

Page 18: ...your plans See Clearances and Floor Protection in this section Since many fireplaces have exposed wooden mantels and trim pay special attention to the clearances necessary to these materials If your f...

Page 19: ...h Factory Built Chimney Chimney Connector Minimum air space with chimney listing Chimney support Attic radiation shield Chimney sections Chimney cap Storm collar Roof flashing Roof radiation shield SS...

Page 20: ...t thimble Flue liner with required air space Minimum of three sheet metal screws per joint of chimney connector Mantel and trim protection Airtight insulated clean out Damper closed and sealed with no...

Page 21: ...mbustible Floor Airtight insulated clean out Flue liner with required air space Floor Protection Stainlesssteel chimney connector must extend to flue liner Minimum 8 masonry thickness in front of smok...

Page 22: ...less steel liner system or other approved lining system Floor Protection Follow liner manufacture s instructions on insulation and support UL1777 insulated stainless steel flex liner or other approved...

Page 23: ...ctor to uprotected ceiling 15 Flue liner with required air space Listed or approved thimble assembly 1 Clearance for exterior chimney or 2 clearance for interior chimney and 2 clearance for NFPA 211 t...

Page 24: ...e wall portion 6 Slide the other end of the metal intake flex pipe into the stub on the rear of the Oakwood and secure it with aluminum tape This air intake will supply outside air for the secondary c...

Page 25: ...ood closer to the wall Please note there are two different shields based on whether the unit is rear or top vented Slide heat shield in from the rear of the unit F Optional Cozy Screen This appliance...

Page 26: ...operating guidelines you will ensure proper draft and gain maximum efficiency and enjoyment from your stove Do not alter the position of the andirons Building a fire too close to the glass may cause d...

Page 27: ...the ash to fall into the ash pan by passing a poker back and forth across the grate The andirons keep the fuel from coming into direct contact with the glass and keep hot coals and embers from spillin...

Page 28: ...hepaper and close the loading door s Allow this start up fire to burn for a few minutes keeping the bypass damper open Add about five more pieces of wood in the 2 to 3 inch 50 80mm size range making s...

Page 29: ...ashes should be the coolest at this time Remove ashes from the fire chamber periodically by raking a poker across the bottom grates Excessive ash buildup can prevent proper venting of exhaust gases Do...

Page 30: ...echnician A Creosote Formation and Need For Removal When wood is burned slowly it produces tar and other organic vapors which combine with expelled moisture to form creosote The creosote vapors conden...

Page 31: ...ct the glass and sealing gasket Replace gasket as needed Do not operate the stove with a broken glass Replacement glass which is ceramic glass should be obtained only through your Harman dealer To rep...

Page 32: ...ason brush and clean all sections of chimney connector pipe Some owners remove the chimney connector for the off season Any ashes left in the connector pipe will actually draw moisture which promotes...

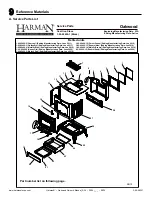
Page 33: ...lue Ending Manufacturing Date Jan 2010 1 2 3 4 6 8 9 10 15 16 17 18 21 22 23 24 25 26 27 28 19 20 13 14 7 5 11 12 1 90 02490 1 Black 1 90 02490 12 Forest Green Ending Manufacturing Date Jan 2010 1 90...

Page 34: ...A 10 Ft 1 00 00999 Y 6 Damper Elbow Painted 3 50 00500S Y 7 Cook Grill Assembly Optional 1 00 08121 8 Flue Collar 4 00 249108D 9 Top Hinge Plate Qty 2 req 2 00 249147S 10 Top 4 00 249105P Gasket 30 Ft...

Page 35: ...249150 21 Hinge Stiffener 2 00 249188L 22 Ash Pan 1 10 249151 Y 23 Steel Ash Box Weldment 1 10 249144S 24 Ca Shield 2 00 249157B 25 Leg Qty 4 req 4 00 249100P Y 26 Bottom 4 00 249104D 27 Right Side P...

Page 36: ...ate 2 00 249122 Y 32 9 Cast Right Inside Plate w Gasket 1 10 249118A Y 32 10 Rear Brick Retainer Pkg of 2 1 00 249135 32 11 Shoe Brick 3 40 00100 Y Gasket shoe Brick 10 Ft 1 00 11862 Y 32 12 Side Bric...

Page 37: ...anty coverage begins on the date of first occupancy of the dwelling or six months after the sale of the product by an independent authorized HHT dealer distributor whichever occurs earlier The warrant...

Page 38: ...y does not cover the following Changes in surface finishes as a result of normal use As a heating appliance some changes in color of interior and exterior surface finishes may occur This is not a flaw...

Page 39: ...Oakwood Woodburning Stove Dry Seasoned Wood Only Harman Oakwood Owner s Manual_R34 2004 ___ 09 15 39 3 90 08327 Service Maintenance Log Date Of Service Performed By Description Of Service...

Page 40: ...___________________ ________________________________________________________________________________ ________________________________________________________________________________ __________________...

Reviews: