WARNING
!
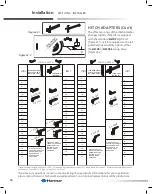
4"-11"
11"-13"
13"-15"
15"-16"
D
O
N
O
T
US
E BA
LL MOUNT ADAP
TE
R
w/
SW
IN
G
A
W
A
Y
Bumper Mount
( Be sure to comply with
vehicle's bumper rating )
Flat Bar Style
( Be sure to comply with
vehicle's bumper rating )
Omit
stabilizer
FOR AL030 ONLY
( Ball Mount
Hitch adapter )
OR
OR
FLIP
OVER
Bumper Mount
( Be sure to comply with
vehicle's bumper rating )
Flat Bar Style
( Be sure to comply with
vehicle's bumper rating )
Omit
stabilizer
FOR AL030 ONLY
( Ball Mount
Hitch adapter )
OR
OR
FLIP
OVER
OR
X
X
OR
X
X
Swing
Away
OR
CLASS
3
CLASS
2
Swing
Away
OR
CLASS
3
CLASS
2
Outside Lifts - Installation & Owner’s Manual 2013
27
Section 2 : inStaller
Installation
aL030 PoWer tote INStaLLatIoN WIth
BaLL moUNt hItch aDaPter
Figure 27-1
Figure 27-2
Ball Mount Hitch
Adapter and
stabilizer
Standard equipment shipped
with AL030 Power Tote
(AL030 can also be upgraded with Class
3 and Class 2 hitch adapters.)
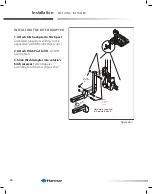
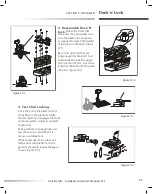
1. Install bumper mount or flat bar.
[Figure 27-1]
2. Install hitch post assembly
[Figure 27-2]
3. adjust for bumper height
.
[Figure 27-3 & 27-4]
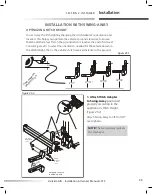
Only class 2 or 3
adapters can be used
with Swing-Away.
Refer to installation
with Swing-Away for
mounting orientation,
page 23.
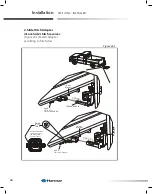
WarNING!
Do not attempt
to mount up from
under Flat Bar
Summary of Contents for AL010/050
Page 62: ...900 62 Notes ...


