background image


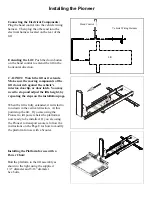
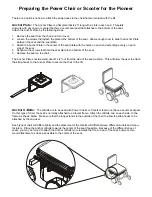
There are 2 options on how to attach the strap hooks to the chair that are included with the lift.   
 

Anchor Plate:  

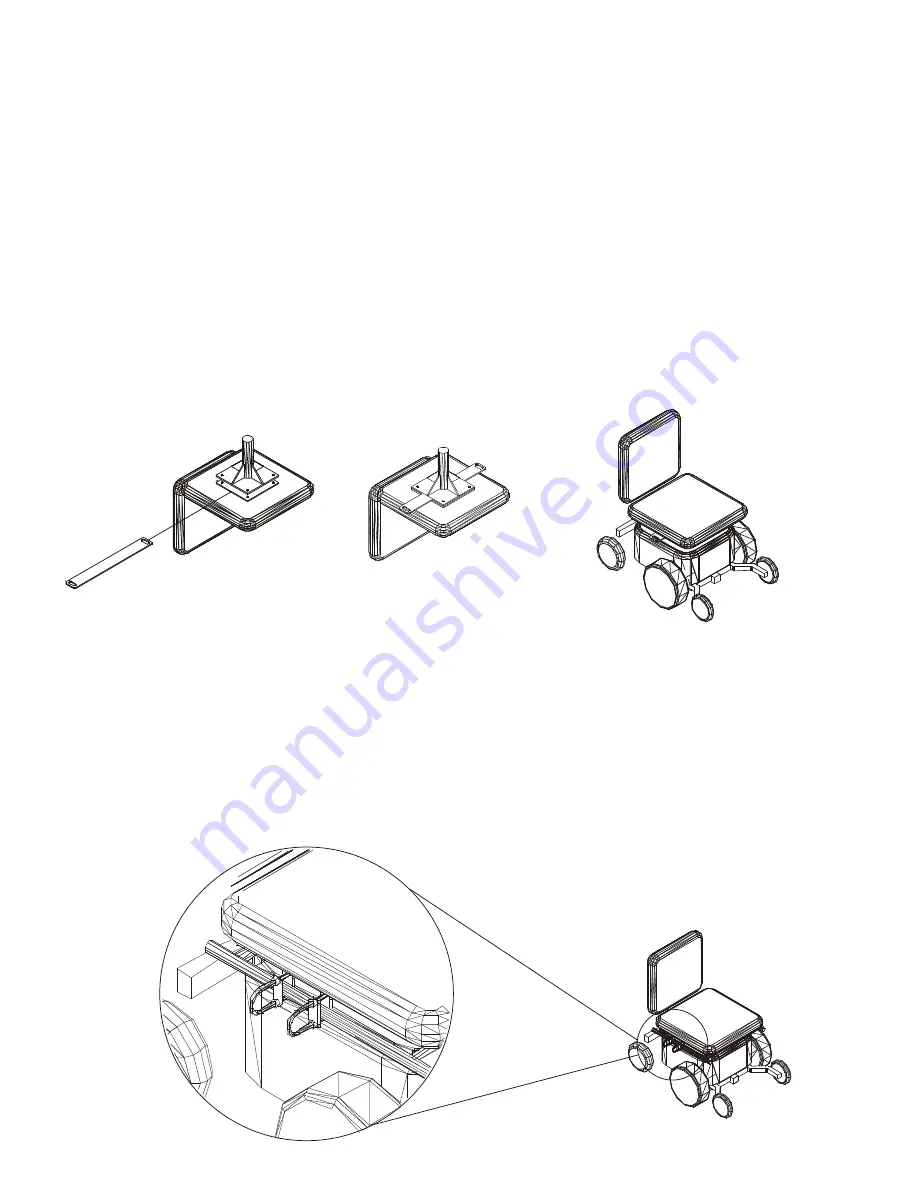
The Anchor Plate is a flat plate that is 20” long with 2 slots in each end.  This plate 

will work with any chair or scooter that has a center seat post that attaches to the bottom of the seat.  
Attach the Anchor Plate by the following steps.


1. Remove the seat from the chair and turn it over. 
2. Loosen the screws that attach the plate to the bottom of the seat.  Allow enough room to slide the Anchor Plate 

between the seat and the seat plate.   

3. Attach the Anchor Plate in the center of the seat plate with the holes on each end extending evenly on each 

side of the seat. 

4. Retighten the screws that hold the seat plate to the bottom of the seat. 
5. Replace the seat on the chair. 
 
The Anchor Plate should extend about 1-1/2” out from the side of the seat cushion.  This will allow the user to attach 
the strap hooks to the Anchor Plate to secure the chair to the lift. 


Anchor U-Bolts:  

The U-Bolts are to be used with Power Chairs or Scooters that do not have a center seat post.

On this type of chair, the seat is normally attached to a tubular frame.  Attach the U-Bolts, two on each side , to the 
frame as shown below.  Make sure that the loop extends to the outside of the chair to allow the strap hooks to be 
attached by the end user.   
 
Each type of chair will differ slightly and the placement of the U-bolts will differ between different models and manu-
facturers.  Place the Anchor U-Bolts towards the center of the seat if possible.  Because of the different types of 
seats, you may be forced to attach the Anchor U-Bolts more towards the front or rear of the seat, but we recom-
mend attachment as close as possible to the center of the seat.  


Preparing the Power Chair or Scooter for the Pioneer


Summary of Contents for AL600 Pioneer

Page 1: ...ptions Please read the manual thoroughly BEFORE attempting any installation adjustment or use of the lift Both installers and operators should familiarize themselves with this entire manual If you hav...

Page 2: ...Assembly 1 Pioneer Platform 1 Leg Assembly 1 Hardware Pack 1 Foot Plate 1 Front Wheel Cradle For Scooter Applications Applications The Pioneer in its factory setup is intended for the transport of pow...

Page 3: ...by road debris Manufactures Recommendation Schedule a routine maintenance visit with the end user Harmar recommends the lift be greased in the applicable areas and the wire harness connections be che...

Page 4: ...oor latch by 0 5 Leveling the lift The floor in some vehicles is not level To level the lift start by parking the vehicle on level ground Use a carpenter s level to verify the lift is level If it is n...

Page 5: ...nuts Verify that the leg assembly is centered from side to side within the vehicle Tighten the nuts on the 5 16 bolts until the assembly is firmly attached to the vehicle If the vehicle has a lip at t...

Page 6: ...on At this point stop the lift If you are using the Pioneer to lift power chairs the platform is now ready to be installed If you are using the Pioneer to transport scooters follow the instructions on...

Page 7: ...Plate should extend about 1 1 2 out from the side of the seat cushion This will allow the user to attach the strap hooks to the Anchor Plate to secure the chair to the lift Anchor U Bolts The U Bolts...

Page 8: ...t Backs If your chair has a folding seat back you may wish to fold it to the down position This will allow you more clearance when loading the chair into the vehicle Depending on the size of your chai...

Page 9: ...ovided hardware to the platform end plates on the passenger s side of the platform Remove the two restraints add the front wheel craddle and reassemble the restraints in the same holes from which they...

Page 10: ...ing the Scooter While holding the hand control stand to the side and away from the lift Press the up button again The lift will raise and retract into the vehicle The lift is retracted fully when the...

Page 11: ...preventative maintenance inspection at least once a year on motors lift frame wiring harness and all moving parts of the lift Check for paint chips and touch up any bare metal with a good gloss black...

Reviews: