9
helix curved Stair lift - Installation & Service Manual 2014
Part Number: 630-00008- Rev A
Wiring & chassis
13.
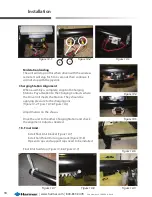
Install batteries.
14.
connect battery wire.
[Figure 9-1]
15.
Replace Shroud
Figure 9-2
Figure 9-1
Figure 9-3
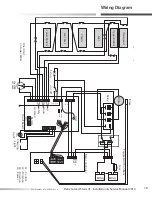
Battery
Charger
White +
Red +
Black
Black -
+
-
+
-
Battery
Charger
White +
Red +
Black
Black -
+
-
+
-
Figure 9-4
Note For oUtSIDe INStaLLS :
the battery charger
needs to be placed out of the weather.
16. Install chassis.
Bottom roller position. ensure
charging point is on
the bottom.
[Figure 9-2]
caUtIoN
Use caution when
handling battery.
caUtIoN
ensure charging fingers
are set as low as possible
to ensure there is no inter-
ference with rail support.
Slide on until drive hits the gear rack. Activate the joystick to drive onto rack, watching
the wheels to ensure they go on smoothly.
17. charging Station
•
Route red and black wires through hole provided in pipe by charging station
determine which end has the Ac power for the charger. connect the charger to the red
and black wires with the connectors provided.
[Figures 9-3 & 9-4]
clip off the green wire. (Not used)


