background image

Omneon MediaDeck™ 

7

C

HAPTER

 2

Replacing a Disk Drive

This section provides instructions for replacing an Omneon 
MediaDeck disk drive. The Omneon MediaDeck contains high-
performance SATA disk drives that can be hot-swapped during 
operation without interrupting the use of the system. 

NOTE:

To avoid potential audio/video disruption stemming from hot-

swapping a disk, the disk in question should be removed from the RAID 
set using SystemManager prior to removing it from the disk enclosure. 

NOTE:

The procedure in this section applies to SystemManager version 

5.19. If you are running a different version of SystemManager, some 
steps may vary. Refer to the 

Omneon


SystemManager Release Notes


for instructions on upgrading SystemManager.

In the event of disk drive failure, replacement disk drives are 
available from Omneon. Refer to the 

Technical Support

 section 

for information on how to request technical support. 

To assist in drive problem diagnosis and remediation, please gather 
the following information for use by Omneon Technical Support 

before

 you remove the failing/failed disk drive:

Site  Location

Server Name

Date of Failure

Time of Failure

Description of Failure

Summary of Contents for Omneon MediaDeck

Page 1: ...Component Replacement Guide Omneon MediaDeck MediaDeck Part Number 28 0136 Revision L...

Page 2: ...nd or other matter Use of this system or otherwise fulfilling their conditions constitutes your acceptance of them as necessary Copies of such licenses notices conditions disclaimers and or other matt...

Page 3: ...dio frequency energy and if not installed and used in accordance with the instruction manual may cause harmful interference to radio communications Operation of this equipment in a residential area is...

Page 4: ...er authorities and the product is marked Parameter Specification Detail CE Low Voltage Directive 73 23 EEC including amendments EN60950 1 1992 A1 A2 A3 A4 Safety of Information Technology Equipment EM...

Page 5: ...60950 1 03 1st Edition Additional Certification Compliance and EMC Data Additional certification compliance and EMC data is listed in the Omneon MediaDeck User s Guide Important Safeguards and Notice...

Page 6: ...oduct in or near water Disconnect AC power before installing any options or servicing the unit unless instructed to do so by this manual This product is grounded through the power cord grounding condu...

Page 7: ...Electrical Standard and local electrical standard for attachment of the power cords Risk of explosion if battery is replaced incorrectly or with an incorrect type There are no user serviceable batteri...

Page 8: ...Component Replacement Guide...

Page 9: ...the Drive Cage 19 Installing the Drive Cage 21 Chapter 5 Replacing an I O Module 23 Stopping Players that Use the I O Module to be Replaced 23 Verifying Which I O Module to Remove 24 Winking the Omne...

Page 10: ...iaDeck 38 Upgrading the MediaDeck Firmware 39 Checking the File System 39 Moving Players to the New MediaDeck in SystemManager 42 Removing the Original MediaDeck from SystemManager 44 Changing vDHCP S...

Page 11: ...vides the following component replacement instructions for the Omneon MediaDeck Replacing the Bezel Replacing a Disk Drive Replacing a Power Supply Replacing the Drive Cage Replacing an I O Module Rep...

Page 12: ...elephone Local 1 408 585 5200 Fax 1 408 521 2191 Email support omneon com http www omneon com service support ftp ftp omneon com Updates Omneon Current For support in Europe Middle East and Africa Tel...

Page 13: ...land Telephone 86 10 8391 3313 Fax 86 10 8391 3688 Email chinasupport omneon com http www omneon com service support ftp ftp omneon com Updates Omneon Current For support in Asia Pacific other territo...

Page 14: ...4 Component Replacement Guide...

Page 15: ...Deck To remove the front bezel 1 Loosen the four captive thumb screws that secure the bezel to the chassis 2 Pull the bezel directly away from the chassis Figure 1 Removing the Bezel CAUTION Observe a...

Page 16: ...rs of the chassis 3 Keeping the corners aligned press the bezel straight onto the chassis The top and bottom edges of the bezel should slide over the top and bottom edges of the chassis The LED connec...

Page 17: ...ure NOTE The procedure in this section applies to SystemManager version 5 19 If you are running a different version of SystemManager some steps may vary Refer to the Omneon SystemManager Release Notes...

Page 18: ...ties page for your Omneon MediaDeck on SystemManager Disk GUID Disk Serial Number Disk Size GB Tip To view Drive Properties from the Configuration tab click Disk Utilities then click the icon for your...

Page 19: ...luded from coverage under the Omneon product limited warranty and maintenance services programs In addition any errors or damages caused by the use of disk drives provided from any other source will c...

Page 20: ...e the state of the LEDs for this drive as follows a The top Activity LED should be steady green indicating that the drive is not being actively used If it is blinking this is the wrong drive to remove...

Page 21: ...ick the link that begins with RaidSet to open the RAID utilities page Scroll to the bottom and click ADD Remove Drives 8 Compare the serial number found on the top of the drive with the serial number...

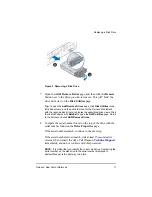
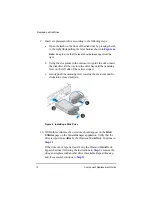
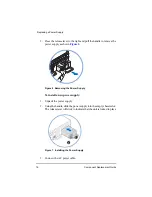
Page 22: ...until the camming lever on the left side of the carrier stops it c Gently push the camming lever towards the enclosure until it clicks into a closed position Figure 4 Installing a Disk Drive 10 Within...

Page 23: ...the rebuild manually by clicking on Start Rebuild 12 Periodically monitor the rebuild until complete Once complete RAID set status will change to Normal Attached Viable This completes the procedure N...

Page 24: ...14 Component Replacement Guide Replacing a Disk Drive...

Page 25: ...dent AC connector If one supply fails the load is transferred to the remaining supply without interruption to service To take full advantage of the redundant supplies Omneon recommends that you use se...

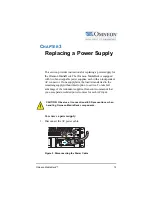
Page 26: ...r supply as shown Figure 6 Figure 6 Removing the Power Supply To install a new power supply 1 Unpack the power supply 2 Using the handle slide the power supply into the empty chassis slot The release...

Page 27: ...MediaDeck Omneon recommends that you first stop the file system Once you reconnect power to your MediaDeck you must then start the file system again CAUTION Observe all conventional ESD precautions wh...

Page 28: ...status of their file systems 2 Click on the name of the MediaDeck you wish to power down The Disk Utilities page for that MediaDeck appears There are two columns displayed the Physical View and Logic...

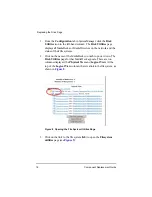
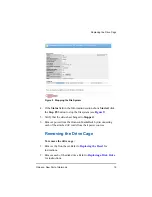
Page 29: ...file system see Figure 9 5 Verify that the status has changed to Stopped 6 Remove power from the Omneon MediaDeck by disconnecting each of the attached AC cords from their power sources Removing the...

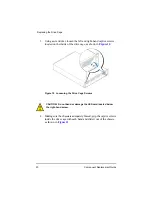
Page 30: ...the inside of the drive cage as shown in Figure 10 Figure 10 Loosening the Drive Cage Screws 4 Making sure the chassis is adequately braced grip the captive screws inside the drive cage with each han...

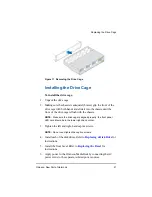
Page 31: ...e drive cage is flush with the chassis NOTE Make sure the drive cage is aligned properly the front panel LED card should be in the lower right hand corner 3 Tighten the left and right hand captive scr...

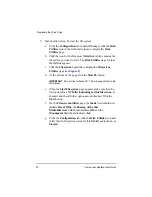
Page 32: ...Figure 8 d At the bottom of the page click the Start FS button IMPORTANT Do not click Initialize FS This will wipe out the entire file system e When the Start Filesystem page appears make sure that t...

Page 33: ...f you are running a different version of SystemManager some steps may vary Refer to the Omneon SystemManager Release Notes for instructions on upgrading SystemManager Stopping Players that Use the I O...

Page 34: ...rify which players use the I O module to be replaced by clicking the Edit link for each player and then clicking Attached Devices The Device column displays all attached devices 5 Uncheck the Attach c...

Page 35: ...inking the light bar on the front panel of the Omneon MediaDeck and the status LED on the back of the processor module If currently On click Wink Off to stop winking the Omneon MediaDeck Winking the I...

Page 36: ...1 Disconnect any cables from the I O module 2 Using a screwdriver loosen the three screws on the rear panel of the I O module as shown The screws are captive and will not come out completely Figure 12...

Page 37: ...temManager To remove an I O module from SystemManager 1 Click the Diagnostics tab to display the Diagnostics page 2 From the Device Maintenance section in the left hand column click the Remove Device...

Page 38: ...both hands to grip the rear panel of the I O module gently slide the module into the chassis until the rear panel is flush with the rear of the chassis 3 Using a screwdriver tighten the three screws o...

Page 39: ...ack section to display the Attach Devices page as shown in Figure 14 Figure 14 Attach Devices Page 3 In the Attach column click the check box for the device Omneon MediaDeck Module that you wish to co...

Page 40: ...Configuration tab then click the Player Configuration button in the left hand column to view the Player Configuration window 2 From the Player Configuration window click the icon for the Omneon Media...

Page 41: ...aneously display both units and allows you to move Players from the original unit to the new one using the Move Player function If you wish to use the same IP addresses on the new unit as on the origi...

Page 42: ...you first stop the file system Once you reconnect power to your MediaDeck you must then start the file system again 1 From the Configuration tab in SystemManager click the Disk Utilities icon in the l...

Page 43: ...eon Now Part of Harmonic 33 Replacing the Processor Module Figure 15 Opening the File System Utilities Page 3 Click on the link to the file system fs0 to open the Filesystem utilities page see Figure...

Page 44: ...stem 4 If the Status field in the Information section shows Started click the Stop FS button to stop the file system see Figure 16 5 Verify that the status has changed to Stopped 6 Remove power from t...

Page 45: ...anel of the processor module as shown The screws are captive and will not come out completely Figure 17 Loosening the Processor Module Screws 3 Using both hands to grip the captive screws gently pull...

Page 46: ...lacing the Processor Module Figure 18 Locating the SAS Connector 5 Press down on the top latch of the SAS connector and disconnect the SAS cable as shown in Figure 19 Figure 19 Disconnecting the SAS C...

Page 47: ...S cable above the processor board as you slide in the module 3 Connect the SAS cable to the SAS connector Refer to Step 4 in the previous section to locate the SAS connector NOTE The SAS connector wil...

Page 48: ...IP address or the Omneon MediaDeck does not appear in the System Diagram please contact Technical Support for assistance Winking the Omneon MediaDeck To wink the Omneon MediaDeck 1 From SystemManager...

Page 49: ...diaDeck Modules in your system are running the same version of firmware continue to the next step Checking the File System Once you have powered up the new MediaDeck check the status of the file syste...

Page 50: ...ent Replacement Guide Replacing the Processor Module Figure 20 Opening the File System Utilities Page 3 Click on the link to the file system name listed fs0 to open the Filesystem utilities page see F...

Page 51: ...ust stop the file system and then start it again to ensure that the correct settings take effect If the Status field shows Started click the Stop FS button to stop the file system Once the file system...

Page 52: ...ate fs0 7 From the Configuration tab click the Disk Utilities icon and verify that the new MediaDeck is shown as Started Moving Players to the New MediaDeck in SystemManager To move players from the p...

Page 53: ...ctive You can also click Select all Players or Clear Selection as desired 4 Click Move to perform the Move function between Omneon MediaDecks The selected Players will disappear from the list 5 Click...

Page 54: ...nging vDHCP Settings NOTE If you wish to use the same IP addresses on the new processor module as on the original one continue to Replacing a Processor Module Using the Same IP Addresses Once you have...

Page 55: ...hown in the main window See Figure 23 for an example Figure 23 vDHCP Settings Dialog Box 4 Click the first Host under HostName select MAC Addr and then type or copy and paste the new MAC address from...

Page 56: ...If you are using static IP addresses on the Omneon MediaDeck not assigned by a DHCP server contact Omneon Technical Support for help with the replacement steps If you are using DHCP continue to Step 2...

Page 57: ...aDeck processor module will appear on the System Diagram page of SystemManager It should display the original IP addresses and the original Players You may modify the host names to match those given t...

Page 58: ...48 Component Replacement Guide Replacing the Processor Module...

Page 59: ...Deck Omneon recommends that you first stop the file system Once you reconnect power to your MediaDeck you must then start the file system again CAUTION Observe all conventional ESD precautions when ha...

Page 60: ...atus of their file systems 2 Click on the name of the MediaDeck you wish to power down The Disk Utilities page for that MediaDeck appears There are two columns displayed the Physical View and Logical...

Page 61: ...on to stop the file system see Figure 25 5 Verify that the status has changed to Stopped 6 Remove power from the Omneon MediaDeck by disconnecting each of the attached AC cords from their power source...

Page 62: ...nstructions 7 Remove the power supplies Refer to Replacing a Power Supply for instructions 8 If your Omneon MediaDeck is currently rack mounted remove the chassis from the rack Refer to the instructio...

Page 63: ...urces 10 Start the file system To start the file system a From the Configuration tab in SystemManager click the Disk Utilities icon in the left hand column to display the Disk Utilities page b Click t...

Page 64: ...e Mode field should now indicate Read Write the Sharing with other MediaDirectors field should indicate Off and the Mountpoint field should indicate fs0 g From the Configuration tab click the Disk Uti...

Page 65: ......

Page 66: ......

Page 67: ......

Page 68: ......

Reviews: