background image

10/20 

|

 13

INSTALLATION MANUAL MULTIFUNCTIONAL SURFACE MOUNTED ROLLER SHUTTER VR150

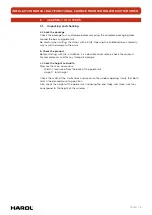
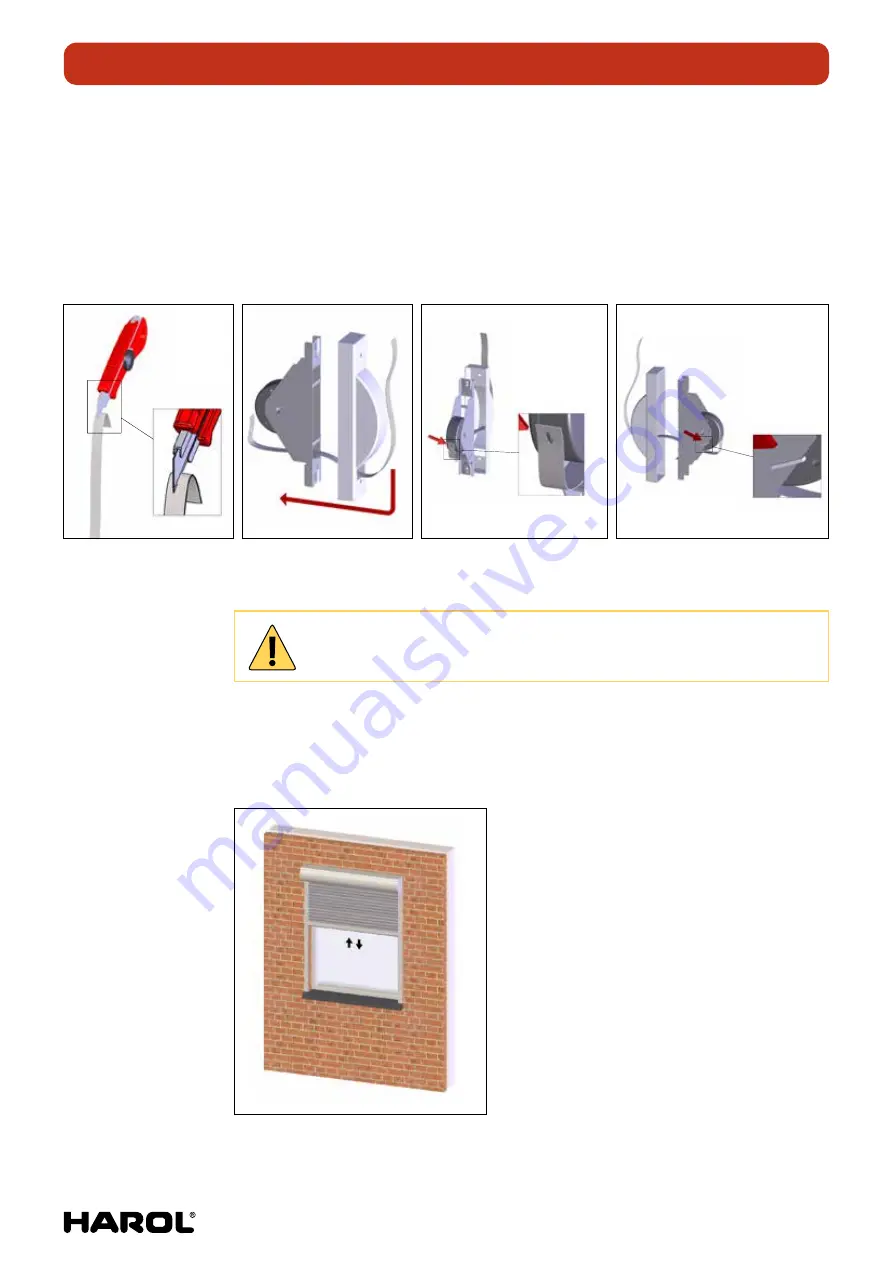
Tape:

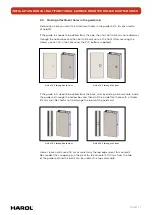
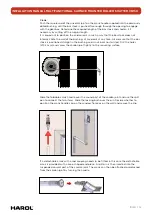
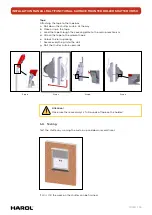
Attaching the tape to the tape box
a.  Roll down the shutter curtain all the way.
b.  Make a slip in the tape.
c.  Lead the tape through the covering plate to the roll-up mechanism.
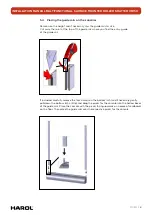
d.  Attach the tape to the relevant hook.
e.  Unlock the roll-up spring.
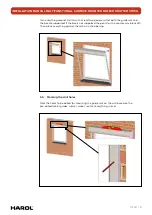
f.  Secure everything in/to the wall.
g.  Roll the shutter curtain upwards.

Attention!

Make sure there are always 2 full rounds of tape on the holder!

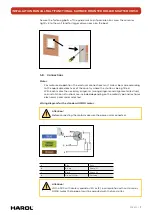
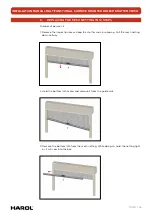
5.9. Testing

Test the shutter by running the curtain up and down several times.

If all is OK, the work on the shutter can be finished.

A  (1 : 1)

A  (2 : 1)

B  (2 : 1)

Step b

Step c

Step d

Step e

Summary of Contents for VR150

Page 1: ...INSTALLATION AND USER GUIDE MULTIFUNCTIONAL SURFACE MOUNTED ROLLER SHUTTER VR150 Art 061715 ZONWERING SUN PROTECTION ROLLUIKEN ROLLER SHUTTERS POORTEN GATES ...

Page 2: ...UIREMENTS 4 5 ASSEMBLY IN 10 STEPS 5 5 1 Unpacking and checking 5 5 2 The wall cardan joint 6 5 3 Making attachment holes in the guide rails 7 5 4 Placing the guide rails on the consoles 8 5 5 Marking the drill holes 9 5 6 Drilling the attachment holes 10 5 7 Installing the shutter 10 5 8 Connections 11 5 9 Testing 13 5 10 Finish 14 6 REPLACING THE MESH NETTING IN 12 STEPS 15 ...

Page 3: ...tallers and therefore are not suitable for use by amateurs or trainees Always wear the appropriate safety clothing Always take the necessary precautions Ensure that you have a robust footing Ensure that there is adequate light in the installation area Remove obstacles and dirt Make sure that no other persons than the installers are present Unauthorised persons can get in the way or be at risk duri...

Page 4: ...lts early on and enable them to be remedied at the lowest possible cost For our general terms and conditions of sale please refer to the price list Make sure the shutter box can always be opened so the mechanical parts inside can be reached easily If this rule is not respected Harol cannot be held responsible for the cost of demolition work among other things Harol NV Industriepark 3 3290 Diest Be...

Page 5: ... result in damage to the paint b Check the product Before starting with the installation it is advisable to accurately check the contents for completeness and for any transport damage c Check the height and width Measure the main dimensions Width measured from the back of the guide rails Height total height Check the width of the shutter box and measure the window opening Verify that both match th...

Page 6: ...is by placing a guide rail in the correct position against the wall Use the top of the guide rail as a point of reference Carefully drill from the outside to the inside of the wall bore hole 10 mm for motor cable 14 mm for crank 20 mm for tape guide A tube is pressed into the hole for the tape guide to prevent damage to the tape When drilling through the wall you will achieve the best results if w...

Page 7: ...ole using the PVC buttons supplied Hole of 6 5 through both sides Hole of 9 5 through the front If the guide rails need to be drilled from the back start by drilling a 6 5 mm hole inside the guide rail through the hollow box and then drill the inside front hole with a thicker 9 5 mm drill Be careful not to damage the joints of the guide rail Hole of 6 5 through both sides Hole of 9 5 through the f...

Page 8: ...guide rail where you find the entry guide of the guide rail B 2 8 1 If included carefully remove the fork clamps on the bottom lath and if necessary gently pull down the bottom lath a little and drop the pivots for the console into the hollow boxes of the guide rails Place the console with the pivots facing upwards on a piece of cardboard on the floor Then place the guide rails over the respective...

Page 9: ...e rails and the box are supported If the box is not supported the pivots for the console may break off Then place everything against the wall or in the opening A 1 10 5 5 Marking the drill holes Mark the holes to be drilled for mounting the guide rails on the wall based on the pre drilled lateral guides Always make sure that everything is level A 1 2 B 1 10 ...

Page 10: ...cardboard Be careful not to damage the paint Next drill the screw holes and insert the correct rawlplugs Attention When drilling the guide rails against the window profile do not drill into the glass A 1 5 5 7 Installing the shutter Pick up the shutter from the floor and with at least two people place it in the position where you want to install it Make sure that the motor cable tape cord slides c...

Page 11: ... country where the shutter is being fitted With each motor the necessary diagrams wiring diagram and alignment directives and installation instructions are included depending on the motor type and or home electronics accessories selected Wiring diagram for the standard OXIMO motor Attention Before connecting the motor make sure the power is disconnected a Blue Zero b Brown Phase S1 c Black Phase S...

Page 12: ...tock is positioned straight in the bushing and is not bent nor twisted Drill the holes Ø 3 2 mm and screw the cardan joint tightly to the mounting surface A A B A A B 1 2 Slide the foldable crank handle over the round part of the cardan joint and use the split pen to connect the two items Slide the locking bush over the pin Decide whether to position the crank handle clip on the window frame or on...

Page 13: ... covering plate to the roll up mechanism d Attach the tape to the relevant hook e Unlock the roll up spring f Secure everything in to the wall g Roll the shutter curtain upwards Attention Make sure there are always 2 full rounds of tape on the holder 5 9 Testing Test the shutter by running the curtain up and down several times If all is OK the work on the shutter can be finished A 1 1 A 2 1 Step b...

Page 14: ...10 20 14 INSTALLATION MANUAL MULTIFUNCTIONAL SURFACE MOUNTED ROLLER SHUTTER VR150 5 10 Finish Place the PVC caps on the holes of the guide rail and use mastic to finish off the box and the guide rails ...

Page 15: ...G IN 12 STEPS Number of persons 2 1 Remove the inspection cover Keep the shutter curtain rolled up Pull the mesh netting down halfway 2 Hold the bottom lath askew and remove it from the guide rails 3 Remove the bottom lath from the mesh netting While doing so hold the netting tight or it will veer into the box ...

Page 16: ...allow the mesh netting to carefully wind around the axle 5 Disconnect the shutter curtain from the axle Remove the little roller tube of the insect screen from its holders by pressing one of the buttons on the left or right A A 1 3 B 1 1 6 Remove the spring and the reverse side from the axle with the netting A 1 2 B 1 2 ...

Page 17: ... SHUTTER VR150 7 Insert this into the new axle with netting A 1 3 B 1 2 8 Tighten the spring using a key In most cases this is after 18 to 19 rotations Remove the key carefully so that the spring is not released it is released when the spring fitting is pressed A 1 1 5 ...

Page 18: ...pring ends back into the mesh netting holders Attention First the spring side When the spring is in place it will automatically release Take care to block the axle to prevent it from unwinding C C 1 2 E 1 1 10 Roll down 50 cm of the netting to make it easy to attach the bottom lath to the netting ...

Page 19: ...ld the bottom lath of the insect screen askew and insert it back into the guide rail 12 Replace the bottom lath and netting in the correct position in the guide rail and entry guide E E 1 1 Harol reserves the right to make any changes to the construction at all times without having to inform the client beforehand and therefore without having to adapt existing installations ...

Reviews: