background image

TV 40

TV 40

7

6

• 

Use genuine factory parts or parts with


equivalent characteristics, including


type, strength and material. Failure to


do so may result in product 


malfunction and possible injury to the


operator and/or others.

•  

If hardware is not secure, or if some of


the hardware is over-tightened,


equipment failure may result, posing


possible safety hazards.

•  

To prevent possible eye injury, always


wear SAFETY GLASSES while


operating equipment.

• 

Replace locknuts and locking screws if


you can tighten them without feeling


considerable resistance for several


turns before they are completely tight.


Replace them with factory authorized


parts or their equivalent.

Guards & Shields

• 

Keep all safety devices in place.

• 

Replace all worn, damaged, unusable,


missing or lost safety shields and


guards before operating the

 equipment.

• 

Keep the equipment in good operating

 condition.

Safety Decals

• 

If safety related or instructional decals


become illegible or are removed,


replace them immediately. New


decals may be obtained from your


local Harper Dealer.

• 

If you replace parts that have such


decals attached to them, make sure


the decals are replaced with current


versions, and are on the replacement


parts before the machine is operated

 again.

Equipment & Controls

• 

Read and understand this manual.

•  

Altering this equipment in any manner


which adversely affects its operation,


performance, durability, or use will


void the warranty and may cause


hazardous conditions.

• 

Know the location and function of all


controls and how to stop this


equipment quickly in an emergency


before you operate the equipment.

• 

Keep all nuts, bolts and screws tight to


help ensure safe operation of this

 equipment.

Towing

• 

If towing on the highway, tail lights and


turn signals must be attached before

 towing.

• 

Use a safety chain when towing.

• 

Make sure jack stand is up.

• 

Tire pressure should be 30-32 psi.

• 

Make sure lug nuts are tight.

• 

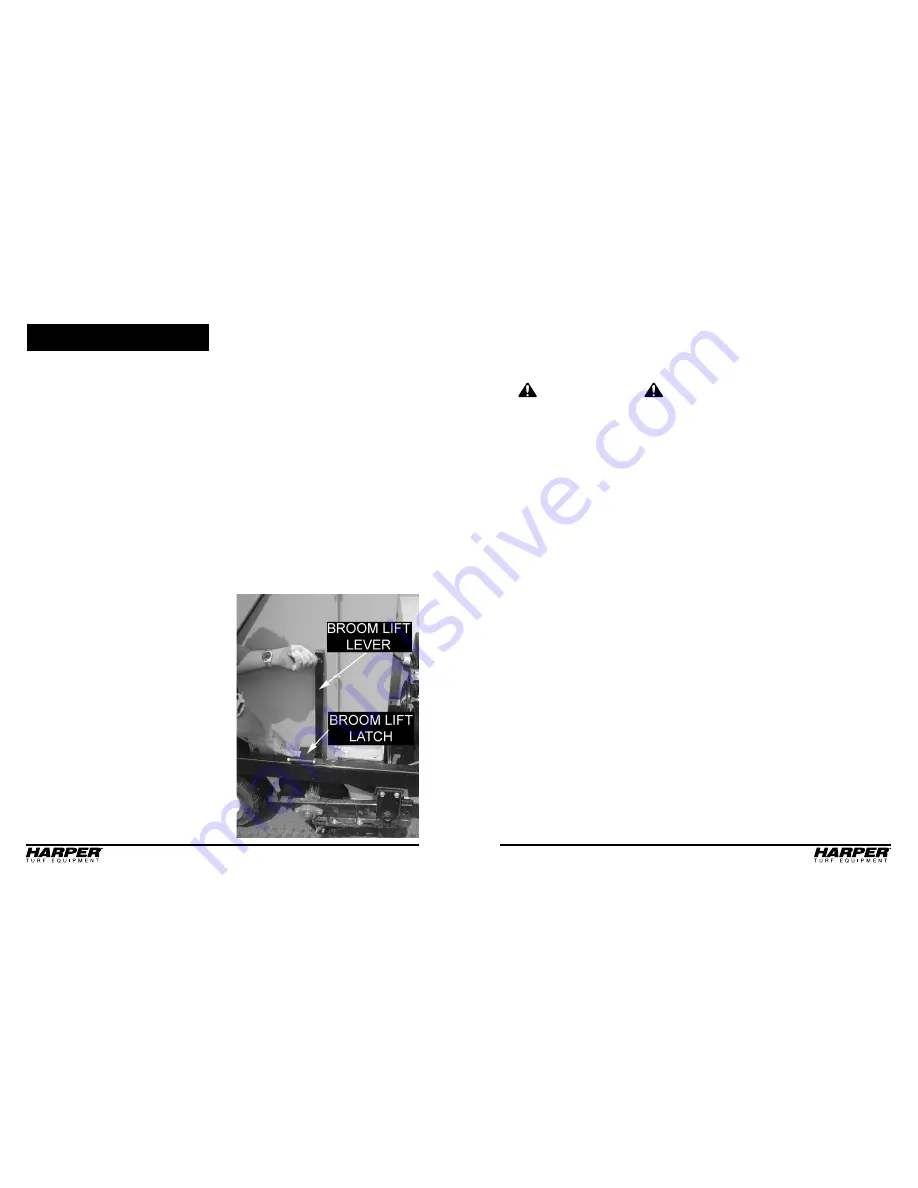
Broom should be locked up so that it


does not rub on the ground.

Safety Guidelines

Broom is locked up when the lift handle is

in the vertical position and the latch is in

place.

Hydraulics

SAFETY WARNING!

Escaping fluid under pressure can

penetrate skin causing serious injury.

To prevent serious injury or death:

• 

Relieve pressure on system before


repairing, adjusting or disconnecting.

• 

Wear proper hand and eye protection


when searching for leaks.

• 

Use wood or cardboard instead of


hands when looking for leaks.

• 

Keep all components in good repair.

• 

Do not use any type of heat, (welding,


soldering, cutting torch, etc) near


pressurized lines.

Before Operation

• 

Before operating this equipment, read


and understand the Owner’s Manual.

• 

Do not allow children to operate this

 machine.

• 

Tire pressure should be 30-32 psi.


Make sure both tires have equal

 pressure.

• 

Wear approved eye and ear protection


and other appropriate safety


equipment while operating the

 machine.

• 

Make sure bolts holding tongue are


secure and the jack is in the transport


position. Use a safety chain.

• 

Any change can damage moving parts  


and void the warranty.

• 

Before starting the machine, visually


inspect all nuts, bolts and other


fasteners to see that they are properly


secured. Nuts, bolts and other


fasteners should be checked every 8


to 10 hours of operation for proper


alignment and tightness.

• 

Replace damaged or missing safety

 decals.

• 

Replace locknuts and locking screws if


you can tighten them without feeling


considerable resistance for several


turns before they are completely tight.


Replace them with factory authorized


parts or their equivalent.

• 

Make sure that all bearings or hinging


parts are greased and or oiled


properly. (See Service & Maintenance


Section for more information)

Summary of Contents for Turbo Vac 40RH

Page 1: ...TV 40 Turbo Vac 40RH 3 2017 OPERATOR S PARTS MANUAL...

Page 2: ...you or others Whenever this symbol is used please pay very close attention to the information presented and make sure you fully understand If you do not contact your dealer or Harper Industries Inc f...

Page 3: ...purge port connection filters vapor hoses clamps control valves control solenoids electronic controls vacuum control diaphrams purge valves liquid vapor separator and other associated components Date...

Page 4: ...LOWER HOUSING JACK STAND BROOM DUMP CABLE TO TOW VEHICLE Safety Features Minimal dust generated quiet operation 90 dB Blower Drive Hydraulic motor powered by PTO pump Blower Fan 25 diameter abrasion r...

Page 5: ...nd turn signals must be attached before towing Use a safety chain when towing Make sure jack stand is up Tire pressure should be 30 32 psi Make sure lug nuts are tight Broom should be locked up so tha...

Page 6: ...ure that the Turbo Vac is adjusted to the correct height Refer to adjustment section for information on setting the height 3 Run the dump cable to the tow vehicle to allow for convenient dumping Attac...

Page 7: ...he hopper door latch should never be necessary If the hopper door won t latch or the hopper door does not seal against the hopper there are adjustments that can be made There are shims that bolt on wi...

Page 8: ...in operating position Always use the stop chain to suspend the brush during transport Contact your Harper Dealer for more infor mation about optional equipment or see the Harper Industries website at...

Page 9: ...ambient air temperatures of 32 F 110 F and it con tains a kinematic viscosity rating around 46 cSt at 40 C 1cSt 1mm s Mobil DTE 25 Mobil DTE 15M Amoco Rykon Premium Oil ISO 46 Chevron Rykon Premium Oi...

Page 10: ...e perform after first 50 hours of use Change hydraulic filter DewEze part 220559 100 Hour Service including previous items Clean cooling areas by removing cooling shrouds 250 Hour or Annually Service...

Page 11: ...an Liner Blower Housing Broom Hydraulic Res Valve and Drive Broom Wheels Broom Finger Reel Hopper Hopper Return Screen Hopper Door Latch Door Seal Assembly Frame and Decals Frame TV 40 Decals Optional...

Page 12: ...TV 40 TV 40 1 1...

Page 13: ...1 2 13 X 2 0 110419 4 BOLT 1 2 13 X 1 75 110444 4 BOLT 5 16 18 X 0 75 WIZ FLANGE 110588 6 NUT 1 2 13 WIZ FLANGE 110630 12 NUT 1 4 20 LOCK NYLON INSERT 110826 4 NUT 3 8 16 GR 5 410851 2 BEARING 4FNG 1...

Page 14: ...8 16 WIZ FLANGE 110673 4 WASHER 1 4 FLAT STANDARD 302060 1 SWIVEL GARDEN HOSE TO PIPE 302061 1 LOCKNUT 3 4 NPT 302062 1 PLUG GARDEN HOSE 970205 1 NOZZLE ACCESS COVER 970657 1 PANEL BLOWER FILLER 97068...

Page 15: ...LER BRACKET PART NUMBER QTY DESCRIPTION 915234 1 GEARBOX PUMP MNT 915235 1 FAN SHIELD WLDMNT 922050 1 VALVE FLOW CONTROL 30GPM 922108 1 PUMP 38cc X 7 8 BUCHER AP300 922109 1 HOSE 1 25 X 73 20 20FJX90M...

Page 16: ...4 1 LEFT BROOM ARM WLDMNT 975615 1 BROOM LIFT WLDMNT 975616 1 RIGHT BROOM ARM WLDMNT BRUSH ROTOR PART NUMBER 900229 973001 110219 910044 110641 942080 110535 973002 975616 975615 975614 942064 110126...

Page 17: ...302042 80 2 CLAMP RUBBER FINGER 970819 20 3 ROTOR FINGER RUBBER WELDMENT 975634 1 4 FINGER ROTOR PART NUMBER 900225 10 21 2013 110219 975623 910044 110534 110641 110671 110535 500231 942080 975616 97...

Page 18: ...oor Instruction Sheet 975629 975629 TV40 DOOR SEAL ASSEMBLY 4 3 Parts List DESCRIPTION QUANTITY PART THIMBLE WIRE ROPE 1 8 1 100621 CLIP WIRE ROPE 1 8 4 100622 WASHER 3 8 FLAT SAE 5 110155 BOLT 10 24...

Page 19: ...160 TIRE WHEEL ASSY 9 5 8 x 18 TURF 2 943051 MOUNT BELT GUARD 1 970722 HITCH ASSY WLDMNT 1 975601 BELT GUARD 1 975604 FRAME ASSY 1 975607 JACK STAND WLDMNT 1 975610 HUB ASSEMBLY 2 510235 HUB ASSEMBLY...

Page 20: ...1 ADAPTOR HOSE SWIVEL 910044 1 COVER VINYL 25 X 1 5 X 4 GRIP 970628 2 FLAP PIVOT BLOCK 970765 1 BRACKET NOZZLE SUPPORT 970768 1 CRADLE REAR HOSE 970769 1 HANGER NOZZLE HANDLE 970770 2 RING HOSE HANGE...

Page 21: ...L FROM BOTH SIDES 3 8 110400 110676 902112 110474 110667 970763 975128 110672 110612 970764 110420 970748 110435 120144 110639 110676 110672 110612 110610 975125 110553 110385 975127 110464 910044 110...

Reviews: