background image

Installation HL2 and HL4

General instructions and regulations

All local regulations including those referring to national and European standards must be observed when installing the appliance.

Ensure there is sufficient ventilation / air supply in the room from which your stove gets the combustion air. This is the room where the

stove is installed if you do not use a wall or stove-base air supply system.

The stove is not suitable for a shared flue system.

The appliance must be installed on a floor having sufficient bearing capacity.

Ensure adequate access for cleaning the appliance, the flue-gas connection and the chimney.

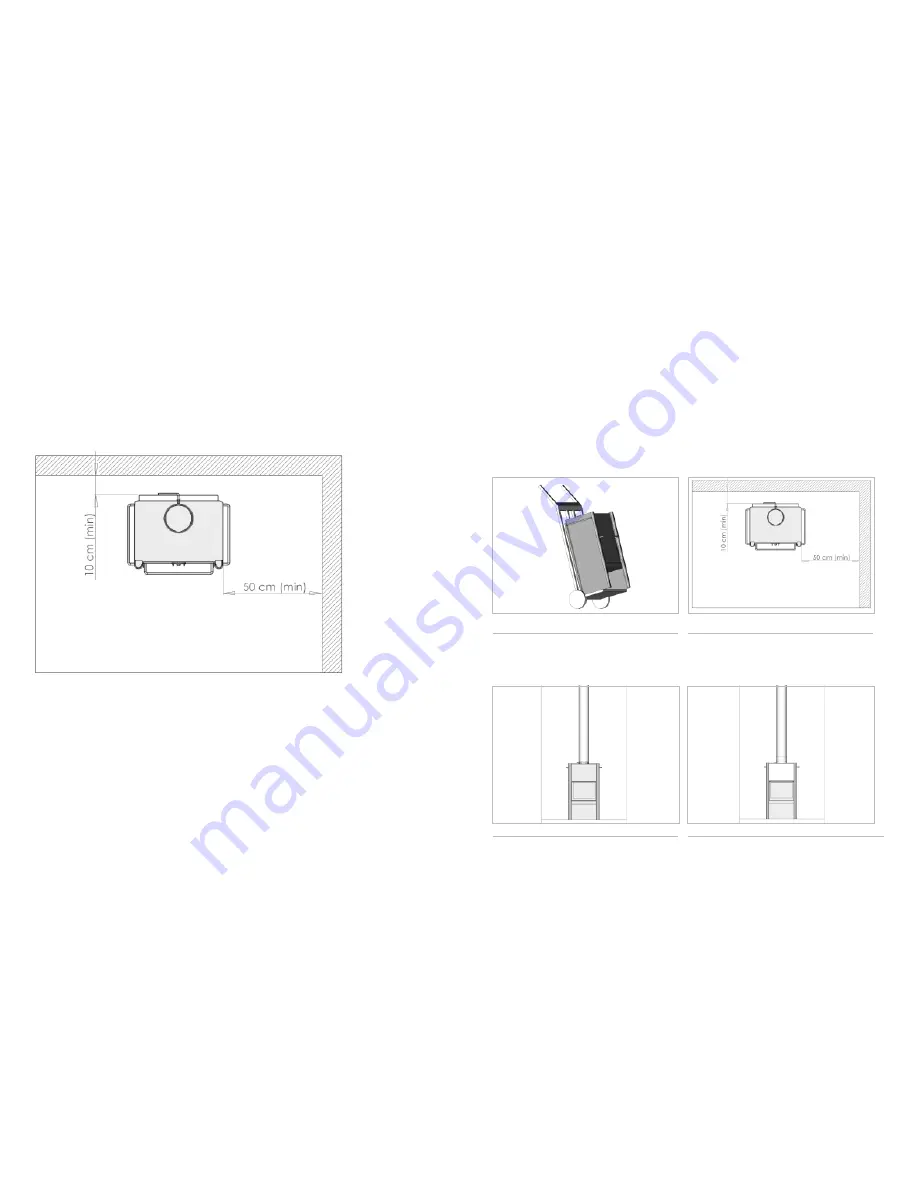
When installing the stove, take into account the minimum distances from the wall so as to avoid any fire risk. 

The minimum distances are shown in the figure below.

Specifications HL 2

• Nominal power of the stove = 7,0 kWatt.

• Flue gas mass flow = 7,2 g/s

• Appliance weight = 85 kg

• Minimum chimney draught = 8,0 Pa

• Flue gas temperature directly over the stove = 316 °C

Specifications HL 4

• Nominal power of the stove = 10,0 kWatt.

• Flue gas mass flow = 7,7 g/s

• Appliance weight = 140 kg

• Minimum chimney draught = 8,0 Pa

• Flue gas temperature directly over the stove = 221 °C

2. Positioning

Place the stove at the position desired, its back at least 10 cm 

from the wall and the side at least 50 cm.

If the wall consists of flammable material, allow for 25 and 

100 cm, respectively. 

3.  Connecting the pipe

Make the pipe to size and connect it using the appropriate 

fastening materials.  

Top-connected stove pipe: Leavc a 50 mm gap between the 

underside of the pipe and the upper side of the connection ring

of the stove.

The figure shows the top-connected stove pipe. This also 

applies to the rear-connected stove pipe.

4.  Clamping the pipe

Fix the clamping strip 

1. Moving the stove

Place the stove with its back against the hand truck.

Move the stove on the hand truck to the place of installation 

desired.

General instructions and directions

• The installation of the HL2 or HL4 must be carried out by a skilled person employed by a dealer recognized by Harrie Leenders

Haardkachels.

• The casing parts are susceptible to scratching. Handle them gently.

• After the stove has been properly installed, burn some kindling wood to check the draught.

Safety recommendations

• Glass tends to break easily, and broken glass is quite sharp. Take therefore adequate safety precautions.

• For general safety, we refer to guidelines or regulations issued by a relevant official body.

Materials and tools required

• Handtruck

•   Wall plugs and screws (when using a ceiling or wall plate)

• Spirit level 

•   Single-walled pipe and accessories (including fasteners)

• Screwdriver

•   Clamping strip

30

31

Summary of Contents for HL2

Page 1: ...Handleiding Installatie instructie Manual Installation instruction Manuel Instruction d installation Anleitung Montageanleitung Manuale Istruzione di montaggio NL HL2 HL4 GB F D I www leenders nl...

Page 2: ...nstallation Anleitung Montageanleitung Manuale Istruzione di montaggio 2 12 17 22 7 28 32 34 36 30 1 Beluchtingsschuif Aeration slide Verrou de l arriv e d air primaire Bel ftungsschieber Presa d aria...

Page 3: ...ming zijn met de bepalingen van de hierna genoemde EU richtlijnen wanneer ge nstalleerd volgens de installatie instructies zoals vervat in de productdocumentatie EN 13240 2001 A2 2004 Lokale verwarmin...

Page 4: ...e kracht van vuur Eigenlijk is er maar weinig bestand tegen een echt heet vuur Ook uw haard kan door oververhitting beschadigen Om dat te voorkomen mag in uw haard niet meer dan 3 kg droog hout tegeli...

Page 5: ...el Product Roomheaters fired by solid fuels as covered under the scope of this standard intended use Space heating in residential buildings Characteristics Report Fire safety 50970 01 Emission of comb...

Page 6: ...that way because the thin layer of rust is both highly decorative and protects the panels against further corrosion The basic module with a single compartment can handle 1 3 cubic meters of wood This...

Page 7: ...ve can also be damaged by overheating Just to prevent this take account of not burning more than 3 kilograms of wood at the same time 3 Kilograms is approximately equal to 3 massif logs oak with 15 mo...

Page 8: ...e lors du d marrage Vous ne pouvez temp rer un feu qu partir du moment que celui ci soit arriv bonne temp rature 3 Veillez un apport suffisant en air frais Comme la plupart des maison dites modernes s...

Page 9: ...t le verrou d arriv e d air primaire vers la gauche remettez le clapet d tranglement en position l g rement ferm e Vous r glez ainsi le tirage dans le po le Si la chambre de combustion est remplie de...

Page 10: ...ung von gef hrlichen Stoffen 50970 01 Oberfl chentemperatur 50970 01 Mechanischer Widerstand um einen Schornstein Rauchkanal zu tragen 50970 01 Thermische Nutzleistung Energieertrag 50970 01 Beschreib...

Page 11: ...r und der Rost sind aus rostgesch tztem verzinktem Stahl Die Corten Stahl der Seitenplatten erh lt nach einiger Zeit eine d nne Oxidationsschicht Das geh rt dazu weil die winzige Rostschicht ist nicht...

Page 12: ...ves Heizen besch digen Das vor zu beugen darf in ihrem Ofen nicht mehr als 3 Kilogramm trockenes Holz gleichzeitig verbrennt werden 3 Kilogramm ist etwa da gleiche wie 3 massive Holzscheite Eichholz m...

Page 13: ...cartone per esempio La legna umida necessita di molta pi energia perch parte del calore servir per togliere l umidit tende inoltre a lasciare depositi sul vetro e crea fuliggine nei tubi di uscita fum...

Page 14: ...ne un fuoco che brucia lentamente in questo modo chiudendo un po la saracinesca di ventilazione spostare a sinistra chiudendo un po la valvola di strozza mento In questo modo regola il tiraggio nella...

Page 15: ...sso grafitico o grasso al rame Rivolgersi al proprio rivenditore di fiducia Il vetro pu annerirsi nel caso in cui si utilizzi legna non secca oppure nel caso in cui ci sia un apporto insufficiente di...

Page 16: ...et toestel moet worden geplaatst op een vloer met voldoende draagkracht Zorg voor voldoende toegang voor het reinigen van het toestel de rookgasaansluiting en de schoorsteen Houdt bij plaatsing van de...

Page 17: ...sired its back at least 10 cm from the wall and the side at least 50 cm If the wall consists of flammable material allow for 25 and 100 cm respectively 3 Connecting the pipe Make the pipe to size and...

Page 18: ...et 50 cm du mur lat ral Si le mur est constitu d un mat riau combustible observez une distance minimale respective de 25 et 100 cm 3 Raccordement R alisez le mat riel d vacuation sur mesure et fixez...

Page 19: ...f die gew nschte Position mindestens 10 cm von der Wand auf der R ckseite und 50 cm seitlich entfernt F r den Fall dass die Wand aus brennbarem Material besteht 25 bzw 100 cm Abstand halten 3 Anschlus...

Page 20: ...namento Posizionare la stufa nel luogo desiderato ad un minimo di 10 cm di distanza dal muro nella parte posteriore e a 50 cm di lato Quando la parete fatta di materiale infiammabile mantenere rispett...

Page 21: ...www leenders nl Harrie Leenders Haardkachels Industrieweg 25 5688 DP Oirschot The Netherlands Tel 31 0 499 572710 Fax 31 0 499 573714 info leenders nl HL2 HL4 h manu INT 05 2007...

Reviews: