background image

52   I

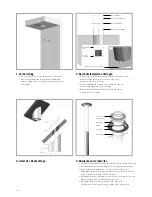
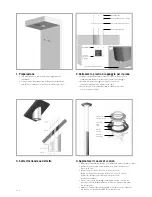
9. Montare il tubo ornamentale e la colonna


•  Fare scorrere il più possibile verso l’alto il tubo ornamentale (con le fessure 


  verso l’alto) e la colonna facendoli passare sopra il canale di scarico 


  (fare scorrere il tubo ornamentale sopra il cordone ed inserirlo nel 


  coperchio di finitura).


•  Fare scorrere anche l’anello di montaggio sulla colonna facendolo passare  


  sopra lo scarico tendendolo il più possibile e serrare utilizzando i 3 bulloni 


  M8 x 20 (utilizzare la chiave a forchetta o fissa a tubo con apertura 13). 


•  Attenzione: i bulloni esagonali lunghi (M8 x 120) devono essere situati sul 


  lato inferiore e le tre viti corte (M8 x 20) sul lato superiore.


•  Serrare correttamente i bulloni!

coperchio di 

finitura

tubo 

ornamentale

colonna

anello di 
montaggio

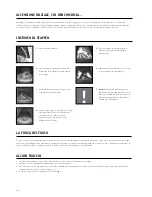
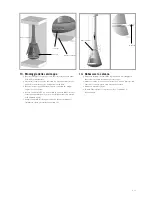
10.  Approntare la stufa


•  Portare il telaio premontato al luogo di installazione utilizzando un carrello 


  a mano.


•  Rimuovere il supporto di scarico dall’elevatore Pharos. 


•  Inserire gli elementi scorrevoli sotto l’elevatore.


•  Collocare il telaio premontato sull’elevatore Pharos (l’elevatore dovrà  


  trovarsi in posizione di massimo abbassamento).


•  Fare scorrere l’elevatore con il telaio diritto sotto il canale di scarico, con  


  l’apertura per accendere il fuoco sul lato anteriore.

12.  Montare la piastra otturatrice


•  Agganciare la maniglia per la piastra otturatrice all’apposito occhio. 


•  Fissare la maniglia alla piastra utilizzando il bullone M6 x 20 


  con un anello M6 ad ambo i lati.


•  Avvitare un dado autobloccante M6 al bullone (con l’ausilio della chiave  


  fissa a tubo o a forchetta con apertura 10).


•  Controllare il funzionamento della piastra otturatrice.

11.  Appendere la stufa


•  Fare in modo che il giunto saldato nel canale di scarico venga a 


  trovarsi sul lato destro e l’apertura per il fuoco della stufa in avanti.


•  Sollevare il telaio con l’elevatore in modo da scorrere sopra il canale 


  di scarico.


•  Fissare il telaio al canale di scarico utilizzando i 3 bulloni M8x20 (con 


  l’ausilio della chiave fissa a tubo o a forchetta con apertura 13).

Giunto 
saldato a 
destra

M8x20

Bullone

+anelli
+dado

maniglia per 
la piastra

occhio

Summary of Contents for PHAROS INTERIOR

Page 1: ...Handleiding Installatie instructie Manual Installation instruction Manuel Instruction d installation Anleitung Montageanleitung Manuale Istruzione di montaggio NL GB F D I Pharos Interior...

Page 2: ......

Page 3: ...8 le contenu Parties du Pharos Interior 2 Mesures d carts standard 3 Recommandations g n rales 24 Manuel 25 Instructions d installation 28 Inhalt Teile des Pharos Interior 2 Anschlu ma e Holz 3 Vorsch...

Page 4: ...LA Pharos interior 1 Convectiesleuven Convection slots Fentes de convection Konvektionsschlitze Fessure di convezione 2 Glasraam Glass window Vitre Glasfenster Vetro 3 Bedieningsklep Control flap Clap...

Page 5: ...3 Maatschetsen in mm Connection sizes in mm Mesures d carts standard en mm AnschluSSmaSSe Holz in Mm Misure per l allacciamento in mm 365 1560 90 min 340 355 390 740 415 310 205 140 230 515 min 2300...

Page 6: ...schoorsteen na een brand eerst wordt geveegd en ge nspecteerd op beschadiging en lekkage Service Het is niet toegestaan modificaties te verrichten aan het toestel zonder autorisatie van de fabrikant M...

Page 7: ...aanslag op het glas en vervuilt het rookkanaal 2 Zorg altijd voor voldoende verse lucht De huidige woningen zijn vaak kierdicht gemaakt Een roostertje of klapraampje openen zorgt voor voldoende verse...

Page 8: ...eller nog geen vlammetje gezien Het betekent dat u zelf gaat zorgen voor die eerste kilometers De keramische vuurstenen zullen vocht gaan verdampen en uw haardkachel gaat zich zetten Stook daarom de e...

Page 9: ...ijn dan is het nodig de steen te vervangen neem contact op met uw leverancier Het glas Lichte aanslag Met keukenpapier en vervolgens met een vochtige doek de lichte aanslag verwijderen Geef het glas d...

Page 10: ...een vloer met voldoende draagkracht Zorg voor voldoende toegang voor het reinigen van het toestel de rookgasaansluiting en de schoorsteen Houdt bij plaatsing van de haard rekening met de minimale afst...

Page 11: ...rd bevinden zoals spuitbus verpakkingsmateriaal en dergelijke Bevestigingsmaterialen 4x Draadstang M8 L 1000 4x Carrosseriering M8 7x bout M8x20 buit zesk 5x bout M6x20 binn zesk 3x bout M4x8 kruiskop...

Page 12: ...oef deze vast m b v de 3 bouten M8x20 dop of steeksleutel S W 13 Let op De beide lange zeskantbouten M8x120 aan de onderkant van de montage ring houden en de drie korte schroeven M8x20 aan de bovenkan...

Page 13: ...oersteun aan de Pharos lift de lift moet in de laagste stand staan Pijl het hart uit van de afvoer op de afvoersteun schietlood Plaats de afvoer op de afvoersteun Krik de afvoer omhoog m b v de Pharos...

Page 14: ...rvoor dat de lasnaad in het afvoerkanaal rechts zit en de vuuropening in de haard naar voren Lift het frame zodat het over het afvoerkanaal schuift Bevestig het frame aan het afvoerkanaal m b v 3 bout...

Page 15: ...Plaats beide schaaldelen met de hollingen op de punten van de stelschroeven Let op de schaaldelen zijn genummerd m b v slagletters de slagletters moeten aan de voorzijde zitten van de haard Plaats de...

Page 16: ...sh the fire Ensure that after a fire the chimney is first swept and inspected for any damage and leaks Service It is not allowed to make any modifications to the appliance without prior authorization...

Page 17: ...fuels only the moisture content of firewood should not be more than 15 So this also holds for the kindling paper and cardboard Wet fuel costs more energy leaves moisture on the glass and soils the flu...

Page 18: ...This means you are going to take care of the initial miles The ceramic firebricks will start evaporating moisture and your woodburning stove will start setting For this reason the first few times do...

Page 19: ...hind them Should this be the case however then it will be necessary to replace the brick contact your supplier The glass Use paper towel and then remove the light moisture using a damp cloth Exert som...

Page 20: ...ess for cleaning the appliance the flue gas connection and the chimney When installing the stove take into account the minimum distances from the wall so as to avoid any fire risk The minimum distance...

Page 21: ...as a spray can packing material or the like Materials required 4x Treaded rod M8 L 1000 4x Bodywork ring M8 7x Bolt M8x20 Hex wrench 5x Bolt M6x20 Hex wrench 3x Bolt M4x8 Crosshead 1x Nut M6 8x Nut M...

Page 22: ...ith the 3 M8x20 bolts socket or open end spanner j w 13 Note Place the mounting ring so that the long hexagon head bolts M8 x120 are at the lower part and the three short screws M8 x20 at the upper pa...

Page 23: ...the Pharos lifting jack the lifting jack must be in its lowermost position Determine the centre of the pipe on the stove pipe support plumb line Place the stove pipe on the stove pipe support Jack the...

Page 24: ...lded seam in the stove pipe is on the right hand side and the fire opening on the front side Jack the frame up until it fits over the stove pipe Fasten the frame to the stove pipe with 3 M8x20 bolts s...

Page 25: ...parts with the hollows on the points of the positioning screws Note The shell parts bear stamped numbers the stamped numbers must be on the front side of the stove Place the bottom shell on the Pharos...

Page 26: ...le feu Apr s un feu de chemin e faites proc der au ramonage et l inspection de la chemin e d g ts fuites Service Il est interdit d apporter des modifications l appareil sans l autorisation du fabrica...

Page 27: ...d nergie il vous no rcit la vitre rapidement et encrasse votre conduit plus rapidement 2 Veillez un apport suffisant en air frais Comme la plupart des maison dites modernes sont tr s bien isol es une...

Page 28: ...emin e et vous le d but d une longue aventure Vous venez d acqu rir un po le chemin e tout neuf sorti de fabrication avec son compteur z ro et sans jamais avoir vu la moindre flamme encore Ceci signif...

Page 29: ...ier n c ssiterai aussit t le remplacement de la ou les pierres Le verre en vitro c ramique D p ts l gers Nettoyage de la vitre avec de l essui tout puis avec un chiffon mi humide essuyez sans frotter...

Page 30: ...age de l appareil du conduit de fum e et de la chemin e Lors du placement tenez compte des distances minimales par rapport au mur risque d incendie Les distances minimales sont repr sent es dans la fi...

Page 31: ...d flecteur en fibre rigide et du d flecteur en acier Mat riaux 4x Tige filet e M8 L 1000 4x Anneau de carrosserie M8 7x Boulon M8x20 Cl allen 5x Boulon M6x20 Cl allen 3x Boulon M4x8 crusiforme 1x cro...

Page 32: ...de montage contre la plaque de roulement et fixez le l aide des 3 boulons M8x20 cl douille ou cl plate surplat 13 Attention Les boulons t te hexagonale longs M8 x 120 en bas et les trois boulons court...

Page 33: ...ement Poussez le support pour le conduit de fum e sur le cric Pharos le cric doit tre dans la position la plus basse D terminez le centre du conduit de fum e sur le support du conduit Placez le condui...

Page 34: ...i re ce que la soudure du conduit de fum e se trouve droite et que l ouverture du foyer soit devant Levez le ch ssis avec le cric de mani re le glisser sur le conduit de fum e Fixez le ch ssis au cond...

Page 35: ...inf rieure Placez les demi enveloppes avec les creux sur les pointes des vis de positionnement Attention Les demi enveloppes portent des num ros frapp s les num ros frapp s doivent tre situ s sur le d...

Page 36: ...euers benutzen Daf r sorgen dass der Schornstein nach einem Brand zuerst gefegt und auf Besch digung und Leckage inspiziert wird Service Es ist nicht erlaubt ohne Zustimmung des Herstellers nderungen...

Page 37: ...nstoffe verwenden Holzfeuchtigkeitsgehalt vorzugsweise maximal 15 Das trifft also auch auf das Anz ndpapier und die Pappe zu Nasser Brennstoff kostet mehr Energie gibt Beschlag auf der Scheibe und bes...

Page 38: ...edeutet da Sie jetzt selbst f r die ersten Kilometer sorgen werden Aus den keramischen Steinen wird Feuchtigkeit verdunsten und Ihr Ofen wird sich setzen Heizen Sie deshalb die ersten paarmal nicht zu...

Page 39: ...uwechseln Nehmen Sie dazu Kontakt auf mit Ihren Lieferanten Die Glasscheibe Leichter Beschlag Mit Allzwecktuch und danach mit einem feuchten Tuch den leichten Beschlag entfernen Geben Sie dem Glas ein...

Page 40: ...nden Zugang zum Reinigen des Ger ts des Rauchgasanschlusses und des Schornsteins sorgen Bei Aufstellung des Ofens in Zusammenhang mit der Brandgefahr die Mindestabst nde zur Wand beachten Die Mindesta...

Page 41: ...fibre rigide et du d flecteur en acier Ben tigtes Material 4x Gewindestange M8 L 1000 4x Karosseriering M8 7x Bolz M8x20 Inbusschl ssel 5x Bolz M6x20 Inbusschl ssel 3x Bolz M4x8 Kreuzschlitz 1x Mutte...

Page 42: ...n und diesen mit Hilfe der 3 Bolzen M8x20 befestigen Steck oder Gabelschl ssel S w 13 Achtung Die langen Sechskantschrauben M8 x 120 an der Unterseite und die drei kurzen Schrauben M8 x 20 an der Ober...

Page 43: ...Abzugsst tze an den Pharos Heber schieben Der Heber mu in der untersten Stellung stehen Die Mitte des Abzugs auf die Abzugsst tze ausrichten Senkblei Den Abzug auf die Anzugsst tze stellen Den Abzug m...

Page 44: ...ernen Die Gleitst cke unter den Heber stellen Den vormontierten Rahmen auf den Pharos Heber bringen daf r sorgen da der Heber in der untersten Stellung steht Den Heber mit Rahmen gerade unter den Abzu...

Page 45: ...ile anbringen Die beiden Schalenteile mit den H hlungen auf die Punkte der Stellschrauben stellen Achtung die Schalenteile sind mit Pr genummern versehen Die Pr genummern m ssen sich an der Vorderseit...

Page 46: ...alcun motivo dell acqua per spegnere il fuoco Dopo un incendio fare spazzare e ispezionare la canna fumaria per escludere la presenza di danni e perdite Assistenza vietato apportare modifiche all app...

Page 47: ...minetto Questo vale anche per eventuali altri materiali che utilizzerete per l accensione carta o cartone per esempio La legna umida necessita di molta pi energia perch parte del calore servir per tog...

Page 48: ...i accesa prima d ora Questo significa che dovrete accompagnarla nei suoi primi passi Le mattonelle ceramiche interne cominceranno a liberare umidit e la stufa comincer ad assestarsi Ecco perch primord...

Page 49: ...e metallica posteriore In questo caso sar necessario cambiare il refrattario contattate il vostro rivenditore Vetro Lieve umidit Rimuovetela con carta assorbente ed uno straccio umido Esercitate una l...

Page 50: ...ordo per lo scarico dei gas di combustione e della canna fumaria Nel posizionare la stufa tenere conto delle distanze minime dal muro per il pericolo di incendio Le distanze minime sono specificate ne...

Page 51: ...tata M8 L 1000 4x Un anello M8 ad ambo i lati 7x Bulloni M8x20 Chiave esagonale 5x Bulloni M6x20 Chiave esagonale 3x Bulloni M4x8 Giraviti a croce 1x Anelli M6 8x Anelli M8 1x Bulloni M6x75 Chiave esa...

Page 52: ...ilio dei 3 bulloni M8x20 utilizzare la chiave a forchetta o fissa a tubo con apertura 13 Attenzione i bulloni esagonali lunghi M8 x 120 devono essere situati sul lato inferiore e le tre viti corte M8...

Page 53: ...a sulla piastra da sfere Avvicinare il supporto di scarico all elevatore Pharos l elevatore dovr trovarsi in posizione di massimo abbassamento Tracciare il centro dello scarico sul supporto di scarico...

Page 54: ...i elementi scorrevoli sotto l elevatore Collocare il telaio premontato sull elevatore Pharos l elevatore dovr trovarsi in posizione di massimo abbassamento Fare scorrere l elevatore con il telaio diri...

Page 55: ...e semicoppe con le superficie concave sulle punte delle viti di posizionamento Attenzione le semicoppe sono numerate con dei numeri impressi tali numeri devono trovarsi presso il lato anteriore della...

Page 56: ...enders nl www leenders nl Ge nstalleerd door Installed by Install par Installiert von Installata da Medewerker van Employee of Collaborateur de Mitarbeiter von Dipendente di Datum Date Date Datum Data...

Reviews: