MM-015371-001, Rev. C
47
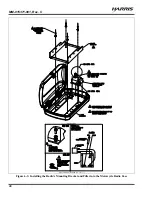
350A1396G1. As shown in Figure 5-3, position it so the two positive (+) studs are nearest the square
hole in the floor, and the ground stud is furthest from the hole. Tighten the screws securely.
CAUTION
Any DC input power provided to the radio shall be no higher or lower than
13.6 volts DC
10%. The DC input power should be free and clear of any AC noise or
DC spikes above 18 volts. If the vehicle cannot meet these requirements, then DC
conditioning will be required before any DC is connected to the radio. This includes
conditioning for both the radio’s main DC power input lead and for its switched ignition
sense power input. DC conditioning can be accomplished by a noise filter or DC
isolation equipment such as Harris part number FL-018314-001 or FL-018314-002, or
similar units equal specifications. Fusing must be placed in-line before any noise filter.
Contact TAC for additional information.
10.1.3
DC Power Cable and Main Fuse Holder Installation
The radio’s DC Power Cable has a 3-pin connector, a 20-foot red wire (for the main power connection), a
20-foot white wire (not connected), and a 4-foot black wire (for the ground connection). It is supplied
with waterproof fuse holders, two AGC-type fuses, and ring terminals. The following installation
procedures are recommended:
10.1.3.1 Black Wire Connection (Ground Wire)
1.
Connect the radio’s DC Power Cable to the radio by mating its 3-pin connector to the radio’s 3-pin
power cable connector as follows: Visually align the key and firmly push and turn the outer locking
ring clockwise until it stops. A click will be sensed to confirm proper mating.
CAUTION
Do not confuse the radio’s DC Power Cable which has a 10-AWG red wire with the
control head’s DC Power Cable which has a 12-AWG red wire. The radio requires
much more DC operating current than the control head. Therefore, it requires the
larger wire size of 10-AWG.
The part number of the radio’s DC Power Cable is
CA-012365-001.
2.
Cut the white wire approximately three (3) inches from the cable’s connector, and insulate its end
using an approved method.
3.
Route the cable’s black wire from the connector at the rear of the radio to the Alternator Whine
Reject Filter near the square hole in the bottom floor of the radio case. Leaving a service loop at the
rear of the radio, cut this wire to a length long enough to reach the ground stud on the filter. Save the
excess-length black wire to make the ground connection near the battery.
4.
Strip approximately ¼-inch of insulation from both the end of the black wire from the cable connector
and one end of the excess-length black wire, then crimp a #8-stud ring terminal (has yellow
insulation) to each stripped wire end. These ring terminals are included with the Motorcycle
Installation Kit.
5.
Remove the nut from filter’s ground stud (stud labeled “
NEG
”) and attach both ring terminals to this
stud. Reinstall the nut. It is not necessary to tighten the nut at this time, since a control head ground
wire will be added to this stud in a later procedure.
6.
Route the excess-length black wire out of the square hole in the bottom floor of the radio case.
7.
Prepare to connect this end of the black wire to vehicle ground by locating an area of metal within
approximately two (2) feet of the radio, and drilling a hole in it if necessary. This surface
must
have a
solid and stable connection to vehicle ground. If a new hole must be drilled, it should
not
be in a

