7 – English
OPERATION
NOTICE:
Before each use, inspect the entire product for damaged,
missing, or loose parts such as screws, nuts, bolts, caps,
etc. Tighten securely all fasteners and caps and do not
operate this product until all missing or damaged parts
are replaced. Please contact customer service or an
authorized service center for assistance.
APPLICATIONS
You may use this product for the purpose listed below:
Trimming grass and weeds from around porches, fences,
and decks
WARNING:
Always remove the battery pack and keep hands clear
of the lock-out button and switch trigger when carrying,
transporting, assembling parts, making adjustments,
cleaning, or when not in use. Following these instructions
will prevent accidental starting that could cause serious
personal injury.
WARNING:
Make sure the latch on the battery pack snaps in place
and the battery pack is fully seated and secure in the
trimmer battery port before beginning operation. Failure
to securely seat the battery pack could cause the battery
pack to fall out, resulting in serious personal injury.
INSTALLING/REMOVING THE BATTERY PACK
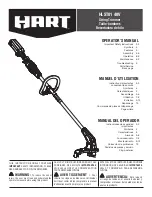
See Figure 7.
Insert the battery pack into the product as shown.
Make sure the latch on the battery pack snaps into
place and the battery pack is secured before beginning
operation.
Depress the latch and pull to remove the battery pack.
For complete charging instructions, see the operator’s
manuals for your battery pack and charger.
STARTING/STOPPING THE TRIMMER
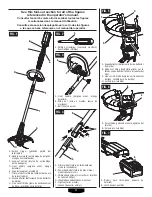
See Figure 8.
To start:
Press and hold the lock-out.
Depress the switch trigger.
To stop:
Release the switch trigger to stop the motor.
Upon release of the switch trigger, the lock-out will
automatically reset to the locked position.
OPERATING THE TRIMMER
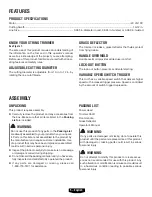
See Figure 9.
Hold the trimmer with your right hand on the rear handle
and your left hand on the front handle.
Keep a firm grip with both hands while in operation.
Trimmer should be held at a comfortable position with
the rear handle about hip height.
Cut tall grass from the top down. This will prevent grass
from wrapping around the boom housing and string head
which may cause damage from overheating.
If grass becomes wrapped around the string head:
Remove the battery pack.
Remove the grass.
WARNING:
Always hold the string trimmer away from the body
keeping clearance between the body and the string
trimmer. Any contact with the string trimmer cutting head
while operating can result in serious personal injury.
CUTTING TIPS
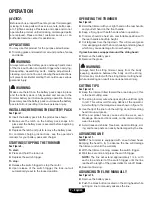
See Figure 10.
Keep the trimmer tilted toward the area being cut; this
is the best cutting area.
The string trimmer cuts when passing the unit from right
to left. This will avoid throwing debris at the operator.
Avoid cutting in the dangerous area shown in figure 10.
Use the tip of the line to do the cutting; do not force string
head into uncut grass.
Wire and picket fences cause extra line wear, even
breakage. Stone and brick walls, curbs, and wood may
wear line rapidly.
Avoid trees and shrubs. Tree bark, wood moldings, sid
-
ing, and fence posts can easily be damaged by the line.
ADVANCING LINE
See Figure 11.
NOTE:
The trimmer is equipped with an auto-feed head.
Bumping the head to try to advance the line will damage
the trimmer and void the warranty.
With the trimmer running, release the switch trigger.
Wait two seconds, and press the switch trigger.
NOTE:
The line will extend approximately 1/4 in. with
each stop and start of the switch trigger until the line
reaches the length of the grass deflector cut-off blade.
Resume trimming.
ADVANCING THE LINE MANUALLY
See Figure 12.
Remove the battery pack.
Push the black button located on the string head while
pulling on line to manually advance the line.

