6 – English
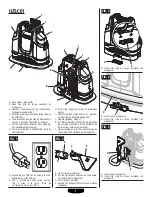
NOTE: ILLUSTRATIONS START ON PAGE 7
AFTER FRENCH AND SPANISH LANGUAGE SECTIONS.
MAINTENANCE
WARNING:
When servicing, use only identical replacement parts.
Use of any other parts could create a hazard or cause
product damage.
WARNING:
Any other servicing should be performed by an
authorized service representative.
GENERAL MAINTENANCE
Avoid using solvents when cleaning plastic parts. Most
plastics are susceptible to damage from various types of
commercial solvents and may be damaged by their use. Use
clean cloths to remove dirt, dust, oil, grease, etc.
WARNING:
Do not at any time let brake fluids, gasoline, petroleum-
based products, penetrating oils, etc., come in contact
with plastic parts. Chemicals can damage, weaken or
destroy plastic which could result in serious personal
injury.
WARNING:
Motor is equipped with bearings which contain
sufficient lubrication for its lifetime. The addition of
lubrication could cause damage. Do not add lubricant
to motor.
CLEANING AND STORING THE SPOT
CLEANER
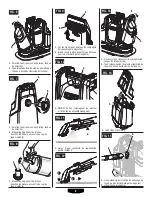
See Figures 13 - 15, page 8.
Unplug the spot cleaner.
Depress the tank release button above the recovery tank.
NOTE:
The recovery tank is on the opposite side of the
appliance as the cord wrap.
Lift the tank up and away from the spot cleaner.
Unlock the latch on the back of the tank and remove the
lid.
Separate the upper and lower halves of the tank.
Empty the recovery tank.
Place the lid back on the recovery tank and secure using
the latch.
Lower the bottom of the recovery tank onto the spot
cleaner at an angle and then push the top of the tank
toward the spot cleaner until the release button clicks
into place.
Remove the solution tank as described earlier in the
manual.
Unscrew the measuring cap and add warm water to the
“self clean fill line”.
Replace the measuring cap and reattach the solution
tank.
Remove the hose and pet tool from the storage clips.
Depress the tab on the pet tool and remove it from the
hose.
Place the hose end inside of the cleaning port.
Plug the spot cleaner into an AC power supply.
Press the on/off button to start the spot cleaner.
Allow the spot cleaner to run for 5-10 seconds.
NOTE:
As the spot cleaner is running, clean water is
flushed through the hose and into the recovery tank.
Press the on/off button to stop the spot cleaner.
Repeat as needed until the hose is cleaned.
Unplug the spot cleaner.
Secure the power cord around the cord wrap.
Remove the hose from the cleaning port.
Remove and empty the recovery tank.
Clean recovery tank, pet tool, and brush insert.
NOTE:
Warm water and mild soap can be used to clean.
Make sure all parts are dry before reassembly.
Store indoors in a place that is inaccessible to children.
Keep away from corrosive agents.
Summary of Contents for HZSC01
Page 19: ...9 9 NOTES NOTAS ...


