- 4 -
THC1 Kits Installation Guide
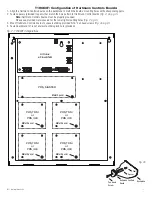
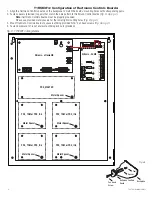
T1HCK3F4: Configuration of Hartmann Controls Boards:
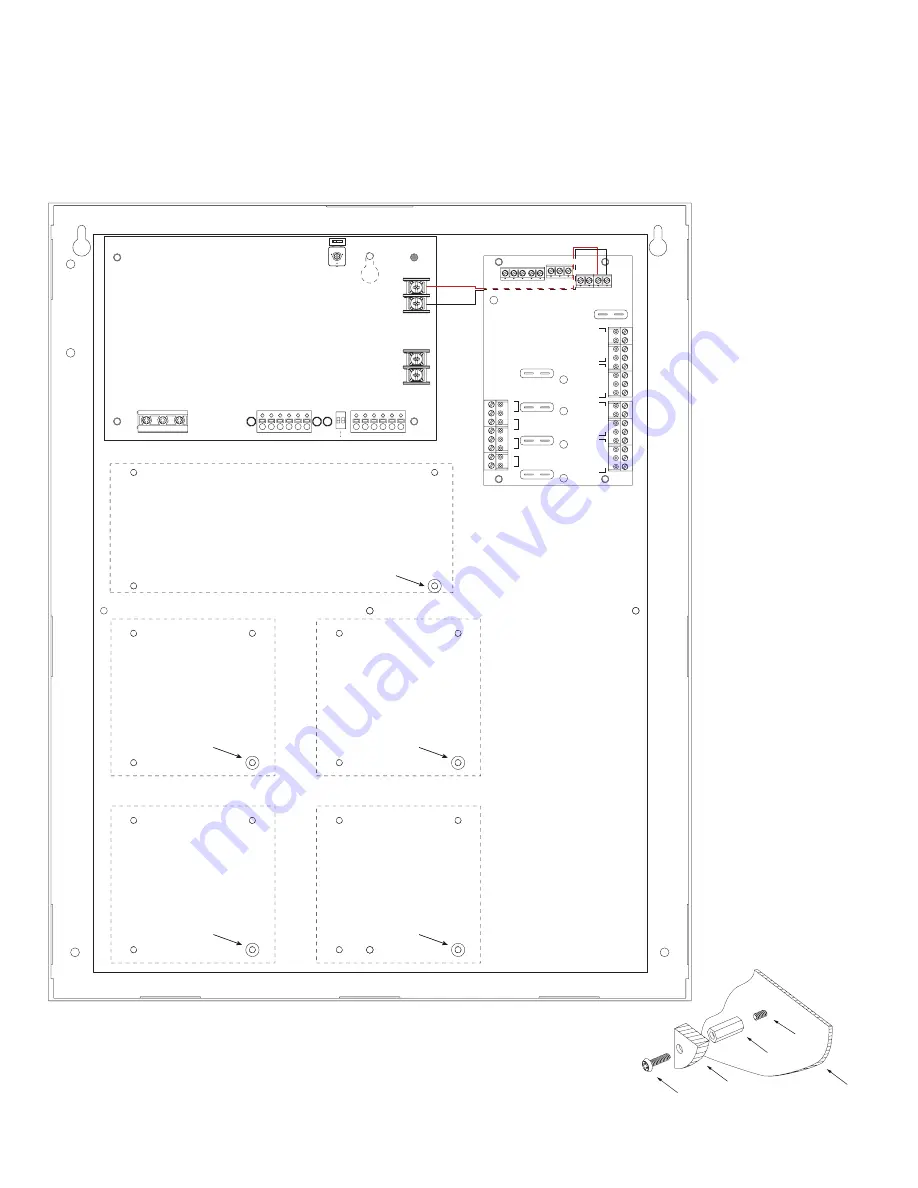
1. Align the Hartmann Controls boards on the backplane to match the boards’ mounting holes with corresponding pems.
2. Fasten spacers (provided) to pems that match the hole pattern for Hartmann Control boards
(Fig. 3, 3a, pg. 4)
.
Note:
Hartmann Controls boards must be properly grounded.
Please use provided metal spacers for the lower right mounting holes
(Fig. 3, pg. 4)
.
3. Mount Hartmann Controls boards to spacers utilizing provided 5/16” pan head screws
(Fig. 3a, pg. 4)
.
4. Fasten backplane to Trove1 enclosure utilizing lock nuts (provided).
NC C NO NC C NO
AC FAIL
BAT FAIL
TRIGGER
AC DC
AC1
EOL
NO
GND
SUPERVISED
RESET
+AUX-
- BAT
+-
DC
+
L G N
OFF - 24V
ON - 12V
ON
Altronix - eFlow6NB
PRS_MASTER
Metal Spacer
Metal Spacer
Metal Spacer
PRS_TDM or PRS_IO8
PRS_TDM or PRS_IO8
PRS_TDM or PRS_IO8
PRS_TDM or PRS_IO8
Metal Spacer
Metal Spacer
TRG
TRIGGER INPUT
ACM4
ACCESS POWER CONTROLLER
LED1
LED2
LED3
LED4
MAIN
OUTPUT
1
NC C NO COM
NC C NO COM
NC C NO COM
NC C NO COM
OUTPUT
2
OUTPUT
3
IN GND
1
IN GND
2
IN GND
3
IN GND
4
OUTPUT
4
- -
+
CONTROL
- -
+
POWER
+INP- T +RET
-
INTERFACE
NO C NC
FACP
Altronix - ACM4
Pem
Spacer
Hartmann Controls
Board
Backplane
Pan Head
Screw
Fig. 3a
Fig. 3 - T1HCK3F4 Configurations

