Section 3:
Start-Up
Copyright © 2011 Haskris Company
18
www.haskris.com
Version R1600-X-R407C-XXX Instruction Manual Rev00
3.2
3.2
3.2
3.2 No Load Start Up
No Load Start Up
No Load Start Up
No Load Start Up
NO LOAD START-UP SHOULD BE PERFORMED IN THE PRESENCE OF
A HASKRIS AUTHORIZED REPRESENTATIVE.
•
Complete Pre Start-Up Checklist portion of No Load Start-Up Checklist.
•
Install refrigeration manifold gauge on both high and low side.
•
Access the R1600 Control Panel (See Section 4) in the upper half of the
R1600.
•
Confirm the Cooling Mode – Stop - Pump Only Mode toggle switch is in the
center position. See R1600 Control Panel description at the beginning of
Section 4 for more details.
•
When the service disconnect switch is turned on, there will be a 3 minute
delay before the unit starts.
•
Turn the I/O switch on. See R1600 Control Panel description at the
beginning of Section 4 for location of I/O switch.
•
Confirm both displays are lit (Temperature Control/Display and Head
Pressure Display). Do not proceed with the No Load Start-up until both
displays are lit.
•
Move the Cooling Mode – Stop - Pump Only Mode toggle switch to the
Cooling Mode position (to the left). The pump motor, compressor motor,
and condenser fan motors will energize.
•
Add glycol solution to the reservoir as necessary to maintain tank full level.
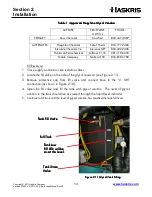
Fill system to tank full level as viewed on the liquid level indicator (See
Figure 2.11).
•
Check to make sure all external piping is leak-tight and that the system is
operating satisfactorily.
•
Clean Blow-Off Wye Strainer (See Section 5.2)
•
Replace all sheet metal panels except outer panel at R1600 Control Panel.
•
Complete No Load Start-Up Data Log
o
To record electrical data for Fan Motor Inverter, lower head pressure
on Head Pressure Display to drive condenser fan motors to full speed
per steps below:
1.
On the Head Pressure Display (See Section 4), press and hold
the
key repeatedly to lower the head pressure value until
the fans begin to run at full speed.
!!!!


