22
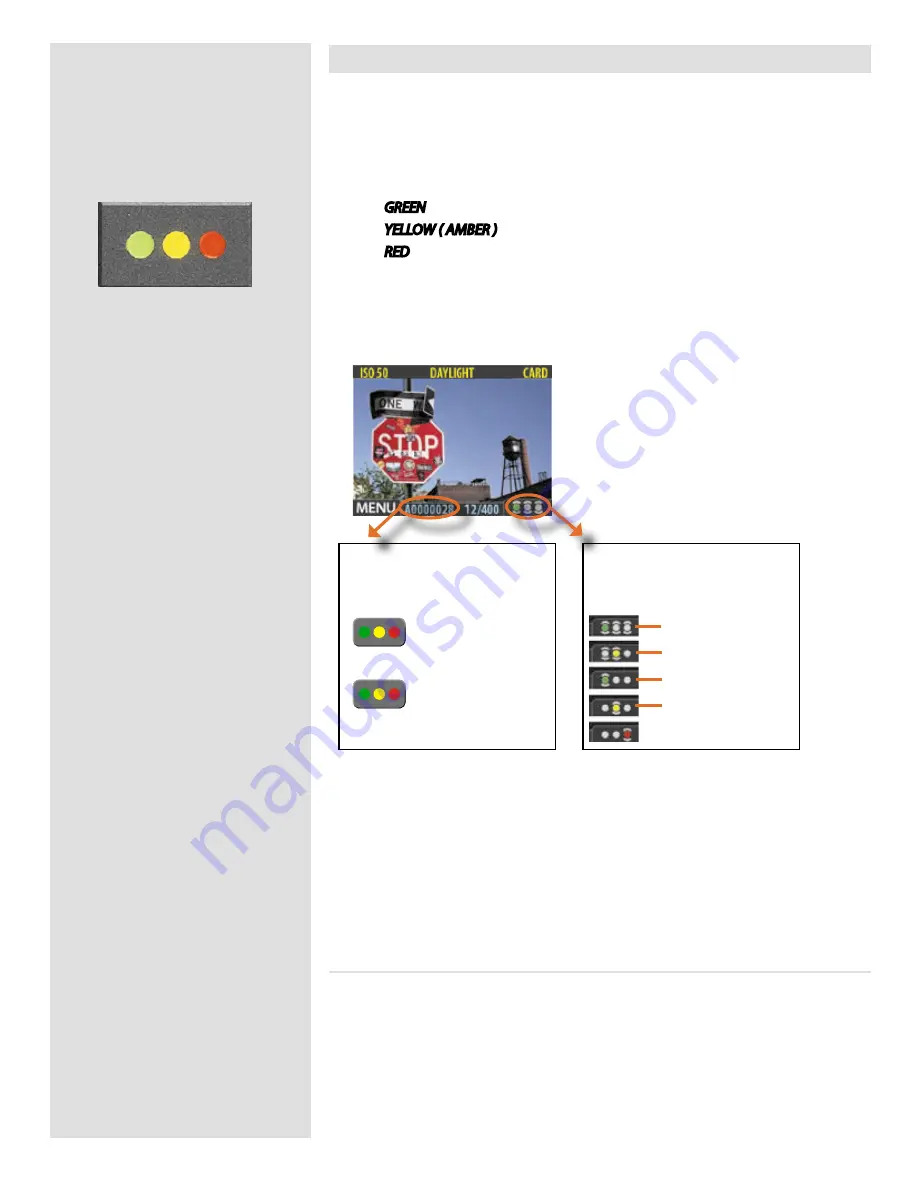
Current approval status (green) and
browse-filter setting (show all)
Press
and hold
the approve
button to change the status of
the currently selected image
Show all
Show green and yellow only
Show green only
Show yellow only
Show red only
Image File Name
Green images start with “
A
”
Yellow images start with “
B
”
Red images start with “
C
”
Press the approve button to
change the status of the
currently selected image
Using Instant Approval Architecture
The Instant Approval Architecture system helps you to classify your images as quickly as
you take them. It works by supplying immediate audio feedback, which tells you instantly
whether each new picture is exposed correctly or likely to be over- or underexposed.
Thereafter, the system enables you to assign each image one of three status levels. Though
you can use the system any way you like, the intention (based on the ‘traffic light’ conven-
tion) is that you should assign the levels as follows:
•
GREEN
for your best shots.
•
YELLOW ( AMBER )
for images that need closer inspection.
•
RED
for images that should probably not be used.
Please note, when the current storage medium is full, red-status images will be de-
leted (one at a time) to make room for new shots. You can continue shooting until no
red-status images remain; if you then try to take additional new shots you will get a
medium-full message.
Please note the two different actions of pressing (or quickly clicking) the approve but-
ton to change the status and pressing and holding to change the browse filter!
One of the greatest advantages of digital photography compared to film is that it costs
no more to shoot 100 images that it does to shoot one. Photographers therefore tend to
take many more pictures when shooting digitally. By assigning approval levels as you
work, it can be much easier to sort through and select images when you get back to your
computer.
Standard Instant Approval workflow
The standard method of working with the Instant Approval Architecture is as follows:
1. Take a shot.
2. The camera analyzes the shot to find out if it seems to be over- or underexposed. If it
suspects a problem, it does the following:
Summary of Contents for CF DIGITAL CAMERA BACK RANGE
Page 1: ...User Manual Hasselblad CF Digital Camera Back Range ...
Page 32: ...32 Menu structure Items on the main menu ...
Page 68: ...Addendum V2 to User Manuals 2007 H1 H1D H2 H2D H3D 503CWD CFV CF 2007 09 20 V2 ...
Page 74: ...Software Reference FlexColor 4 0 for Camera Backs by Hasselblad Imacon ...
Page 85: ...Software Reference FlexColor 4 0 for Camera Backs Introduction 12 ...
Page 93: ...Software Reference FlexColor 4 0 for Camera Backs FlexColor Menus 20 ...
Page 127: ...Software Reference FlexColor 4 0 for Camera Backs The Preferences Window 54 ...
Page 133: ...Software Reference FlexColor 4 0 for Camera Backs FlexColor ICC Profiles 60 ...
Page 143: ...Software Reference FlexColor 4 0 for Camera Backs The Thumbnails Window 70 ...
Page 155: ...Software Reference FlexColor 4 0 for Camera Backs The Exposure Window 82 ...
Page 159: ...Software Reference FlexColor 4 0 for Camera Backs Active and Reload Buttons 86 ...
Page 165: ...Software Reference FlexColor 4 0 for Camera Backs The Gradations Window 92 ...
Page 177: ...Software Reference FlexColor 4 0 for Camera Backs The Texture Window 104 ...
Page 183: ...Software Reference FlexColor 4 0 for Camera Backs The Live Video Window 110 ...
Page 185: ...Software Reference FlexColor 4 0 for Camera Backs The Tasks Window 112 ...
Page 189: ...Software Reference FlexColor 4 0 for Camera Backs Appendix 116 Keyboard Shortcuts ...


