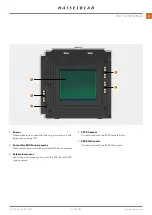
Camera Body
Display
Storage
Power
Quality
Live View
Connectivity
F
G
C
D
E
A
B
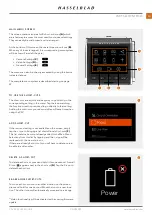
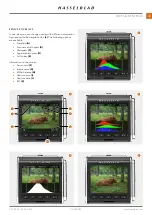
MAIN MENU SCREEN
This screen contains an area for 8 short-cut icons
(A) which
are a fast way to access the most used functions and settings.
They can easily be customized and re-arranged.
At the bottom of this screen there are three menu Icons
(B).
When any of them is tapped, the corresponding menu system
will be shown. From left they are:
●
Camera Settings
(C)
●
Video Settings
(D)
*)
●
General Settings
(E)
The menus can also be directly accessed by using the button
indicated above.
The complete menu system is described starting on page
69.
TO USE THE SHORT-CUTS
The short-cuts are a quick and easy way to go directly to the
corresponding setting in the menu. Tap the icon matching
the function or setting required to go directly to that setting.
Adding the short-cuts you use most often will save time when
using the CFV.
ADD SHORT-CUT
If the required setting is not available on the screen, simply
tap the + icon to bring up a list of additional short-cuts
(F).
This list contains items not already added to the Main Menu.
Select any from this list by tapping and the + sign will be
replaced with the new short-cut.
If there are already 8 short-cuts you will have to delete one to
be able to add another.
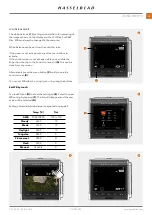
DELETE A SHORT-CUT
To delete a short-cut, press and hold it for one second. A small
X icon ( ) appears next to the short-cut
(G). Tap the X icon to
delete the short-cut.
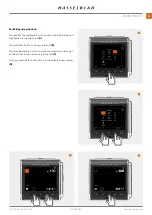
RE-ARRANGE SHORT-CUTS
To move a short-cut icon to another location on the screen,
press and hold for one second. Move the icon to a new loca-
tion. The other icons will automatically move and re-arrange.
*)
Video functionality will be activated with a coming firmware
update.
CFV II 50C USER GUIDE
www.hasselblad.com
33
PARTS & CONTROLS
Summary of Contents for CFV II 50C
Page 1: ...CFV II 50C User Guide 2019 12 20 v1 ...
Page 6: ...1 INTRODUCTION ...
Page 15: ...2 QUICK START ...
Page 21: ...3 SAFETY ...
Page 25: ...4 PARTS CONTROLS ...
Page 39: ...5 USING THE CFV ...
Page 68: ...6 SETTINGS ...
Page 98: ...7 PHOCUS ...
Page 106: ...8 ACCESSORIES ...
Page 109: ...9 APPENDIX ...


