background image


Hastings


Operations Manual


Page 6 

Then a constant source of heat is what you will 
be looking for. This is where the 

“SmartStat” 

puts the St. Croix in a different category. The 
stove operates on a Thermostat and once the heat 
demand has been met the stove will drop into the 
#1 Heat Level and pilots there for one hour. If the 
thermostat doesn’t call for heat during that one-
hour period, the stove will shut down and wait to 
re-light itself when the thermostat calls for heat 
again. The control board automatically switches 
back and forth between a “Piloting Thermostat 
System” and a “Fully Automatic Thermostat 
System” based on how often the thermostat calls 
for heat. This eliminates the On/Off cycle of an 
Automatic stove, once the Heating season arrives. 
 

Pre-Lighting Instructions 
 

When lighting your stove for the first time, or any 
time you have run out of Pellets, you will need to 
fill the hopper. Pellets are fed from the hopper to 
the burn pot by an auger. A high torque motor 
that is capable of doing SERIOUS harm to 
fingers drives the auger. Keep fingers and other 
objects away from the auger.  


WARNING: The Auger can start at any time 
while the stove is running 


CAUTION: The Ash Cleanout Rod must be 
pushed in to operate the stove. (See Figure 1 
on page 2)                           


WARNING: The Fire Door and Ash Pan Door 
must be in the latched position during normal 
operation. 


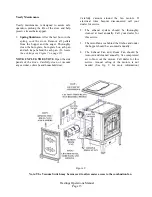
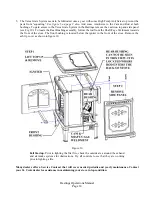
Lighting Your Stove. 

(Refer to Figure 2)


1.   Make sure there are pellets in the hopper and 
the viewing door and ash pan door are closed. 
 
2.   Push the On/Off button on the control board. 
(

Button #2) 

 
At this point all that needs to be done is to 
monitor the burn pot to make sure the stove starts 
up properly. Once the On/Off button has been 
pushed the Start Up program takes over. 
The Start up Program works as follows: 


a.


The Combustion fan and Room fan come on at 
high speed and the control board checks to make 
sure the Vacuum switch locks in. (See 
Diagnostic features in column to the right.)  


b.


When the board senses the Vacuum switch the 
Combustion fan drops to the #1 setting and the 
Room fan shuts off.  


c.


The Igniter and the Auger come on (the Auger 
only runs for 2 minutes). The stove will typically 
light in the first 3 - 4 minutes.  After 5 minutes 
the board checks for “Proof of Fire” and starts 
feeding pellets on the #1 setting (See Diagnostic 
Features in the column to the right). Once the 
board senses P.O.F. the Igniter shuts off and the 
stove has started successfully. 


d.


If the board fails to sense P.O.F. it will repeat 
the previous step and continue feeding pellets on 
the #1 setting for 5 more minutes. 


e.


The board will check for P.O.F. one more time. 
If the board still fails to sense the Proof of Fire 
switch, the stove will go into “Safety shutdown” 
(See Diagnostic Features in the column below). 


If this happens, repeat steps 1 through 4 from the 
section on Lighting Your Stove. 


CAUTION: NEVER ADD FIRE STARTER TO 
A HOT STOVE. 


Shutting The Stove Off (Refer to Figure 2) 


1.  Press the On/Off switch (2) once; the lights will 
go off and the fire will go out in a few minutes. The 
board essentially goes into “Safety shutdown”. 


2.   As long as the Exhaust Temperature within the 
stove remains above 110°F, the Room Air Fan, the 
Combustion Exhaust Fan and the Versa Grate motor 
will continue to run. Once the P.O.F. switch drops 
out the Combustion Fan runs for another 10 minutes 
and finally the stove shuts down completely. 


3. NEVER unplug the stove to shut it off. Doing so 
may cause a significant amount of smoke to enter 
the room.


Diagnostic Features of the Control Board 


The #2 LED and the #3 LED lights on the LED 
Light bar as show in Figure 2 will flash to give a 

Summary of Contents for St. Croix

Page 1: ...eatures 4 Thermostat Function How does it work 5 Pre Lighting Instructions 6 Lighting Your Stove 6 Shutting the Stove off 6 Diagnostic Features 6 7 Safety Features 7 COMBUSTION AIR DAMPER 7 8 Flame Pattern Characteristics 8 MAINTAINING THE STOVE 9 Daily Maintenance 10 11 Periodic Maintenance 11 12 Yearly Maintenance 13 14 SAFE OPERATION 15 TROUBLESHOOTING AND FAQ 16 20 WARRANTY 21 PARTS LAYOUT 22 ...

Page 2: ...rt has been expended to ensure that each St Croix wood pellet stove meets the highest quality standards of material and workmanship Here are some important aspects of wood pellet stove installation and operation which you must observe in order to obtain maximum comfort and safety from your new St Croix wood pellet stove 1 Have your new St Croix wood pellet stove installed by trained qualified pers...

Page 3: ...Hastings Operations Manual Page 2 SAVE THIS OPERATIONS AND MAINTENANCE MANUAL Figure 1 The Hastings Hopper opening has 2 hopper lids The inner lid has a gasket that provides a tight seal ...

Page 4: ...burning only dry clean quality fuel Clinkers and ash are a by product of combustion and are not caused solely by your stove Stove performance can be quickly and severely reduced if poor quality pellets are used APPROVED FUELS PELLETS NOTE Contact your dealer for more information on APFI approved wood pellet fuels Pellets with excessive sawdust should be screened by sifting with 1 4 mesh screening ...

Page 5: ...roduce dizziness nausea and in extreme cases death 9 An outside source of combustion air is required on all mobile home installations If room air is used to supply combustion air room air starvation operation of exhaust fans and icing of air vents can adversely affect proper stove operation If these conditions exist outside air should be used 10 Smoke detectors installed in the same general area a...

Page 6: ... time This will reduce the heat output on the 1 setting This setting will also create more buildup on the glass See point 8 on page 17 c The first and fifth LED lights indicate the 1 High setting 1 75 second on time This will produce the most heat available on the 1 setting This is helpful in keeping the glass a little cleaner when burning on low The adjustments described in points 4 and 5 remain ...

Page 7: ...Start Up program takes over The Start up Program works as follows a The Combustion fan and Room fan come on at high speed and the control board checks to make sure the Vacuum switch locks in See Diagnostic features in column to the right b When the board senses the Vacuum switch the Combustion fan drops to the 1 setting and the Room fan shuts off c The Igniter and the Auger come on the Auger only ...

Page 8: ...afety sensors This may cause the stove to go out In some cases after waiting approximately 45 seconds the stove will start responding to the control board again Many times the cause of this is a change in the vacuum inside the stove This may be caused by excessive wind opening the Firebox door or opening the Ash Pan door The control board will monitor the vacuum switch and resume normal operation ...

Page 9: ...amper during the break in period is very important See Preventing Chimney Fires on page 2 Break in requires the burning of 15 bags of pellets or continuous burn for two weeks If during the initial break in period you experience difficulty keeping the stove burning or there appears to be an excessive amount of burning pellets being evacuated from the burn grate it may be necessary to close the damp...

Page 10: ...lame becomes dark orange is accompanied by black smoke or burns with a lazy motion it s time to clean the grate When you first operate your stove or whenever you change fuels check to determine needed cleaning frequency First let s become familiar with the burn system in a St Croix Pellet stove Remember cleaning frequency may change dramatically from one fuel to another Pellets with high ash conte...

Page 11: ...safety hazard 3 Check ash pan See Fig 1 to determine emptying frequency needed NOTE Do not use a vacuum cleaner for this purpose Hot coals may cause your vacuum filter to catch fire Place ashes in a metal container with a tight fitting lid The closed container of ashes should be placed on a noncombustible floor or on the ground well away from all combustible materials pending final disposal If the...

Page 12: ...sh pan door is tightly closed after each opening 2 The Hastings has 3 Ash Trap cleanouts 2 are located below the rear brick panel Remove covers and clean regularly See Figure 7 below Be sure to clean both sides Use scraper shown in figure 5 6 to scrape ash into ash pan Use a vacuum cold stove only to thoroughly clean these areas The other Clean out is located behind the Ash Pan See figure 7 below ...

Page 13: ... in the stove make sure the screws are in the keyhole slots and the back of the baffle is lifted up over the inner back 5 Periodic cleaning of the exhaust system is required Under certain conditions creosote buildup may occur rapidly Low quality pellets and poor installations require more frequent chimney cleanings See Page 3 Preventing Chimney Fires The products of combustion will also contain sm...

Page 14: ...the stove Carefully clean or vacuum any sawdust cobwebs and household dust Carefully vacuum around the fan motors If electrical wires become disconnected call your dealer for service 2 The exhaust system should be thoroughly cleaned at least annually Call your dealer for this service 3 The motor fan area behind the firebox and under the hopper should be vacuumed annually 4 The Exhaust Fan and Room...

Page 15: ...bly follow the rod from the Shaft Cage Weldment towards the front of the stove The front bushing is located below the igniter in the front of the stove Remove the ash lip cover as shown in figure 10 Many dealers offer a Service Contract that will cover needed periodic and yearly maintenance Contact your St Croix dealer for assistance in maintaining your stove in top condition Figure 10 Fall Startu...

Page 16: ...l particles of Fly Ash The fly ash will collect in the venting system and restrict the flow of flue gases Incomplete combustion such as occurs during start up and shut down or incorrect operation of the room heater will lead to some soot or creosote formation which will collect in the venting system The exhaust system should be inspected regurlarly during the heating season to determine if creosot...

Page 17: ...urning make sure all doors are securely latched and hold down the On Off button approximately 5 seconds until stove starts up again This will restart the stove in the start up program Occasionally use the auger button to manually feed fuel until the auto feed takes over Auto feed will start 5 minutes after the stove has been restarted 3 My stove isn t burning and the number 3 Feed Light is blinkin...

Page 18: ...nual Minimum vertical height needed to establish some natural draft and prevent smoke spillage Solution Pull the Slide Out Bottom out and drop the fuel into the ash pan This will minimize the amount of smoke that can spill into the room 6 I turned the stove on with the On Off switch and nothing happens First check to see if the stove is plugged in and the receptacle has power to it Solution Check ...

Page 19: ...1 to be increased or decreased depending on the type of fuel used a Pressing the auger trim button once will turn the 1 and 5 light on at the same time This is an increase of 25 seconds to the On Time of the 1 setting This is the 1 High setting 1 75 seconds Using the auger trim button is also helpful when trying to keep the glass cleaner when burning on the 1 setting The more fuel on low will usua...

Page 20: ... the stove like this the pellets flame out every so often when the auger feeds more pellets they tend to smolder too much causing this stubborn build up on the glass Solution First trim the combustion fan voltage for level 1 by pressing the fan button once see button in figure to the right indicated with the arrow You will see all five lights on the light bar flash once This will reduce the combus...

Page 21: ...w fire even though I have the Heat Level on 5 If the stove is operating on a Thermostat this usually indicates a problem in the Thermostat circuit There is either a bad connection in the wires or the Thermostat itself has a problem Troubleshoot all of the components in the system If the stove is not operating on a Thermostat make sure the slide switch on the control board is in the Manual position...

Page 22: ... of this warranty have been met the manufacturer s total responsibilities and liabilities shall be to repair or replace at the manufacturer s option the defective part s All costs of removal shipment to and from the dealer or manufacturer any losses during shipment and reinstallation and any other losses due to the stove being removed shall be covered by the owner of the stove NEITHER THE MANUFACT...

Page 23: ...ID 9 80P20089 R CAST HOPPER LID 10 80P52650 R MOUNTING BRACKET CAST FRONT PANEL 11 80P20093 R 80P20093 GR CAST FRONT FRAME 12 80P20094 R 80P20094 GR CAST FRONT PANEL 13 80P20100 R HINGE PINS CAST FRONT PANEL 14 80P20098 R 80P20098 GR CAST DOOR RIGHT 15 80P20097 R 80P20097 GR CAST DOOR LEFT 16 80P20101 R HINGE PINS CAST DOORS 17 80P20092 R 80P20093 GR CAST SIDE PANEL LEFT When installing the stove ...

Page 24: ...Hastings Operations Manual Page 23 Hastings Part Layout ...

Page 25: ...P52232 R QUICK DISCONNECT GASKET 12 80P20168 R COMBUSTION FAN GASKET 13 80P53650 R EXHAUST ADAPTER WELDMENT 14 80P52887 R PIPE CONNECTOR ASSEMBLY 15 80P52957 R AUGER MOUNT BRACKET ASSEMBLY 16 80P30191 R AUGER MOTOR RETAINER BRACKET 17 80P20248 R 5 8 COLLAR WITH SETSCREW 18 80P52658 R CONTROL BOARD COVER 19 80P53785 R CONTROL BOARD MOUNT BOX 20 80P53681 R SLIDE TOP STANDOFF PLATE 21 80P20183 R PLAS...

Page 26: ...ER WELDMENT 46 80P53632 R BELLY PAN DOOR WELDMENT 47 80P52645 R BELLY PAN DOOR HANDLE 48 80P52652 R ASH LIP 49 80P52954 R FRONT BUSHING ASSEMBLY 50 80P52677 R IGNITER HOT ROD 51 80P20296 R VERSA GRATE MOTOR 52 80P52953 R VERSA GRATE BRACKET ASSEMBLY 53 80P52372 R VERSA GRATE COLLAR W SETSCREW 54 80P52376 R CAM CONNECTOR ROD 55 80P50560 R CAM 56 80P52981 R SHAFT CAGE WELDMENT 57 80P52955 R REAR BUS...

Page 27: ...nt of a power failure or if the units gets unplugged the trim settings will be lost Draft Trim Circle one See point 4 on page 4 Default Draft Low Draft High Draft Feed Trim Circle one See point 5 on page 5 Default Pilot High Pilot Low Pilot Serial Number Date of Purchase Dealer Information Even Temp Inc P O Box 127 Waco NE 68460 EMAIL service eventempinc com WEB ADDRESS www stcroixheat com ...

Reviews: