background image

INSTALLATION

Form No. FS2HACm-0815

7

English

5. Install any options or accessories that came with the unit.

Refer to the OPTIONS AND ACCESSORIES section for

details.

6. Plug the unit into a properly grounded electrical receptacle

of the correct voltage, size, and plug configuration. See the

SPECIFICATIONS section for details.

Installing 4" (102 mm) Legs

Some units may be supplied with 4" (102 mm) legs. Use the

following procedure to install the legs.

The National Sanitation Foundation (NSF) requires that

units over 36″ (914 mm) in width or weighing more than 

80  lbs.  (36  kg)  either  be  sealed  to  or  raised  above  the

installation surface. If unit cannot be sealed at the point of

use, 4″ (102 mm) legs are included to allow for proper

cleaning access below unit.

Do not lay unit on the side with the control panel. Damage

to unit could occur.

NOTE: Additional help may be needed to maneuver the unit to

the proper position for installing legs.

1. Carefully position the unit with the control panel facing up.

This step requires at least two people.

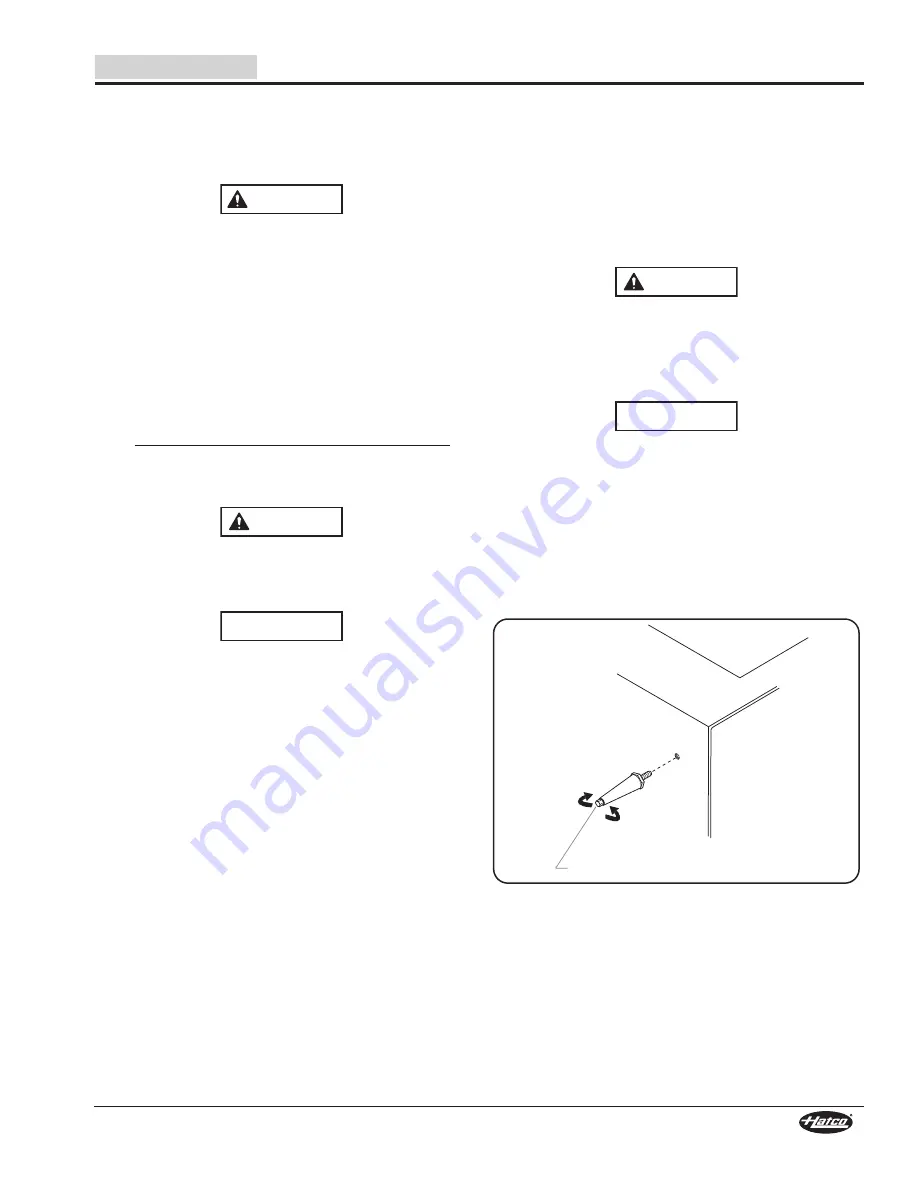
2. Attach the 4" (102 mm) legs by turning the legs clockwise

into one of the threaded holes in each of the four corners

on the bottom of the unit. Hand-tighten until snug. Do not

over-tighten.

Installing the Legs

3. Position  the  unit  upright  and  move  it  to  the  desired

operating location. This step requires at least two people.

NOTE: The feet on the 4″ (102 mm) legs are adjustable for

leveling the unit. Use an adjustable wrench to make

leveling adjustments once the unit is placed in its final

position.

NOTICE

CAUTION

Lengthen

Shorten

Adjustable tip for leveling.

General

The Flav-R-Savor

®

Heated Air Curtain Cabinets are shipped

with most components installed and ready for operation. The

following installation instructions must be performed before

plugging in and operating the cabinet.

ELECTRIC SHOCK HAzARD:

• Plug unit into a properly grounded electrical receptacle

of the correct voltage, size, and plug configuration. If

plug and receptacle do not match, contact a qualified

electrician to determine and install proper voltage and

size electrical receptacle.

• Units supplied without an electrical plug require field

installation  of  proper  plug.  Plug  must  be  properly

grounded  and  of  correct  voltage,  size,  and

configuration  for  electrical  specifications  of  unit.

Contact a qualified electrician to determine and install

proper electrical plug.

• Unit is not weatherproof. Locate unit indoors where

ambient air temperature is a minimum of 70°F (21°C).

FIRE HAzARD: Locate unit a minimum of 1″ (25 mm) from

combustible walls and materials. If safe distances are not

maintained, discoloration or combustion could occur.

Locate  unit  at  proper  counter  height  in  an  area  that  is

convenient for use. Location should be level to prevent

unit or its contents from falling accidentally and strong

enough to support weight of unit and contents.

Do not locate unit in area with excessive air movement

around unit. Avoid areas that may be subject to active air

movements or currents (i.e., near exhaust fans/hoods, air

conditioning ducts, and exterior doors).

1. Remove the unit from the carton.

NOTE: To  prevent  delay  in  obtaining  warranty  coverage,

complete  online  warranty  registration.  See  the

ImPORTANT OWNER INFORmATION

section for details.

2. Remove tape and protective film from all surfaces of unit.
3. Place the unit in the desired location. This step requires at

least two people.

• Locate  the  unit  in  an  area  where  the  ambient  air

temperature is constant and a minimum of 70°F (21°C).

Avoid areas that may be subject to active air movements

or  currents  (i.e.,  near  exhaust  fans/hoods,  air

conditioning ducts, and exterior doors).

• make sure the unit is at the proper counter height in an

area convenient for use.

• make sure the countertop is level and strong enough to

support the weight of the unit and food product.

• make sure all the feet on the bottom of the unit are

positioned securely on the countertop.

4. Seal the unit to the countertop using an NSF-approved

sealant or install the included 4″ (102 mm) legs. Refer to

the “Installing the 4" (102 mm) Legs” procedure in this

section.

WARNING

CAUTION

NOTICE

Summary of Contents for FLAV-R-SAVOR FS2HAS Series

Page 1: ...Este manual contiene importante información sobre seguridad concerniente al mantenimiento uso y operación de este producto Si usted no puede entender el contenido de este manual por favor pregunte a su supervisor Almacenar este manual en una localización segura para la referencia futura Ne pas utiliser cet équipement sans avoir lu et compris le contenu de ce manuel Le non respect des instructions ...

Page 2: ...wner Information 2 Introduction 2 Important Safety Information 3 Model Description 4 All models 4 FS2HAC 2PT model 4 FS2HAC 4PT model 4 Model Designation 4 Specifications 5 Plug Configurations 5 Electrical Rating Chart 5 Dimensions 6 Installation 7 General 7 Installing 4 102 mm Legs 7 Record the model number serial number voltage and purchase date of the unit in the spaces below specification labe...

Page 3: ...cool before performing any cleaning adjustments or maintenance DO NOT submerge or saturate with water Unit is not waterproof Do not operate if unit has been submerged or saturated with water Unit is not weatherproof Locate unit indoors where ambient air temperature is a minimum of 70 F 21 C Do not steam clean or use excessive water on unit This unit is not jet proof construction Do not use jet cle...

Page 4: ... Curtain Cabinets is 190 F 87 C The units can be sealed to the countertop or equipped with 4 102 mm legs FS2HAC 2PT Model The FS2HAC 2PT is a two pan pass through style unit that allows for food product access from either side The unit is capable of holding two full size sheet pans FS2HAC 2PT model Power I O on off Switch Warning Light Crumb Tray FS2HAC 4PT Model The FS2HAC 4PT is a four pan pass ...

Page 5: ...sh Electrical Rating Chart Plug Configurations Units are supplied from the factory with an electrical cord and plug installed plugs are supplied according to the applications Some export units may require field installation of the proper plug ELECTRIC SHOCK HAzARD Plug unit into a properly grounded electrical receptacle of the correct voltage size and plug configuration If plug and receptacle do n...

Page 6: ... 4 102 mm 22 1 8 562 mm 30 1 8 765 mm Cabinet Openings FS2HAC 2PT 18 1 8 W x 8 1 4 H 461 x 235 mm FS2HAC 4PT 18 1 8 W x 16 1 4 H 461 x 438 mm SPECIFICATIONS 6 Form No FS2HACm 0815 English Dimensions C A G F Front View Side View D E B Dimensions FS2HAC 4PT shown with legs included NOTE Specification label located on the top of the unit See label for serial number and verification of unit electrical...

Page 7: ... plug and receptacle do not match contact a qualified electrician to determine and install proper voltage and size electrical receptacle Units supplied without an electrical plug require field installation of proper plug Plug must be properly grounded and of correct voltage size and configuration for electrical specifications of unit Contact a qualified electrician to determine and install proper ...

Page 8: ...et Pan WARNING Digital Temperature Controller 5 Allow the unit to reach the setpoint temperature before loading preheated food product onto the sheet pans NOTE If the warning light illuminates during operation a blower malfunction has occurred Turn off unit and contact an Authorized Service Agent or Hatco for assistance Shutdown 1 move the Power I O on off switch to the O off position and allow th...

Page 9: ...Screws Heat duct cover in closed position FS2HAC 2PT Model The FS2HAC 2PT model has a two sheet pan capacity When two sheet pans are being used Access the food product by reaching in with tongs and pulling the pan approximately half way out of the unit Serve the food product and then push the sheet pan back into the unit with tongs make sure the pan is behind the line next to the arrow inside each...

Page 10: ...the bright finish of the unit it is recommended that the exterior and interior surfaces be cleaned daily Use non abrasive cleaners and cloths only Abrasive cleaners and cloths could scratch finish of unit marring its appearance and making it susceptible to soil accumulation WARNING NOTICE 1 move the Power I O on off switch to the O off position and allow the unit to cool NOTE A cooling fan inside ...

Page 11: ...helf and the other two shelves above No sheet pan on bottom shelf Place a pan on the bottom shelf Imbalanced improper air flow in building Identify air flow sources and make necessary changes move any portable fans Close all windows and doors Close drive thru window Check ceiling vents and redirect if necessary Install flip up panel accessory onto cabinet Defective component Contact Authorized Ser...

Page 12: ...ght hinge bracket for the flip up panel with the right pan support screw hole Installing a Flip Up Panel 5 Insert the right pan support screw through the hinge bracket through the pan support and into the cabinet wall Tighten securely 6 Remove one of the hinge screws from the panel hinge at the top of the flip up panel 7 Insert the hinge screw remaining on the panel hinge into one of the hinge bra...

Page 13: ...ER INTELLECTUAL PROPERTY RIGHT INFRINGEmENT Without limiting the generality of the foregoing SUCH WARRANTIES DO NOT COVER Coated incandescent light bulbs fluorescent lights heat lamp bulbs coated halogen light bulbs halogen heat lamp bulbs xenon light bulbs LED light tubes glass components and fuses Product failure in booster tank fin tube heat exchanger or other water heating equipment caused by ...

Page 14: ...ntes pour le Propriétaire 14 Introduction 14 Consignes de Sécurité Importantes 15 Description du Modèle 16 Tous les modèles 16 FS2HAC 2PT modèle 16 FS2HAC 4PT modèle 16 Désignation du Modèle 16 Caractéristiques Techniques 17 Configuration des Fiches 17 Tableau des valeurs nominales électriques 17 Dimensions 18 Installation 19 Généralités 19 Installation des pieds de 102 mm 4 19 Notez le numéro de ...

Page 15: ...fonctionnement sain AVERTISSEMENT ATTENTION AVIS DANGER DE DÉCHARGE ÉLECTRIQUE Brancher l appareil sur une prise de courant avec terre de tension de format et de configuration des broches corrects Si la fiche et la prise ne se correspondent pas s adresser à un électricien qualifié pour déterminer et installer une prise de courant de format et de tension corrects Les appareils fournis sans fiche él...

Page 16: ...chauffé Flav R Savor est de 87 C 190 F Les appareils peuvent être fixés sur le comptoir ou équipés de pieds de 102 mm 4 Modèle FS2HAC 2PT Le FS2HAC 2PT est un modèle à deux plaques du type ouvert des deux côtés pour permettre le passage des plats L appareil capable de contenir deux plaques à pâtisserie grande taille FS2HAC 2PT modèle Interrupteur d alimentation I O marche arrêt Témoin Plateau à mi...

Page 17: ...s Les appareils sont livrés avec un cordon électrique avec fiche différentes fiches sont fournies selon les applications Certains appareils pour l exportation pourront exiger l installation sur site de la fiche correcte DANGER DE DÉCHARGE ÉLECTRIQUE Brancher l appareil sur une prise de courant avec terre de tension de format et de configuration des broches corrects Si la fiche et la prise ne se co...

Page 18: ...moire FS2HAC 2PT 461 L x 235 H mm 18 1 8 W x 8 1 4 H FS2HAC 4PT 461 L x 438 H mm 18 1 8 W x 16 1 4 H CARACTÉRISTIQUES TECHNIQUES Français 18 Formulaire n FS2HACm 0815 Dimensions C A G F Vue de face Vue de côté D E B Dimensions FS2HAC 4PT montré Ajouter 102 mm 4 à la hauteur D lorsque les jambes de 102 mm 4 sont installées NOTA situé sur l appareil Reportez vous à l étiquette du numéro de série et ...

Page 19: ...ormat et de configuration des broches corrects Si la fiche et la prise ne se correspondent pas s adresser à un électricien qualifié pour déterminer et installer une prise de courant de format et de tension corrects Les appareils fournis sans fiche électrique demandent l installation de la fiche correcte La fiche doit être correctement mise à la terre et de tension taille et configuration correctes...

Page 20: ...t de consigne de température dans cette section Flèche Interrupteur d alimentation I O marche arrêt Témoin Plaque grande taille AVERTISSEMENT ATTENTION NOTA Le régulateur de température numérique est préréglé en usine sur un point de consigne de température de 87 C 190 F Une fois que vous avez modifié le point de consigne de température le nouveau point de consigne de température sera mémorisé jus...

Page 21: ...s peuvent être chargé et déchargés d un côté ou de l autre Vis desserrées Vis serrées Couvercle de la conduite chauffante en position ouverte Couvercle de la conduite chauffante en position fermée Tous les modèles Toujours garder une plaque grande taille ou deux plaques de la demi taille sur l étagère inférieure Assurez vous que toutes les plaques sont derrière la ligne à côté de la flèche à l int...

Page 22: ...matériel Hatco AVERTISSEMENT Nettoyage quotidien Afin de préserver la finition brillante de l armoire Flav R Savor il est recommandé de nettoyer quotidiennement les surfaces extérieures et intérieures Utilisez uniquement des nettoyants non abrasifs et des chiffons doux Les chiffons et nettoyants abrasifs risquent de rayer la finition de l appareil d altérer son apparence et de le rendre vulnérable...

Page 23: ...VERTISSEMENT Vous avez des questions en ce qui concerne les pannes Si le problème persiste veuillez contacter l agence d entretien agréée Hatco la plus proche ou Hatco pour obtenir une assistance Pour trouver l agence d entretien la plus proche rendez vous sur le site Internet de Hatco www hatcocorp com et cliquez sur Trouver un agent d entretien ou contactez l équipe d entretien et de pièces déta...

Page 24: ...que l appareil ait le temps d atteindre la température du point de consigne Pas de plaque sur l étagère la plus basse Placez une plaque sur l étagère la plus basse Débit d air inadéquate déséquilibré dans le bâtiment Identifier les sources de débit d air et apporter les changements nécessaires Déplacez tous les ventilateurs portatifs Fermez toutes les fenêtres et portes Fermer la fenêtre volante V...

Page 25: ...charnière droite pour le panneau rabattable avec le trou de la vis de support de la plaque droite Installation d un panneau rabattable 5 Insérez la vis du support de la plaque droite à travers la charnière puis le support de plaque et dans la paroi de l armoire Serrez fermement 6 Retirez l une des vis de charnière de la charnière de plaque en haut du panneau rabattable 7 Insérez la vis de charnièr...

Page 26: ...A PROPRIÉTÉ INTELLECTUELLE Sans restreindre la portée générale des énoncés précédents CES GARANTIES NE COUVRENT PAS Ampoules d éclairage à incandescence enduites lumières fluorescentes ampoules de lampes chauffantes ampoules d éclairage à halogène enduites ampoules de lampes chauffantes au xénon tubes d éclairage DEL composants en verre et fusibles défaut de produit dans la cuve d un appareil de c...

Page 27: ...NOTES Français Formulaire n FS2HACm 0815 27 ...

Page 28: ...ppliance Installation Buffalo 716 884 7425 Duffy s Equipment Services Inc Buffalo 800 836 1014 3Wire Northern Plattsburgh 800 634 5005 Duffy s Equipment Services Inc Sauquoit 800 836 1014 J B Brady Inc Syracuse 315 422 9271 NORTH CAROLINA Authorized Appliance Charlotte 704 377 4501 OHIO Akron Canton Comm Svc Inc Akron 330 753 6634 Service Solutions Group Cincinnati 513 772 6600 Commercial Parts an...

Reviews: