Form No. FSCDm-1016
12
English
MAINTENANCE
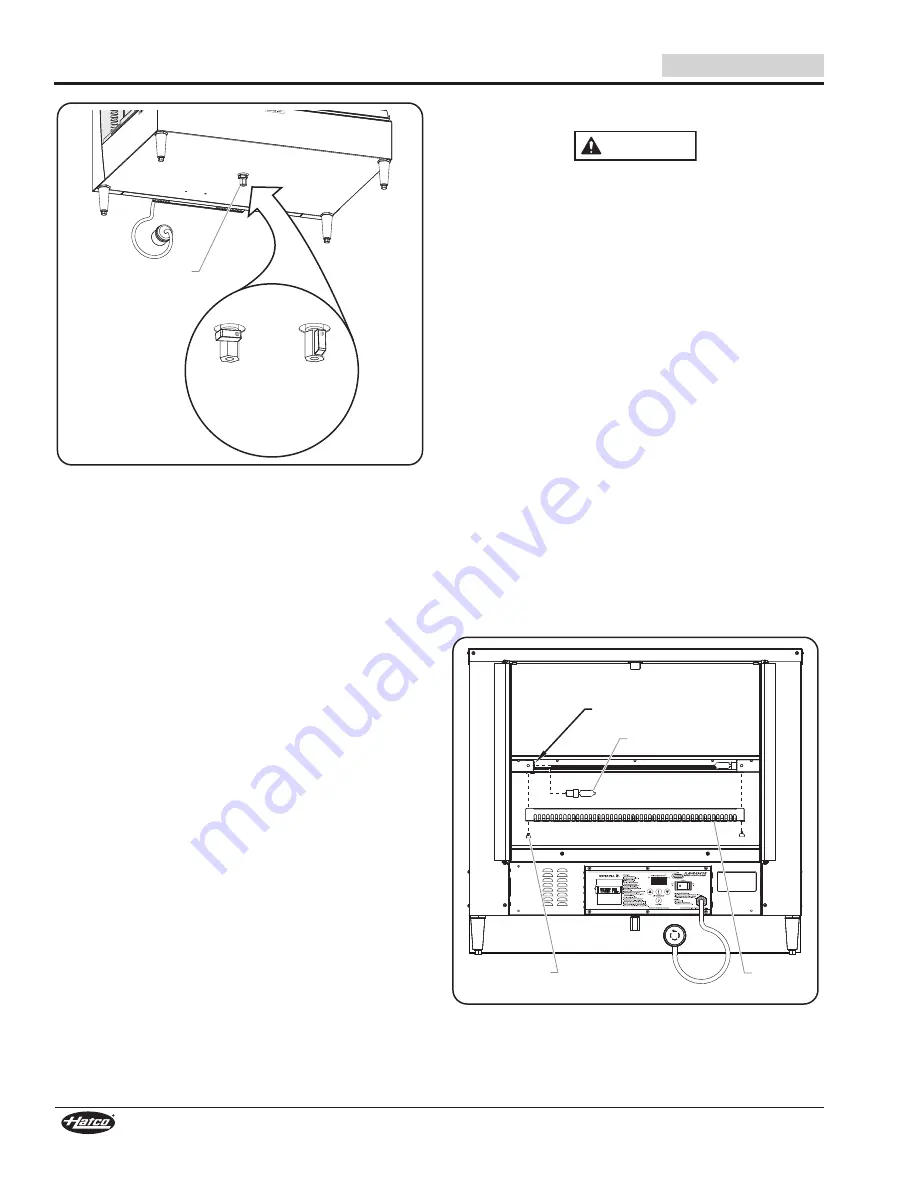
Draining the Water Reservoir (shown without leg skirt)
Removing Lime and Mineral Deposits
Use the following procedure for periodic cleaning and deliming
of the water reservoir on humidified models.
NOTE: The lime and mineral content of the water used for daily
operation will determine how often the deliming
procedure must be performed.
NOTE: Perform this procedure when the unit will not be used
for a period of time, such as the end of the day.
1. move the PoWER oN/oFF (I/o) switch to the oFF (o)
position and unplug the power cord. allow the unit to cool.
2. after the unit has cooled down, perform the “Draining the
Water Reservoir” procedure in this section.
3. Fill the water reservoir with a mixture of 75% water and 25%
white vinegar. Do not use flavored vinegar.
4. Plug in and turn on the unit.
5. Set both the air temperature and humidity level to their
highest settings and allow the unit to run for 30 minutes.
6. move the PoWER oN/oFF (I/o) switch to the oFF (o)
position and unplug the power cord. allow the unit to cool.
7. Perform the “Draining the Water Reservoir” procedure to
empty the deliming solution from the water reservoir.
8. Continue to fill and drain the water reservoir with clean water
until the deliming solution is rinsed through and the reservoir
is clean.
9. Plug the unit into its power source and fill the reservoir as
usual for daily operation using the procedure in the
oPERaTIoN section of this manual.
Drain Valve
Valve handle
in closed
position.
Valve handle
in open
position.
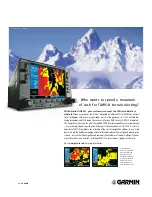
Replacing Xenon Display Lights
The light fixtures in this unit have safety shields covering
the light bulbs to meet National Sanitation Foundation
(NSF) standards. To avoid personal injury and/or food
contamination, always operate the unit with the safety
shields properly installed.
Units are equipped with four Xenon display light bulbs that
illuminate the cabinet (two above each shelf). These bulbs have
a bulb guard/safety shield to guard against injury and food
contamination in the event of breakage. When replacing a
Xenon bulb, use Hatco P/N R02.30.168.00 and the following
procedure.
1. move the PoWER oN/oFF (I/o) switch to the oFF (o)
position and unplug the power cord. allow the unit to cool.
2. Remove the two thumbscrews that secure the bulb guard
to the bulb housing assembly.
3. Remove the old Xenon bulb from the light socket.
a. Rotate the bulb in the socket until the tab on bulb is clear
of the locking channel on the socket.
b. Pull the bulb out of the socket.
4. Install a new Xenon bulb into the light socket.
a. Push the bulb into the socket until the tab on the bulb
aligns with the locking channel on the socket.
b. Turn the bulb so that the tab on the bulb locks into the
locking channel on the socket.
5. Position the bulb guard on the bulb housing assembly, and
secure using the two thumbscrews.
Replacing Xenon Display Lights (rear view of unit)
WARNING
Thumbscrew
Xenon Bulb
Light Socket
Bulb
Guard


