English
Form No. GR5ALM-0217
16
OPTIONS AND ACCESSORIES
6. Make the electrical connections between the unit and the
output terminals on the terminal block or wire leads inside
the control enclosure. Refer to the wiring diagrams included
with the unit and the RMB control box.
NOTE: To ground the RMB, use either a separate ground wire,
metallic conduit, or other locally accepted method in
accordance with the National Electric Code (NEC) or
Canadian Electric Code (CEC).
7. Tie all ground leads (green and/or green/yellow leads)
together and terminate with a UL Listed wire nut.
8. Make the electrical connections between the power supply
and the input terminals on the terminal block or wire leads
inside the control box. Refer to the wiring diagram included
with the RMB control box.
NOTE: Verify which wire leads from the foodwarmer are for
phase, neutral, and/or lighting connections, as applicable.
9. Make sure all wire connections are tight, and secure both
conduit runs to the conduit connectors.
10. Reinstall the wiring access cover on bottom of the control
box.
11. Turn on power at the fused disconnect switch/circuit
breaker, turn on the unit, and test operation.
Infinite Switch
Use the following procedure to install an infinite switch. An
infinite switch needs to be installed into an approved electrical
box/enclosure (not supplied) by a qualified electrician.
WARNING
ELECTRIC SHOCK HAZARD: Turn OFF power switch,
disconnect unit from power source, and allow unit to cool
before performing any cleaning, adjustments, or maintenance.
NOTICE
To prevent premature failure of components due to
excessive heat, remote mounted control switches must be
installed outside the strip heater heat zone.
1. Verify unit is off and disconnected from the power source.
2. Install the infinite switch. Refer to the wiring diagram for
proper electrical connections. Make sure the switch is
installed with the “H1” terminal oriented on top. This will
ensure that the switch functions match the markings on the
switch label.
• Power In: L1 and L2 (for 100V and 120V units, L2 is
neutral)
• To Heating Element: H1 and H2
NOTE: The terminals on the infinite switch are specially
designed, high-temperature rated terminals that do not
require solder connections.
NOTICE
The infinite switch must be installed using the terminals
and wires supplied with the switch. Failure to use the
supplied Genuine Hatco Replacement Parts will void all
warranties and may damage the equipment.
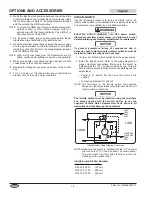
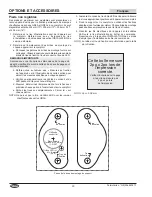
LINE
100V
120V
208V
240V
NEUTRAL
NEUTRAL
208V
240V
LOAD
Infinite Switch Wiring Diagram (rear view)
NOTE: Make sure the switch is installed with the “H1” terminal
oriented on top (“12 o’clock” position), as shown above.
This will ensure that the switch functions match the
markings on the switch label.
Infinite Switch Kit Part Numbers
Part Number
Voltage
R02.19.018.00
120 volt
R02.19.017.00
208 volt
R02.19.019.00
240 volt

