


12
Form No. GRCDHDm-0712
INSTALLATION
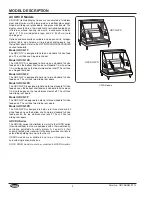
Assembling GRCD Models
Position the unit upright on the counter near the location it will
be used. Installation of the following items is required before
operating the unit.
1. Remove plastic bag containing the 4″ (102 mm) adjustable
legs from inside the unit.
2. Remove the pan rail (GRCD units); or pan skirts and water
reservoir (GRCDH units).
3. Remove the front curved glass by rotating it partially forward
and lifting straight up and off. Discard the rubber packing
strips.
4. Remove rear doors on 2-pan and 3-pan models by grasping
the door edges then lifting up and out of the bottom channel.
Discard the protective cardboard from top of each door.
NOTE: Do not remove the plastic glides from the top of the door
glass before completing assembly.
NOTE: Models GRCD-1P and GRCDH-1P have a single,
hinged door that does not need to be removed.
Do not lay unit on the side with control panel or on front of
a curved glass unit. Damage to unit could occur.
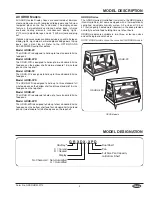
5. Carefully lay the unit on its side. Two people are required
for this step.
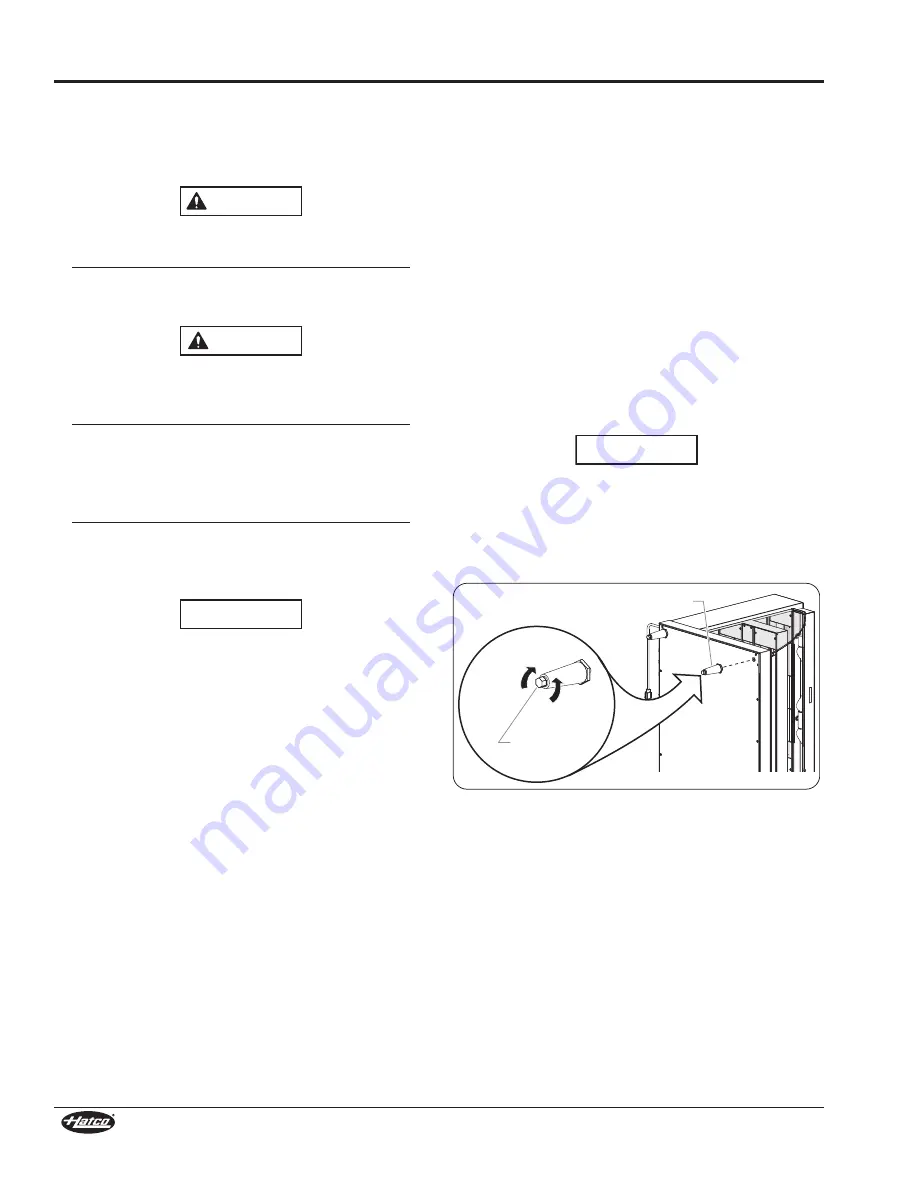
6. Install the 4″ (102 mm) legs to the bottom of the unit. Hand
tighten the legs until snug. Do not over-tighten.
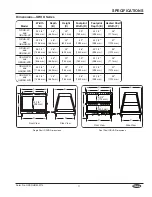
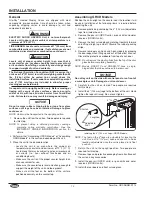
Installing the 4″ (102 mm) Legs—GRCD models
NOTE: The feet on the 4″ legs are adjustable for leveling the
unit. Use a 9/16″ (14 mm) open-end wrench to make
leveling adjustments once the unit is placed in its final
position.
7. Return the unit to the upright position. Two people are
required for this step.
8. Remove tape and protective packaging from all surfaces of
the unit and any accessories.
9. Install the pan rail (GRCD units); or pan skirts and water
reservoir (GRCDH units).
10. Install the rear doors and front curved glass.
NOTICE
Lengthen
Shorten
Adjustable
Foot
4″ Leg
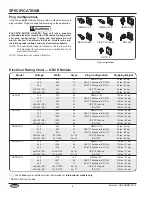
General
Glo-Ray
®
Heated Display Cases are shipped with most
components pre-assembled. Care should be taken when
unpacking shipping carton to avoid damage to unit and
components enclosed.
ELECTRIC SHOCK HAzARD: unit is not weatherproof.
Locate unit indoors where ambient air temperature is a
minimum of 70°F (21°C).
FIRE HAzARD: Locate unit a minimum of 1″ (25 mm) from
combustible walls and materials. If safe distances are not
maintained, discoloration or combustion could occur.
Locate unit at proper counter height in an area that is
convenient for use. Location should be level to prevent unit
or its contents from falling accidentally and strong enough
to support weight of unit and contents.
The National Sanitation Foundation (NSF) requires that
units over 36″ (914 mm) in width or weighing more than 80
lbs. (36 kg) either be sealed to or raised above the
installation surface. If unit cannot be sealed at the point of
use, 4″ (102 mm) legs are included to allow for proper
cleaning access below unit.
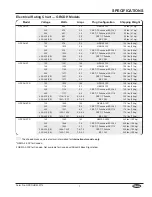
Transport unit in upright position only. Before moving or
tipping unit, secure all glass surfaces, doors, pan rails,
and/or skirts with tape, and drain water from humidified
units. Failure to do so may result in damage and injury.
Do not remove rubber shipping tabs or tape from glass
surfaces until legs have been installed. Damage to glass
could occur.
NOTE: Unit must be transported in the upright position.
1. Remove the unit from the carton. Two people are required
for this step.
NOTE: To prevent delay in obtaining warranty coverage,
complete online warranty registration. See the
ImPORTaNT OWNER INFORmaTION
section for
details.
2. Perform either “assembling GRCD models” or “assembling
GRHD models” in this section, depending on the unit.
3. Place the unit in the desired location.
• Locate the unit in an area where the ambient air
temperature is constant and a minimum of 70° F (21° C).
avoid areas that may be subject to active air movements
or currents (i.e., near exhaust fans/hoods and air
conditioning ducts).
• make sure the unit is at the proper counter height in an
area convenient for use.
• make sure the countertop is level and strong enough to
support the weight of the unit and food product.
• make sure all the feet on the bottom of the unit are
positioned securely on the countertop.
WARNING
CAUTION
NOTICE