Form No. GRCDHDm-0712
13
INSTALLATION
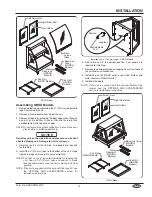
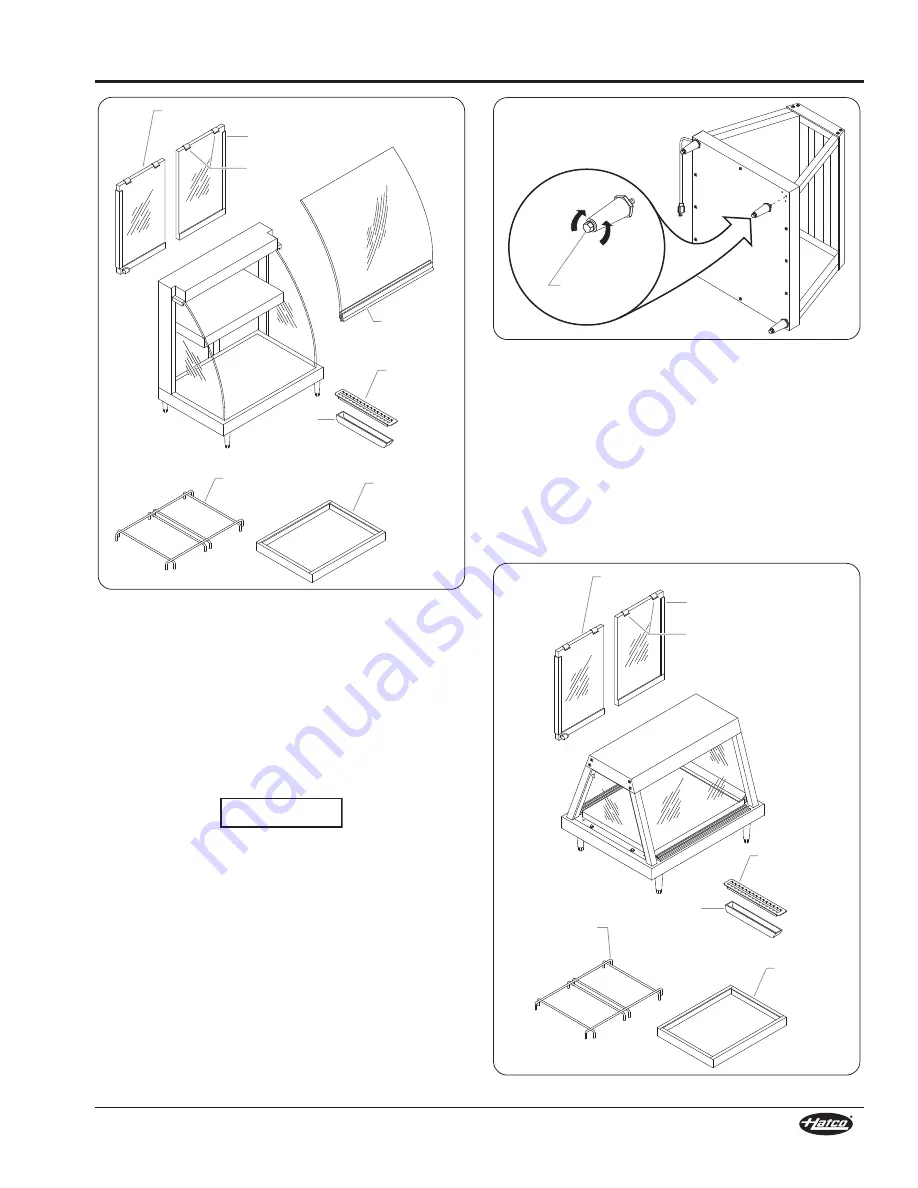
GRCD model
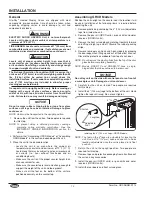
Assembling GRHD Models
1. Remove plastic bag containing the 4″ (102 mm) adjustable
legs from inside the unit.
2. Remove all components from inside the unit.
3. Remove all doors by grasping the door edges then lifting up
and out of the bottom channel. Discard the protective
cardboard from the top of each door.
NOTE: Do not remove the plastic glides from the top of the door
glass before completing assembly.
Do not lay unit on the side with control panel or on front of
a heated display unit. Damage to unit could occur.
4. Carefully lay the unit on its side. Two people are required
for this step.
5. Install the 4″ (102 mm) legs to the bottom of the unit. Hand
tighten the legs until snug. Do not over-tighten.
NOTE: The feet on the 4″ legs are adjustable for leveling the
unit. Use a 9/16″ (14 mm) open-end wrench to make
leveling adjustments once the unit is placed in its final
position.
NOTE: If the unit is supplied with the optional Slant Leg Kit, see
the
OPTIONS aND aCCESSORIES
section for
installation instructions.
Left Rear Door
Right Rear Door
Door Glides
Pan Rail
(GRCD Models)
Front
Curved
Glass
Water
Reservoir
(GRCDH
Models)
Reservoir
Cover
(GRCDH
Models)
Pan Skirt
(GRCDH
Models)
NOTICE
Installing the 4″ (102 mm) Legs—GRHD models
6. Return the unit to the upright position. Two people are
required for this step.
7. Remove tape and protective packaging from all surfaces of
the unit and any accessories.
8. Install the pan rail (GRHD units); or pan skirt, divider, and
water reservoir (GRHDH units).
9. Install all the doors.
NOTE: If the unit is supplied with the optional Display Sign
Holder, see the
OPTIONS aND aCCESSORIES
section for installation instructions.
GRHD model
Lengthen
Shorten
Adjustable
Foot
Left Rear Door
Right Rear Door
Door Glides
Water
Reservoir
(GRHDH
Models)
Pan Rail
(GRHD Models)
Reservoir Cover
(GRHDH
Models)
Pan Skirt
(GRHDH
Models)

