OPERATION
14
Form No. GRCDHDm-0712
4. Fill the water reservoir with softened or distilled water. Each
reservoir has a 3 quart (2.8 liter) capacity. If the red LOW
WaTER indicator is on, press the red Reset Button located
to the left of the indicator light.
NOTE: Use of softened or distilled water is recommended to
preserve the life of electrical and mechanical
components. If hard water is used, the reservoir will
require periodic cleaning and deliming. See the
maINTENaNCE
section for deliming instructions.
NOTE: The reservoir capacity permits uninterrupted operation
for approximately 4 hours, depending on the settings
and how frequently the door is opened. When the red
LOW WaTER
indicator is lit, add water to the reservoir
and press the red Reset Button.
5. Re-install the center pan divider.
6. Turn the BaSE HEaT CONTROL to the desired temperature
setting.
7. Turn the TOP HEaT CONTROL and the CENTER HEaT
CONTROL (dual units only) to the desired temperature
setting.
NOTE: On dual shelf models, the TOP HEAT and CENTER
HEAT indicator lights will illuminate when controls are
in the ON position.
NOTE: Temperature and humidity settings may vary depending
upon product make-up and consistency.
BuRN HAzARD: Some exterior surfaces on unit will get
hot. use caution when touching these areas.
8. allow unit 30 minutes to reach operating temperature.
Shutdown
Perform the following steps for shutdown of all models.
1. move the Power ON/OFF (I/O) switch on the base to the
OFF (O) position.
2. Perform the “Daily Cleaning” procedure in the
maINTENaNCE section of this manual.
CAUTION
General
Use the following procedures to operate the Glo-Ray
®
Heated
Display Cases.
Read all safety messages in the IMPORTANT SAFETY
INFORMATION section before operating this equipment.
Do not place food product directly onto shelves. Food
product must be wrapped, boxed, or on a food pan.
Startup
Perform the following step for startup of all models, and then
proceed to the appropriate section for the remaining steps for
startup.
1. Plug unit into a properly grounded electrical receptacle of
the correct voltage, size and plug configuration. See the
SPECIFICaTIONS section for details.
GRCD and GRHD (Non-Humidified) Models
1. move the Power ON/OFF (I/O) switch on the base to the
ON (I) position.
2. Turn the BaSE HEaT CONTROL to the desired temperature
setting.
3. Turn the TOP HEaT CONTROL and the CENTER HEaT
CONTROL (dual units only) to the desired temperature
setting.
NOTE: On dual shelf models, the TOP HEAT and CENTER
HEAT indicator lights will illuminate when controls are
in the ON position.
BuRN HAzARD: Some exterior surfaces on unit will get
hot. use caution when touching these areas.
4. allow unit 30 minutes to reach operating temperature.
GRCDH and GRHDH (Humidified) Models
1. Remove the center slotted pan divider from the water
reservoir (two dividers on GRHD-4P and -4PD models).
2. move the Power ON/OFF (I/O) switch to the ON (I) position.
3. Rotate the HUmIDITy CONTROL to the desired position.
• The HUmIDITy ON Indicator (green) will light up to show
that humidity is on. The LOW WaTER indicator (red) will
light when the water reservoir is empty.
• The unit can be run without humidity by turning the
HUmIDITy CONTROL to the OFF (O) position.
WARNING
CAUTION
!
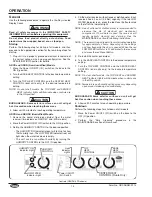
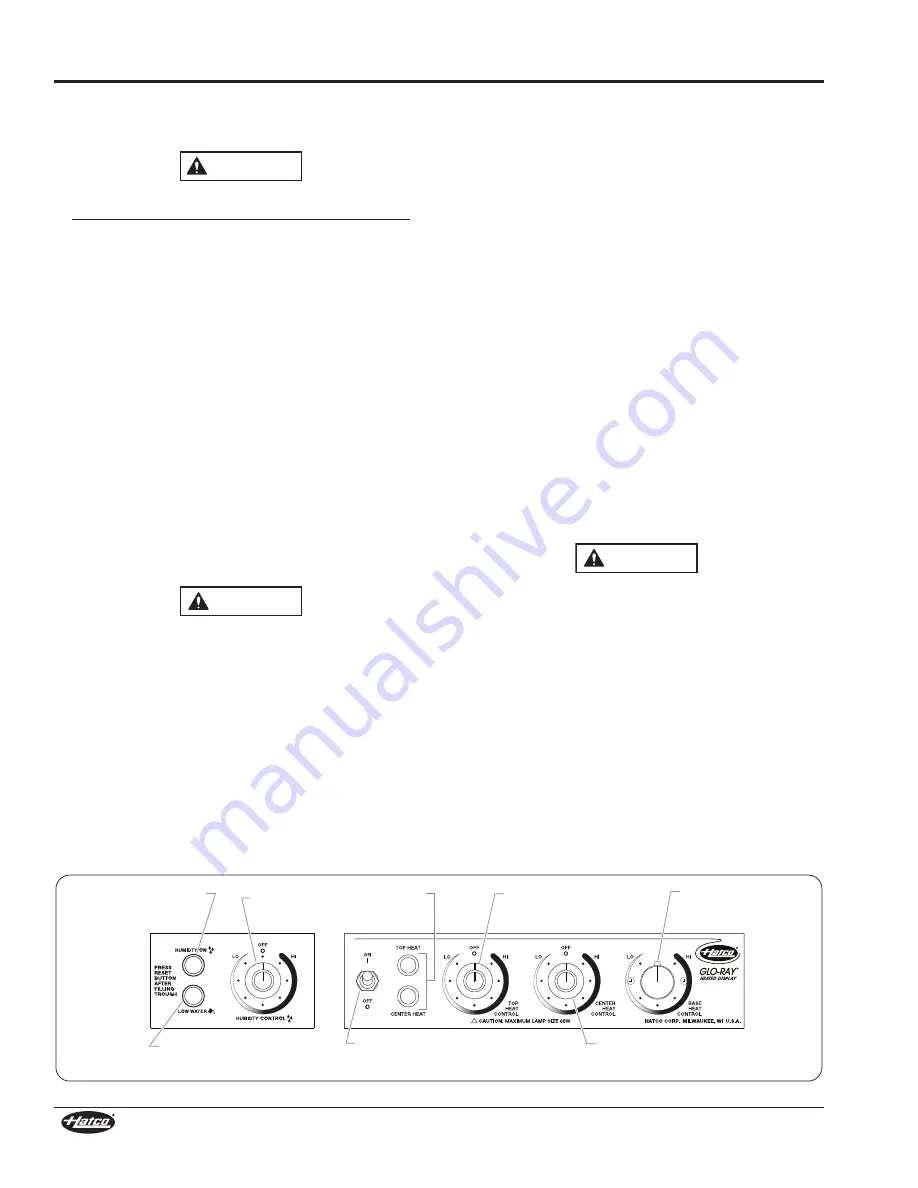
Power ON/OFF
(I/O) Switch
Heat
Indicator
Lights
TOP
HEAT
CONTROL
BASE
HEAT
CONTROL
CENTER HEAT
CONTROL (Duals Only)
HUMIDITY ON
Indicator Light
HUMIDITY
CONTROL
LOW WATER
Indicator Light
Controls (GRHDH-2PD shown)

