background image

MAINTENANCE

Form No. MDWM-0608

7

General

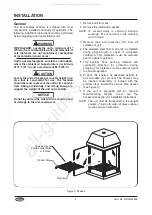
The Hatco Mini Display Warmer is designed for

maximum durability and performance, with minimum

maintenance.

ELECTRIC SHOCK HAZARD:

• Turn the power switch OFF, unplug the power

cord, and allow the unit to cool before

performing any maintenance or cleaning.

• DO NOT submerge or saturate with water.

Unit is not waterproof. Do not operate if unit

has been submerged or saturated with water.

• Do not steam clean or use excessive water on

the unit.

This unit has no “user-serviceable” parts. If

service is required on this unit, contact an

Authorized Hatco Service Agent or contact the

Hatco Service Department at 800-558-0607 or

414-671-6350; fax 800-690-2966; or International

fax 414-671-3976.

Cleaning

Use non-abrasive cleaners only. Abrasive

cleaners could scratch the finish of the unit,

marring its appearance and making it

susceptible to soil accumulation.

To preserve the finish of the Mini Display Warmer

cabinet, it is recommended that the exterior and

interior surfaces be wiped daily with a damp cloth.

Shelves should be removed and washed. Stubborn

stains may be removed with a good stainless steel

cleaner or a non-abrasive cleaner. Hard to reach

areas should be cleaned with a small brush and mild

soap.
Clean the glass sides using a common glass

cleaner. In almost all cases, glass panels should be

cleaned while remaining in the unit. Only for difficult

or hard to clean stains is removal of the fixed glass

panels suggested.

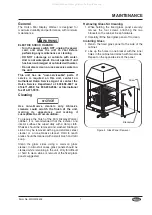
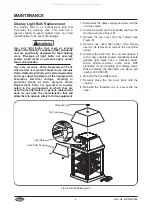
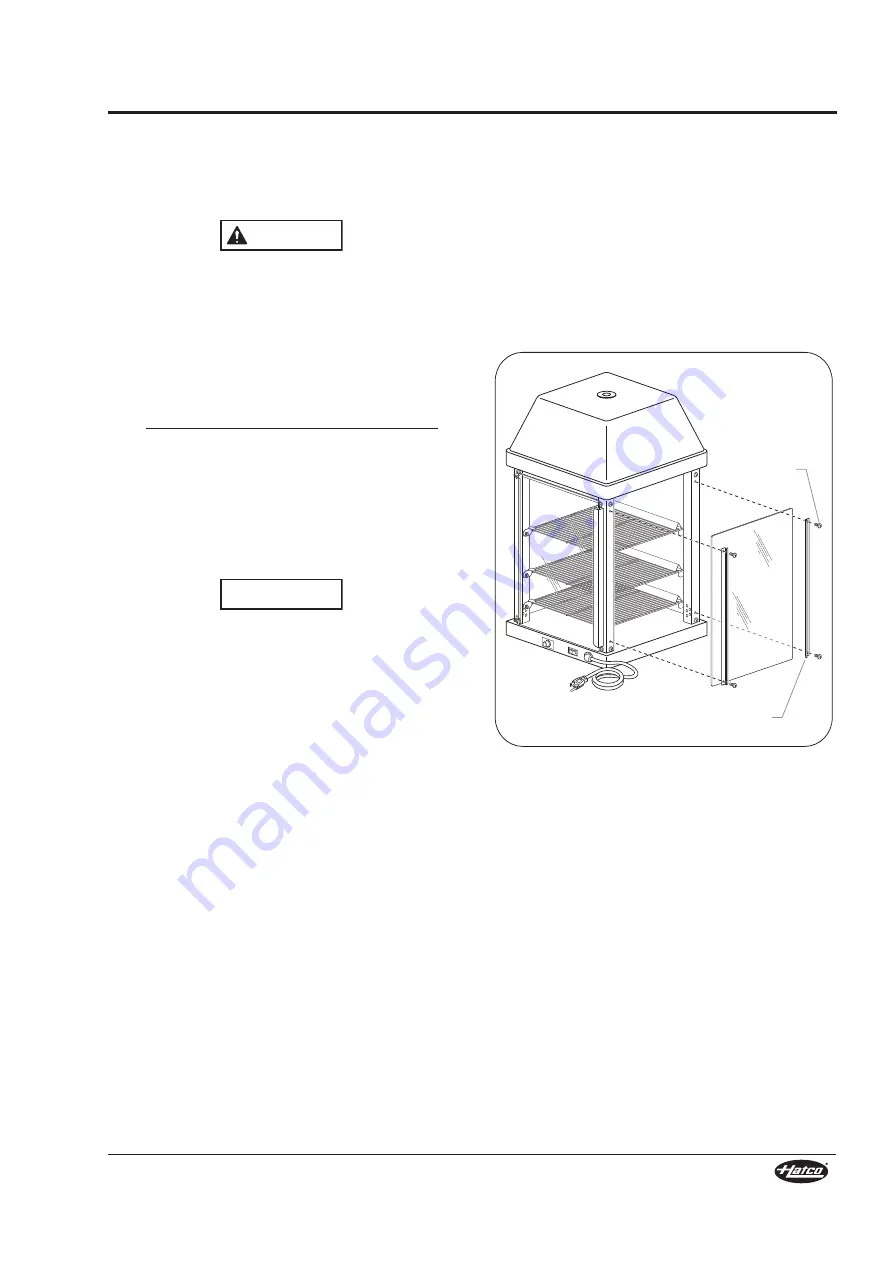
Removing Glass for Cleaning

1. While holding the fixed glass panel securely,

remove the four screws attaching the two

brackets to the cabinet. Keep hardware.

2. Carefully lift the fixed glass panel off to clean.
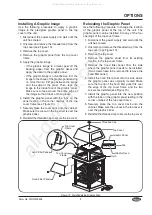
Installing Glass

1. Return the fixed glass panel to the side of the

cabinet.

2. Line up the holes in one bracket with the inner

holes in the cabinet and attach with two screws.

Repeat on the opposite side of the panel.

Figure 8. Glass Panel Removal

Screw

Bracket

NOTICE

WARNING

All manuals and user guides at all-guides.com

Summary of Contents for MDW-1X

Page 1: ...una localizaci n segura para la referencia futura Do not operate this equipment unless you have read and understood the contents of this manual Failure to follow the instructions contained in this man...

Page 2: ...prepared foods for prolonged periods of time while maintaining that just made quality Mini Display Warmer cabinets provide the best environment for products like sandwiches cookies pretzels muffins a...

Page 3: ...ome aftermarket or generic replacement parts do not have the characteristics that will allow them to operate safely in Hatco equipment FIRE HAZARD Locate the unit a minimum of 1 25 mm from combustible...

Page 4: ...ys provide flexibility for a variety of product choices Shelf height is also adjustable to accommodate a variety of food package sizes The unit has incandescent lighting to heighten product awareness...

Page 5: ...and install the proper voltage and size electrical outlet Figure 3 Plug Configuration NOTE Receptacle not supplied by Hatco NEMA 5 15P WARNING Form No MDWM 0608 3 Electrical Rating Chart Model Voltag...

Page 6: ...taining warranty coverage fill out and mail in the warranty card to Hatco 3 Remove tape and protective film from all surfaces of unit 4 The stainless steel floor in all units is protected during shipp...

Page 7: ...arefully lift the door off of the bottom hinge pivot pin Also remove the nylon washer and save 3 Remove the screw attaching the bottom hinge pivot pin to the cabinet Keep the nylon washer and hardware...

Page 8: ...t the Temperature Control to the desired level between MIN and MAX BURN HAZARD Some exterior surfaces on the unit will get hot Use caution when touching these areas 4 Allow 30 minutes to preheat check...

Page 9: ...rve the finish of the Mini Display Warmer cabinet it is recommended that the exterior and interior surfaces be wiped daily with a damp cloth Shelves should be removed and washed Stubborn stains may be...

Page 10: ...urn Genuine Hatco Replacement Parts are specified to operate safely in the environments in which they are used Some aftermarket or generic replacement parts do not have the characteristics that will a...

Page 11: ...back onto the cabinet Make sure the cut out in the top cover is over the graphic panel 8 Reinstall the threaded cap to secure the top cover Relocating the Graphic Panel Use the following procedure to...

Page 12: ...Service Agent or Hatco for assistance No heat but light works Temperature control set too low Heating element s not working Temperature control not working properly Adjust temperature control to a hi...

Page 13: ...ED TO ANY IMPLIED WARRANTY OF MERCHANTABILITY OR FITNESS FOR A PARTICULAR PURPOSE OR PATENT OR OTHER INTELLECTUAL PROPERTY RIGHT INFRINGEMENT Without limiting the generality of the foregoing SUCH WARR...

Page 14: ...NOTES 12 Form No MDWM 0608 All manuals and user guides at all guides com...

Page 15: ...NOTES Form No MDWM 0608 13 All manuals and user guides at all guides com...

Page 16: ...EBRASKA Anderson Electric Omaha 402 341 1414 NEVADA Burney s Commercial Las Vegas 702 736 0006 Hi Tech Commercial Service N Las Vegas 702 649 4616 NEW JERSEY Jay Hill Repair Fairfield 973 575 9145 Ser...

Reviews: