background image

8

Form No. SNACKM-0519

English

OPERATION

  4. Press  the

button to turn on the Snack System 

(operating mode).


•  A beep will sound and the

button will illuminate 

green.


• The LED display will flash the active setpoint 

temperature followed by the current temperature of the 

unit, and preheating will begin. 

  5.  Press the desired

button that corresponds to 

the installed cooking plates.


• The indicator light above the selected preset will 

illuminate.


•  The LED display will flash the setpoint temperature of 

the Preset button, followed by the current temperature 

of the unit.

  6.  Using the included heat-resistant cleaning brush, carefully 

apply an oil-based, non-stick shortening evenly onto each 

cooking plate. Make sure the shortening makes it to the 

bottoms of the grooves in each plate.

  7.  Close the Snack System and allow to heat for 30 minutes.
 

•  When beeps will sound and the LED display will show 

the current timer setting. Continue to allow the unit to 

heat for the full 30 minutes to season the plates.

  8.  Open the Snack System and spread batter onto the bottom 

cooking plate. The amount of batter will be determined by 

the type of batter and the style of the installed cooking 

plates.

  9.  Close the Snack System, and press the 

 button to start 

the timer.

 10.  When cooking is complete, several beeps will sound and 

the LED display will flash zeros.


•  Touch the

button to reset the timer. 

 11.  Carefully open the Snack System and immediately remove 

the food product using a pair of tongs or other appropriate 

utensil.

 12.  Discard the food product. 
 

• The first baked food product after startup will soak up 

excess shortening, preparing the Snack System for 

cooking.

IMPORTANT NOTE

Perform the entire “Startup” procedure each time the Snack 

System is turned on. Seasoning the cooking plates and 

discarding the first baked food product are important steps 

toward ensuring quality product, non-stick operation, and 

ease of cleanup.

 13.  Continue cooking food product. 
 

• If product begins sticking to the cooking plates, spray 

the top and bottom cooking plates lightly with an oil-

based food release spray. Continue to spray the plates 

in between product as needed.

Cooking Waffles

  1.  Make sure the “Startup” procedure is complete.
  2.  Open the Snack System, and spread waffle batter onto 

the bottom cooking plate. The amount of batter will 

be determined by the type of batter and the size of the 

cooking plates.

  3.  Close the Snack System, and press the 

 button to start 

the timer.

  4. When the cooking cycle is complete, several beeps will 

sound and the LED display will flash zeros.


•  Touch the

button to reset the timer. 

  5.  Carefully open the Snack System, and immediately remove 

the waffle using a pair of tongs or other appropriate utensil.

  6. Continue to cook waffles by repeating steps 2–5 of this 

procedure.


• If the waffles begin sticking to the cooking plates, spray 

the top and bottom cooking plates lightly with an oil-

based food release spray. Continue to spray the plates 

in between waffles as needed.
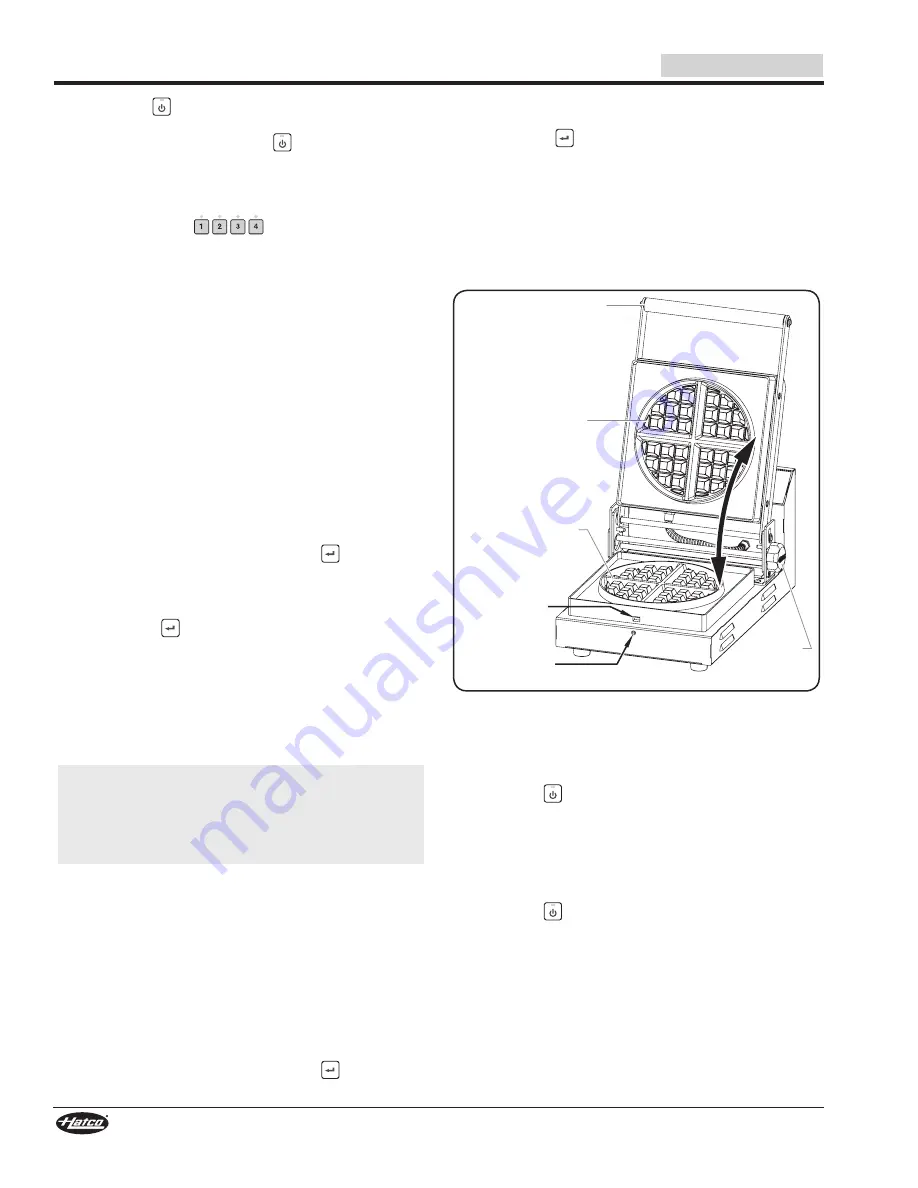
Bottom

Cooking

Plate

Top Plate

Adjustment

Knob

Bottom

Locking Tab

Top

Cooking

Plate

Handle

Bottom

Release Button

Snack System in open position 

(shown with Belgian Waffle plates).

Standby Shutdown

Use standby shutdown to put the unit in standby mode during 

extended periods of non-use.
  1.  Press the 

 button to shut down operation and put the 

unit into standby mode. The light will be red.


•  The heating elements and LED display will shut down. 

Daily Shutdown

Use the following procedure to shutdown the unit  at the end 

of each day.
  1.  Press the 

 button to shut down operation and put the 

unit into standby mode. 

  2.  Move the Power I/O switch located on the back of the unit 

to the “O” (off) position to turn off power to the unit. 

 3. Perform the “Daily Cleaning” procedure in the 

MAINTENANCE section of this manual.

Summary of Contents for SNACK Series

Page 1: ... puede resultar en un serio lesión o muerte Este manual contiene importante información sobre seguridad concerniente al mantenimiento uso y operación de este producto Si usted no puede entender el contenido de este manual por favor pregunte a su supervisor Almacenar este manual en una localización segura para la referencia futura ADVERTENCIA Ne pas utiliser cet équipement sans avoir lu et compris ...

Page 2: ...afety Information 3 Model Description 4 Model Designation 4 Specifications 5 Plug Configurations 5 Electrical Rating Charts 5 Dimensions 5 Installation 6 General 6 Changing Cooking Plates 6 Operation 7 General 7 Operator Controls 7 Operating the Unit 7 Cooking Tips 9 Changing Between Fahrenheit and Celsius 9 Programming the Snack System 9 Maintenance 10 General 10 Daily Cleaning 10 Troubleshooting...

Page 3: ...have been instructed on the safe and proper use of the unit This unit is not intended for use by children or persons with reduced physical sensory or mental capabilities Ensure proper supervision of children and keep them away from the unit Never leave unit unattended during use Do not use unit for any purpose other than for which it is designed WARNING FIRE HAZARD Locate unit a minimum of 2 51 mm...

Page 4: ... Coffee Bean Freestyle Waffle NOTE Refer to the OPTIONS AND ACCESSORIES section for information regarding available cooking plates as well as other items Snack Systems feature a Power I O on off switch on the back a multi function control panel and a top plate adjustment knob All units are equipped with a factory attached 6 1829 mm power cord and plug SNACK 1 Model This model is a single head Snac...

Page 5: ...ctrical Rating Chart Plug Configurations Units are supplied from the factory with an electrical cord and plug Plugs are supplied according to the application WARNING ELECTRIC SHOCK HAZARD Plug unit into a properly grounded electrical receptacle of the correct voltage size and plug configuration If plug and receptacle do not match contact a qualified electrician to determine and install proper volt...

Page 6: ...nd a minimum of 70 F 21 C Avoid areas that may be subject to active air movements or currents i e near exhaust fans hoods and air conditioning ducts Make sure the unit is at the proper counter height in an area convenient for use Make sure the countertop is level and strong enough to support the weight of the unit and food product Make sure all the feet on the bottom of the unit are positioned sec...

Page 7: ...C The timer setting range of the unit is 0 10 10 00 Refer to Programming the Snack System in this section for more information and to make adjustments to these settings Arrow Buttons The Arrow buttons are used to change time and temperature settings Press the button to increase a time or temperature setting Press the button to decrease a time or temperature setting Enter Button The Enter button st...

Page 8: ...e first baked food product are important steps toward ensuring quality product non stick operation and ease of cleanup 13 Continue cooking food product If product begins sticking to the cooking plates spray the top and bottom cooking plates lightly with an oil based food release spray Continue to spray the plates in between product as needed Cooking Waffles 1 Make sure the Startup procedure is com...

Page 9: ...hold the button for three seconds A beep will sound and the LED display will show either F or C to indicate the active unit of measure Programming the Snack System The Snack System is capable of storing 4 different cooking cycles using the Preset buttons A cooking cycle consists of three different settings temperature time and top cooking plate power Use the following procedure to program a Preset...

Page 10: ...tch finish of unit marring its appearance and making it susceptible to soil accumulation Do not use harsh chemicals such as bleach cleaners containing bleach or oven cleaners to clean this unit Clean unit daily to avoid malfunctions and maintain sanitary operation Daily Cleaning To preserve the finish of the unit as well as maintain performance it is recommended that the unit be cleaned daily WARN...

Page 11: ...ustments or maintenance Troubleshooting Questions If you continue to have problems resolving an issue please contact the nearest Authorized Hatco Service Agency or Hatco for assistance To locate the nearest Service Agency log onto the Hatco website at www hatcocorp com select the Support pull down menu and click on Find A Service Agent or contact the Hatco Parts and Service Team at Telephone 800 5...

Page 12: ...TF Sandwich Cooking Plates Teflon Item No Description 12BEANTF Coffee Bean Cooking Plates 12 bean Teflon FREESTYLE Freestyle Waffle Cooking Plates RBELGIAN Belgian Waffle Cooking Plates round 7 178 mm Sandwich Plates Belgian Waffle Plates Freestyle Waffle Plates Top Bottom Chelky Plates Top Bottom Donut Plates Top Bottom Panini Plates Top Bottom Coffee Bean Plates Top Bottom Cooking Plates Additio...

Page 13: ... PARTICULAR PURPOSE OR PATENT OR OTHER INTELLECTUAL PROPERTY RIGHT INFRINGEMENT Without limiting the generality of the foregoing SUCH WARRANTIES DO NOT COVER Coated incandescent light bulbs fluorescent lights heat lamp bulbs coated halogen light bulbs halogen heat lamp bulbs xenon light bulbs LED light tubes glass components and fuses Product failure in booster tank fin tube heat exchanger or othe...

Page 14: ...priétaire 14 Introduction 14 Consignes de Sécurité Importantes 15 Description du Modèle 16 Désignation du Modèle 16 Caractéristiques Techniques 17 Configuration des fiches 17 Tableau des valeurs nominales électriques 17 Dimensions 17 Installation 18 Généralités 18 Remplacement des plaques de cuisson 18 Mode d emploi 19 Généralités 19 Panneau de commande 19 Fonctionnement de l appareil 20 Conseils ...

Page 15: ...nflammables à proximité de ces plaques ou de tout autre appareil Assurez vous que tous les opérateurs ont été formés à l utilisation sûre et correcte de l appareil Cet appareil ne doit pas être utilisé par des enfants ou des personnes avec des capacités physiques sensorielles ou mentales diminuées Assurez vous que les enfants sont bien surveillés et tenez les à l écart de l appareil AVERTISSEMENT ...

Page 16: ...on OPTIONS ETACCESSOIRES pour obtenir des informations sur les plaques de cuisson disponibles ainsi que sur d autres articles Les systèmes de collations sont dotés d un interrupteur d alimentation I O marche arrêt d un panneau de commande multifonction et d un bouton de réglage de la plaque supérieure Tous les appareils sont équipés d un cordon d alimentation de 1 829 mm 6 po et d une prise instal...

Page 17: ...lectriques Configuration des fiches Les appareils sont fournis par l usine avec un cordon et une prise électriques Les fiches fournies correspondent à leur application AVERTISSEMENT DANGER DE DÉCHARGE ÉLECTIQUE Brancher l appareil sur une prise de courant avec terre de tension de format et de configuration des broches corrects Si la fiche et la prise ne se correspondent pas s adresser à un électri...

Page 18: ...raisse risquent d endommager l appareil Les dommages à toute partie du comptoir pouvant être causés par la chaleur générée par l équipement de Hatco ne sont pas couverts par la garantie de Hatco Contactez le fabricant du comptoir pour plus de renseignements 5 Placez l appareil à l emplacement souhaité Placez l appareil dans une zone dont la température ambiante est constante 21 C 70 F minimum Évit...

Page 19: ...oin de chauffage se trouvant au dessus du préréglage sélectionné s allume Les boutons de préréglage sont réglés en usine avec les valeurs suivantes 190 C 375 F 03 30 100 gaufres panini 170 C 340 F 04 00 80 donut grains de café 155 C 310 F 06 00 100 chelky autres pâtisseries 170 C 340 F 04 00 70 autre produit de pâte à gâteau NOTA La plage de températures de l appareil est de 104 218 C 220 425 F La...

Page 20: ...tante à la chaleur fournie appliquez soigneusement de la matière grasse non collante à base d huile sur chaque plaque de cuisson Assurez vous que la matière grasse pénètre dans les rainures de chaque plaque 7 Fermez le système de collations et laissez le chauffer pendant 30 minutes Des signaux sonores retentissent et l écran DEL indique le réglage actuel du minuteur Laissez encore l appareil chauf...

Page 21: ...on sans Teflon avant utilisation se référer à la procédure de Démarrage de la présente section Après chaque utilisation nettoyez toujours soigneusement les plaques de cuisson à l eau et au savon doux Le système de collations peut cuire la plupart des pâtes normalement cuites dans un four ordinaire cela inclut les pâtes à pain et à pizza les pâtes feuilletées croissants de nombreuses pâtes à pâtiss...

Page 22: ...ez sur le bouton ou pour augmenter ou diminuer le réglage au nombre de minutes souhaité 5 Appuyez sur le bouton Les deux caractères qui représentent secondes clignotent sur l écran DEL MODE D EMPLOI 6 Appuyez sur le bouton ou pour augmenter ou diminuer le réglage au nombre de secondes souhaité 7 Appuyez sur le bouton La puissance en pourcentage de l élément supérieur clignote sur l affichage DEL e...

Page 23: ...rence et la rendant vulnérable à l accumulation de saleté L utilisation de produits chimiques agressifs tels que l eau de javel les produits nettoyants contenant de la javel ou les produits de nettoyage pour les fours sont proscrits pour nettoyer l appareil Nettoyez l unité quotidiennement pour éviter les dysfonctionnements et assurer un fonctionnement sain Nettoyage quotidien Afin de préserver la...

Page 24: ...ge ou tout entretien Vous avez des questions en ce qui concerne les pannes Si le problème persiste veuillez contacter l agence d entretien agréée Hatco la plus proche ou Hatco pour obtenir une assistance Pour trouver l agence d entretien la plus proche rendez vous sur le site Internet de Hatco www hatcocorp com et sélectionnez le menu déroulant Support Assistance puis cliquez sur Find A Service Ag...

Page 25: ... Brosse de nettoyage Numéro d élément Description PANINI Plaques de cuisson pour panini 4DONUTTF Plaques de cuisson pour donuts 4 donuts Teflon 5CHELKY Plaques de cuisson pour chelky 5 chelky SANDWICHTF Plaques de cuisson pour sandwich Teflon Numéro d élément Description 12BEANTF Plaques de cuisson pour grains de café 12 grains Teflon FREESTYLE Plaques de cuisson pour gaufres de style libre RBELGI...

Page 26: ... TOUTES AUTRES ATTEINTES AUX DROITS DE LA PROPRIÉTÉ INTELLECTUELLE Sans restreindre la portée générale des énoncés précédents CES GARANTIES NE COUVRENT PAS LES ÉLÉMENTS SUIVANTS ampoules d éclairage à incandescence enduites lumières fluorescentes ampoules de lampes chauffantes ampoules d éclairage à halogène enduites ampoules de lampes chauffantes au xénon tubes d éclairage DEL composants en verre...

Page 27: ...Formulaire n SNACKM 0519 27 Français NOTAS ...

Page 28: ...is 314 535 2222 NEBRASKA Anderson Electric Omaha 402 341 1414 NEVADA Burney s Commercial Las Vegas 702 736 0006 Hi Tech Commercial Service N Las Vegas 702 649 4616 NEW JERSEY Jay Hill Repair Fairfield 973 575 9145 Service Plus Flanders 973 691 6300 NEW YORK Alpro Service Co Maspeth 718 386 2515 Duffy s AIS Buffalo 716 884 7425 3Wire Plattsburgh 800 634 5005 Duffy s AIS Sauquoit 800 836 1014 J B Br...

Reviews: