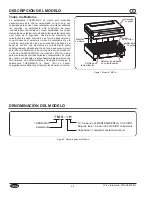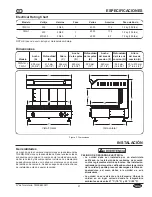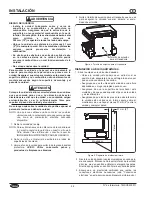
background image

Nºdeformulario.TMSCEM-0911

31

MANTENIMIENTO

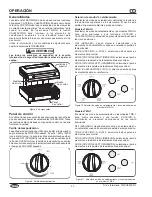
Luces indicadoras

Haytreslucesindicadorasenelpaneldecontrol:

luzindicadoralEFT(IZQUIERDA):seiluminacuandolaperilla

detemporizaciónestáactivayelparizquierdodeelementos

superioresestáseleccionadoparacalentamiento.
luz indicadora RIGHT (DERECHA): se ilumina cuando la

perilla de temporización está activa y el par derecho de

elementossuperioresestáseleccionadoparacalentamiento.
luz indicadora ON (ENCENDIDO): se ilumina cuando el

selectordemododecalentamientoestáencualquierfunción

deCOCCIóNoCAlEFACCIóN.

Operación de la salamandra

Función COCCIÓN

CuandolaunidadestáenlafunciónCOCCIóN,loselementos

de

calentamiento

superiores

operan

a

máxima

potencia/intensidadparaasegurarqueelcalorsedistribuyaen

formauniformesobrelasuperficiedecocción.laintensidad

de la temperatura puede ajustarse subiendo o bajando la

carcasasuperiorousandosolamenteunpardeelementosde

calentamientoenlugardeloscuatro.laintensidaddelcalor

quepenetraenlacomidadisminuyeamedidaqueladistancia

entrelacomidayloselementosdecalentamientoaumenta.

Utiliceelsiguienteprocedimientoparaoperarlasalamandra

enlafunciónCOCCIóN.

No bloquee la perilla de temporización en la posición de

ENCENDIDO. La unidad tiene elementos de calentamiento

de  encendido  instantáneo  diseñados  para  alcanzar  las

temperaturas de cocción rápidamente. Bloquear la perilla

de  temporización  en  la  posición  de  ENCENDIDO

aumentará el consumo energético y podría acortar la vida

útil de los elementos de calentamiento.

1. Muevalacarcasasuperioralaalturadecoccióndeseada.
2. Coloquelosalimentossobrelarejilladecocción.
3. Gireelselectordemododecalentamientoalafunciónde

COCCIóNdeseada.

• laluzindicadoraON(ENCENDIDO)seiluminará.

4. Girelaperilladetemporizaciónensentidohorariopara

seleccionareltiempodecoccióndeseado.

• las luces indicadoras correspondientes, lEFT

(IZQUIERDA)oRIGHT(DERECHA),seiluminaránpara

indicar qué elementos están seleccionados y

efectuandoelcalentamiento.

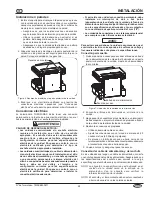
AVISO

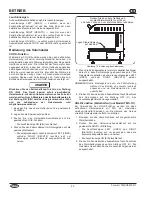
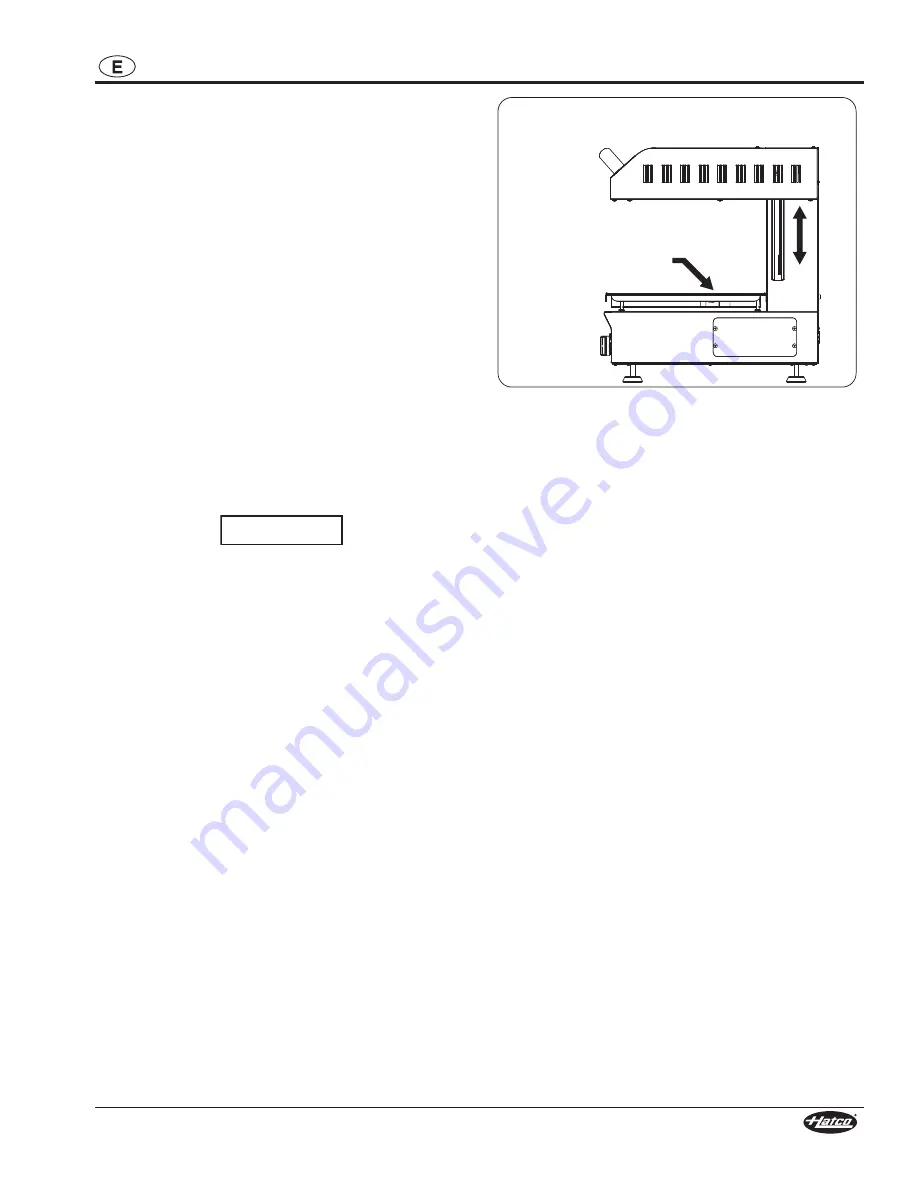
Figura12.Operacióndelasalamandra

5. Cuandoseacabeeltiempo,seescucharáunpitidoque

indica que el ciclo de COCCIóN ha terminado. los

elementos de calentamiento se apagarán y las luces

indicadoraslEFT(IZQUIERDA)oRIGHT(DERECHA)se

apagarán.

NOTA: El operador puede cambiar el ajuste del temporizador

y prender o apagar los elementos de calentamiento en

cualquier  momento  durante  el  funcionamiento  de  la

unidad.

6. Cuandosehayacompletadolacocción,gireelselectordel

mododecalentamientoalaposiciónOFF(APAGADO)

(O).Todaslaslucesindicadorasseapagarán.

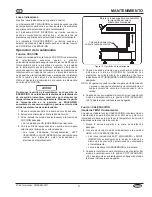
Función CALEFACCIÓN
(modelos TMS-1h únicamente)

CuandoseutilizalafunciónCAlEFACCIóN,loselementosde

calentamientosuperioresfuncionanal25%desupotenciao

intensidadmáximaparamantenerlatemperaturadecocción

alcanzadaduranteelciclodecocción.

1. Mueva la carcasa superior a la altura de calefacción

deseada.

2. Gireelselectordemododecalentamientoalaposición

HOlDl+R(CAlEFACCIóN D+I).

• las luces indicadoras lEFT (IZQUIERDA) y RIGHT

(DERECHA)seiluminaránparaindicarquetodoslos

elementosseencuentranseleccionadosyefectuando

elcalentamiento.

• laluzindicadoraON(ENCENDIDO)seiluminará.

3. Cuandoelcalefacciónestécompleto,gireelselectordel

mododecalentamientoalaposiciónOFF(APAGADO)

(O).loselementosdecalentamientoseapagaránytodas

laslucesindicadorasseapagarán.

Coloque los alimentos

sobre la rejilla de cocción.

Baje la carcasa superior para aumentar

la intensidad del calor y

súbala para disminuirla.

Summary of Contents for Therm-max Salamander

Page 1: ...r online Salamandra Series TMS Manual de Instalación y Operación P 24 Regístrese en línea Fornello portatilei Serie TMS Manuale per l installazione e l uso P 46 Registratevi online Salamander Serien TMS Installations und Bedienungshandbuch P 13 Registrieren Sie sich online Salamander Séries TMS Manuel d installation et d utilisation P 35 S inscrire en ligne Register Online see page 2 www hatcocorp...

Page 2: ...tions appearing in this manual be read prior to installation or operation of a unit Important Owner Information 2 Introduction 2 Important Safety Information 3 Model Description 4 Model Designation 4 Specifications 5 Electrical Rating Chart 5 Dimensions 5 Installation 6 General 6 Countertop Installation 6 Wall Installation 7 Electrical Connections 7 Operation 8 General 8 Control Panel 8 Operating ...

Page 3: ...codes Installation by unqualified personnel will void unit warranty and may lead to electric shock or burn as well as damage to unit and or its surroundings Units supplied without an electrical plug require field installation of proper plug Plug must be properly grounded and of correct voltage size and configuration for electrical specifications of unit Contact a qualified electrician to determine...

Page 4: ...e strategically positioned inside the moveable upper housing to reduce the transfer of heat to the surrounding area The HOlD function on TMS 1H models is ideal for keeping foods hot or reheating foods A removeable cooking grate and drip tray allows for easy cleanup The unique features and flexibility of the THERM MAX Salamander make it easy to operate energy efficient and highly functional in any ...

Page 5: ...eight C Footprint Width D Footprint Depth E Cooking Width F Cooking Depth G Cooking height h TMS 1H and TMS 1 600 mm 23 5 8 510 mm 20 1 8 546 mm 21 1 2 520 mm 20 1 2 380 mm 15 540 mm 21 1 4 365 mm 14 5 16 50 to 212 mm 2 to 8 1 4 SPECIFICATIONS Electrical Rating Chart NOTE Shipping weight includes packaging Dimensions Form No TMSCEM 0911 5 Front View Side View A F F F D E G C H B Figure 3 Dimension...

Page 6: ...level to prevent unit or its contents from falling accidentally and strong enough to support the weight of the unit and contents Do not place anything on top of unit doing so may subject personnel to injury or damage unit NOTE A qualified person must check possible placements of the salamander to ensure that the proper electrical supply line is available 1 Remove the unit from the shipping carton ...

Page 7: ...n for electrical specifications of unit Contact a qualified electrician to determine and install proper electrical connection When installing a hardwired unit a 2 pole or 3 pole switch depending on unit must be installed between unit and main electrical supply The switch must be rated properly and have contacts with a minimum opening distance of 3 mm 1 8 Unit must be connected to an equipotential ...

Page 8: ...Grate Control Panel Height Gauge heating Mode Selector The heating mode selector determines the function of the overhead elements in the salamander The operation of this knob is slightly different for each model TMS 1h Models The heating mode selector on TMS 1H models has five positions and two functions COOK and HOlD The following are descriptions of the five positions OFF No elements selected Th...

Page 9: ...uct onto the cooking grate 3 Turn the heating mode selector to the desired COOK function The ON indicator light will illuminate 4 Turn the timer knob clockwise to the desired cooking time The appropriate lEFT and or RIGHT indicator light s will illuminate to indicate which elements are selected and heating Figure 12 Operating the Salamander NOTICE Place food product onto cooking grate Lower upper ...

Page 10: ...o operate safely in hatco equipment This unit has no user serviceable parts If service is required on this unit contact an Authorized hatco Service Agent or contact the hatco Service Department at 414 671 6350 fax 414 671 3976 WARNING Cleaning To preserve the finish of the unit as well as maintain performance it is recommended that the unit be cleaned daily Use non abrasive cleaners and cloths onl...

Page 11: ... Plug unit into proper power supply Unit not turned on Review Operating the Salamander in the OPERATION section of this manual Circuit breaker tripped Reset circuit breaker If circuit breaker continues to trip contact an Authorized Hatco Service Agent or Hatco for assistance Timer or Heat Mode switch defective Contact an Authorized Hatco Service Agent or Hatco for assistance Form No TMSCEM 0911 11...

Page 12: ...r misapplication improper installation or application of improper voltage 2 LIMITATION OF REMEDIES AND DAMAGES Hatco s liability and Buyer s exclusive remedy hereunder will be limited solely to replacement of part or Product using at Hatco s option new or refurbished parts or Product by Hatco or a Hatco authorized service agency with respect to any claim made within the applicable warranty period ...

Page 13: ...buch sorgfältig zu lesen Wichtige Informationen für den Benutzer 13 Einleitung 13 Wichtige Sicherheitshinweise 14 Modellbeschreibung 15 Modellbezeichnung 15 Technische Daten 16 Tabelle der elektrischen Anschlüsse 16 Abmessungen 16 Aufstellen des Gerät 16 Allgemeines 16 Installation auf der Arbeitsplatte 17 Installation an der Wand 18 Elektrische Anschlüsse 18 Betrieb 19 Allgemeines 19 Bedienfeld 1...

Page 14: ...ELEkTROSChOCkS Das Gerät darf nur von einem qualifizierten Elektriker installiert werden Der Einbau muss alle örtlichen elektrischen Vorschriften erfüllen Bei Installation durch unqualifizierte Personen erlischt die Garantie des Geräts und elektrischer Schock oder Verbrennungen sowie Beschädigungen des Geräts und oder der Umgebung können die Folge sein Bei Geräten ohne Stecker muss am Einsatzort e...

Page 15: ...eeffizienten und hochfunktionalen Gerät in jeder Küche Abbildung 1 Modell TMS 1H Oberes Gehäuse Zeitschaltknopf Rost Ablaufschale Höhenanzeige Heizmodus Auswahlknopf MODELLBEzEIChNUNG T M S 1 H THERM MAX Salamander Fassungsvermögen Gastronorm Wanne in voller Größe H COOK und HOLD Funktionen Ohne Zeichen Nur COOK Funktion Abbildung 2 Modellbezeichnung Die Geräte haben spezifische Spannungswerte übe...

Page 16: ...der sind die meisten Komponenten vormontiert Beim Entpacken des Versandkartons sollte vorsichtig vorgegangen werden um eine Beschädigung des Geräts und der enthaltenen Komponenten zu vermeiden Der Salamander kann auf einer Arbeitsplatte oder an einer Ziegel oder Betonwand montiert werden Die folgenden Installationsschritte sind durchzuführen bevor der Salamander in Betrieb genommen wird GEFAhR VON...

Page 17: ...ektrische Versorgungsleitung zur Verfügung steht 1 Nehmen Sie das Gerät aus dem Versandbehälter ANMERKUNG Um Verzögerungen beim Garantiebeginn zu vermeiden führen Sie die Online Garantieregistrierung bitte sofort durch Einzelheiten dazu finden Sie unter WICHTIGE INFORMATIONEN 2 Entfernen Sie Klebeband und Schutzfolien von allen Oberflächen des Geräts 3 Reinigen Sie das Gerät gründlich um alle Schu...

Page 18: ...pannung Größe und konfiguration aufweisen Setzen Sie sich mit einem qualifizierten Elektriker in Verbindung um den korrekten elektrischen Anschluss festzustellen und zu installieren Montageschlitze WARNUNG Bei Installation eines fest verdrahteten Geräts muss ein 2 poliger oder 3 poliger Schalter je nach Gerät zwischen dem Gerät und der hauptstromversorgung installiert werden Der Schalter muss die ...

Page 19: ...RNUNG Oberes Gehäuse Rost Bedienfeld Höhenanzeige heizmodus Auswahlknopf Mit dem Heizmodus Auswahlknopf wird die Funktion der oben befindlichen Elemente im Salamander festgelegt Die Bedienung dieses Knopfes unterscheidet sich leicht von Modell zu Modell Modell TMS 1h Der Heizmodus Auswahlknopf am Modell TMS 1H hat fünf Stellungen und zwei Funktionen COOK und HOlD Im Folgenden werden die fünf Stell...

Page 20: ... den Rost 3 Drehen Sie den Heizmodus Auswahlknopf auf die gewünschte COOK Funktion Die leuchtanzeige ON EIN leuchtet auf 4 Drehen Sie den Zeitschaltknopf im Uhrzeigersinn auf die gewünschte Garzeit Die entsprechende n leuchtanzeige n lEFT lINKS und oder RIGHT RECHTS leuchten auf um anzuzeigen welche Elemente ausgewählt sind und heizen HINWEIS Abbildung 12 Bedienung des Salamander 5 Wenn die Zeit a...

Page 21: ... Eigenschaften und funktionieren nicht sicher in hatco Geräten Falls eine Reparatur dieses Geräts erforderlich sein sollte wenden Sie sich an Ihren autorisierten hatco Servicebetrieb oder an die hatco Serviceabteilung unter 1 414 671 6350 Telefon oder 1 414 671 3976 Fax WARNUNG Reinigung Um die Oberfläche des Geräts zu schützen und die leistung zu bewahren ist es empfehlenswert das Gerät täglich z...

Page 22: ...g anschließen Gerät ist nicht eingeschaltet lesen Sie im Abschnitt BEDIENUNG dieses Handbuchs Bedienung des Salamander leistungsschutzschalter ausgelöst leistungsschutzschalter zurücksetzen Wird der leitungsschutzschalter weiterhin ausgelöst wenden Sie sich an einen autorisierten Hatco Vertreter oder an Hatco Zeitschaltung oder Heizmodusschalter defekt Wenden Sie sich an Ihren Hatco Händler oder a...

Page 23: ...unsachgemäße Installation oder Anlegen einer falschen Stromspannung 2 EINSChRäNkUNG DER ERSATzLEISTUNGUND DES SChADENERSATzES Die Haftung seitens Hatco und das ausschließliche Rechtsmittel des Käufers ist nach Ermessen von Hatco oder einer von Hatco autorisierten Serviceagentur nur der Ersatz des von der Garantie geschützten Teils oder Produktes sofern die oben angeführten Garantiefristen eingehal...

Page 24: ...en este manual antes de instalar u operar una unidad Información Importante para el Propietario 24 Introducción 24 Información Importante de Seguridad 25 Descripción del Modelo 26 Denominación del Modelo 26 Especificaciones 27 Cuadro de Clasificación Eléctrica 27 Dimensiones 27 Instalación 27 Generalidades 27 Instalación sobre mostradores 28 Instalación en paredes 29 Conexiones eléctricas 29 Opera...

Page 25: ... un electricista calificado La instalación debe realizarse de acuerdo con los reglamentos eléctricos locales Una instalación realizada por personal no calificado anulará la garantía de la unidad y podría provocar descargas eléctricas o quemaduras así como daños a la unidad o a sus alrededores Las unidades suministradas sin enchufe eléctrico requieren la instalación en el sitio de un enchufe apropi...

Page 26: ...entos de calentamiento están estratégicamente ubicados dentro de la carcasa superior móvil para reducir la transferencia de calor hacia la zona circundante la función CAlEFACCIóN en los modelos TMS 1H es ideal para mantener las comidas calientes o recalentarlas la rejilla de cocción y la bandeja de goteo desmontables permiten una fácil limpieza las características y flexibilidad únicas de la salam...

Page 27: ...ralidades la mayoría de los componentes incluidos en las salamandras THERM MAX vienen preensamblados Debe tenerse cuidado al desempacar la caja en la cual se envía la unidad para evitar dañar la unidad y los componentes incluidos la salamandra puede ubicarse sobre un mostrador o montarse en una pared de ladrillos o de cemento Se deben seguir estas instrucciones de instalación antes de operar la un...

Page 28: ... unidad de la caja NOTA Para evitar retrasos en la obtención de la cobertura de la garantía registre la garantía en nuestro sitio web Para obtener más información consulte la sección INFORMACIóN IMPORTANTE PARA El USUARIO 2 Quite la cinta y el material de embalaje de todas las superficies de la unidad 3 limpie a fondo la unidad para quitar toda la grasa industrial protectora AVISO Utilice únicamen...

Page 29: ...ngase en contacto con un electricista calificado para determinar e instalar la conexión eléctrica adecuada Ranuras de montaje ADVERTENCIA Si se instala una unidad con conexión permanente debe instalarse un interruptor de dos o tres polos dependiendo de la unidad entre la unidad y la fuente de alimentación eléctrica principal El interruptor debe contar con las especificaciones adecuadas y tener con...

Page 30: ...ción Panel de control Medidor de altura Selector de modo de calentamiento El selector de modo de calentamiento determina la función de los elementos superiores de la salamandra El uso de esta perilla es ligeramente distinto para cada modelo Modelos TMS 1h El selector de modo de calentamiento en los modelos TMS 1H tiene cinco posiciones y dos funciones COCCIóN y CAlEFACCIóN A continuación se presen...

Page 31: ...ón 3 Gire el selector de modo de calentamiento a la función de COCCIóN deseada la luz indicadora ON ENCENDIDO se iluminará 4 Gire la perilla de temporización en sentido horario para seleccionar el tiempo de cocción deseado las luces indicadoras correspondientes lEFT IZQUIERDA o RIGHT DERECHA se iluminarán para indicar qué elementos están seleccionados y efectuando el calentamiento AVISO Figura 12 ...

Page 32: ...miten operar en forma segura en los equipos hatco Esta unidad no tiene piezas a las que el usuario pueda realizar mantenimiento Si necesita realizar mantenimiento en esta unidad comuníquese con un agente de servicio autorizado de hatco o con el Departamento de Servicio de hatco al 414 671 6350 fax 414 671 3976 ADVERTENCIA Limpieza Para preservar el acabado de la unidad y mantener el desempeño se r...

Page 33: ...a Enchufe la unidad a una fuente de alimentación adecuada la unidad no está encendida Vuelva a leer Operación de la salamandra en la sección OPERACIóN de este manual El disyuntor se disparó Restablezca el disyuntor Si el disyuntor se sigue disparando póngase en contacto con un agente de servicio autorizado por Hatco o con Hatco para obtener ayuda El temporizador o el interruptor de modo de calenta...

Page 34: ...rica inadecuado al Producto 2 LIMITACIÓN DE REMEDIOS y DAÑOS la responsabilidad de Hatco y los derechos del Comprador descritos a continuación se limitarán exclusivamente al reemplazo de la pieza o del Producto empleando a discreción de Hatco piezas nuevas o restauradas o un Producto nuevo o restaurado por Hatco o uno de sus centros de servicio autorizados siempre que la reclamación se haya efectu...

Page 35: ...mande de lire l ensemble des instructions d installation de sécurité et de fonctionnement fournies dans ce manuel avant d installer et d utiliser l appareil Informations Importantes pour le Propriétaire 35 Introduction 35 Consignes de Sécurité Importantes 36 Description du Modèle 37 Désignation du Modèle 37 Caractéristiques Techniques 38 Tableau des Caractéristiques électriques 38 Dimensions 38 In...

Page 36: ...re conforme à l ensemble des réglementations électriques locales Une installation par un personnel non qualifié provoquera une annulation de la garantie de l appareil Cela peut également entraîner un choc électrique ou une brûlure et endommager l unité et ou les zones environnantes Les unités livrées sans prise électrique requièrent l installation d une prise adéquate Cette prise doit être mise à ...

Page 37: ...ue des éléments chauffants dans la partie supérieure mobile limite le transfert de chaleur vers les zones environnantes la fonction Conservation des modèles TMS 1H est idéale pour maintenir les aliments au chaud ou pour les réchauffer Une grille de cuisson amovible et un bac récolteur facilitent le nettoyage de l unité les fonctionnalités et la flexibilité uniques de l appareil Salamander THERM MA...

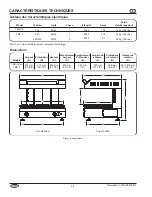
Page 38: ...4 365 mm 14 5 16 50 to 212 mm 2 to 8 1 4 Model Tension hertz Phase Intensité Amps Poids d embarquement TMS 1H 230 50 60 1 4000 17 4 72 kg 159 lbs TMS 1 230 50 60 1 4000 17 4 72 kg 159 lbs 230 400 50 60 3 4000 8 7 72 kg 159 lbs Formulaire n TMSCEM 0911 38 CARACTéRISTIqUES TEChNIqUES Tableau des Caractéristiques électriques NOTA Le poids d embarquement comprend l emballage Dimensions Vue de face Vue...

Page 39: ...ille pain ou de son contenu et suffisamment solide pour résister au poids de l appareil et de son contenu Aucun élément ne doit être posé sur l unité Le non respect de cette consigne pourrait causer des dommages sur le personnel et l équipement NOTA Une personne qualifiée est tenue de contrôler les éventuels emplacements de l appareil afin d assurer qu ils disposent d une alimentation électrique 1...

Page 40: ...ntactez un électricien qualifié pour procéder au choix et à l installation des branchements électriques adaptés Fentes de fixation AVERTISSEMENT Lors de l installation d une unité câblée un interrupteur bipolaire ou tripolaire selon l unité doit être installé entre l unité et l alimentation électrique principale La puissance de l interrupteur doit être adaptée et il doit disposer de contacts dotés...

Page 41: ...RTISSEMENT Sélecteur du mode de chauffage le sélecteur du mode de chauffage détermine la fonction des éléments supérieurs de l appareil Salamander le fonctionnement de ce bouton diffère légèrement selon les modèles Modèles TMS 1h le sélecteur du mode de chauffage des modèles TMS 1H comptent cinq positions et deux fonctions CUISSON et CONSERVATION les cinq différentes positions sont décrites ci des...

Page 42: ...2 Placez les aliments sur la grille de cuisson 3 Placez le sélecteur de mode de chauffage sur la fonction de CUISSON souhaitée l indicateur lumineux MARCHE s allumera 4 Tournez le bouton du minuteur dans le sens des aiguilles d une montre pour obtenir le temps de cuisson souhaité l indicateur lumineux GAUCHE et ou DROITE approprié s allumera pour indiquer quels éléments sont sélectionnés et en cha...

Page 43: ...téristiques leur permettant de fonctionner sans danger dans la matériel hatco Cet appareil ne contient aucune pièce réparable par l utilisateur Si cet appareil doit être réparé contacter un réparateur hatco agréé ou le Service après vente hatco au 1 414 671 6350 télécopieur 1 414 671 3976 AVERTISSEMENT Nettoyage Afin de préserver la finition de l unité et de conserver son efficacité il est recomma...

Page 44: ...riée l unité est éteinte Reportez vous à la partie Fonctionnement de l appareil Salamander de la section FONCTIONNEMENT de ce manuel le coupe circuit a disjoncté Redémarrez le coupe circuit Si le coupe circuit continue de disjoncter contactez un agent de service agréé ou Hatco pour obtenir une assistance le minuteur ou l interrupteur du mode de chauffage est défectueux Contactez un agent de servic...

Page 45: ...ttaques chimiques ou le gel ou une mauvaise utilisation manipulation ou application du produit une mauvaise installation ou l application de tension inadaptée 2 LIMITATION DES REMèDES ET DOMMAGES la responsabilité de Hatco et le recours exclusif de l acheteur ci dessous seront limités seulement au remplacement de tout ou partie du produit en utilisant au choix de Hatco les pièces neuves ou remises...

Page 46: ... Informazioni Importanti per il Proprietario 46 Introduzione 46 Importanti Informazioni Sulla Sicurezza 47 Descrizione dei Modelli 48 Indicazione del Modello 48 Dati Tecnici 49 Tabella di corrispondenza electtrica 49 Dimensioni 49 Installazione 50 Informazioni Generali 50 Installazione del piano di lavoro 50 Installazione a parete 51 Collegamenti elettrici 51 Funzionamento 52 Informazioni Generali...

Page 47: ...lettriche locali L installazione da parte di personale non qualificato annulla la garanzia dell unità e può portare a folgorazioni o a ustioni oltre a danni all unità e o a ciò che la circonda Le unità fornite senza una spina elettrica richiedono l installazione sul posto della spina adeguata La spina deve essere messa a terra in modo corretto e avere la tensione le dimensioni e la configurazione ...

Page 48: ...ll interno della custodia superiore movibile per ridurre la dispersione del calore nell area circostante la funzione Hold Mantieni sui modelli TMS 1H è ideale per mantenere i cibi caldi o per riscaldare gli alimenti la griglia di cottura e lo sgocciolatoio rimovibili agevolano la pulizia le funzionalità uniche e la flessibilità del fornello portatile THERM MAX lo rendono facile da usare a risparmi...

Page 49: ... 21 1 4 365 mm 14 5 16 50 to 212 mm 2 to 8 1 4 Modello Tensione hertz Fase Watts Ampere Peso di Spedizione TMS 1H 230 50 60 1 4000 17 4 72 kg 159 lbs TMS 1 230 50 60 1 4000 17 4 72 kg 159 lbs 230 400 50 60 3 4000 8 7 72 kg 159 lbs N di pubblicazione TMSCEM 0911 49 DATI TECNICI Tabella di corrispondenza electtrica NOTA Il peso di spedizione comprende l imballaggio Figura 3 Dimensioni Dimensioni Vis...

Page 50: ...in piano per evitare che l unità e il suo contenuto possano rovesciarsi e forte a sufficienza da supportare il peso dell unità stessa e del suo contenuto Non collocare niente sopra l unità per evitare di causare lesioni personali o danni all unità NOTA Una persona qualificata deve controllare le aree di possibile collocamento del fornello portatile per assicurarsi che sia disponibile la linea di a...

Page 51: ...e dimensioni e la configurazione corretti riportati nelle specifiche dell unità Contattare un elettricista qualificato per determinare e installare il collegamento elettrico appropriato Fessure di montaggio AVVERTENZA quando si installa un unità cablata è necessario inserire un commutatore a 2 o 3 poli a seconda dell unità tra l unità e l alimentazione elettrica principale Il commutatore deve aver...

Page 52: ... AVVERTENZA Selettore della modalità di riscaldamento Il selettore della modalità di riscaldamento stabilisce la funzione degli elementi superiori del fornello portatile Questa manopola funziona in modo leggermente diverso per ciascun modello Modelli TMS 1h Il selettore della modalità di riscaldamento sui modelli TMS 1H ha cinque posizioni e due funzioni COOK CUOCI e HOlD MANTIENI Di seguito sono ...

Page 53: ... di cottura 3 Ruotare il selettore della modalità di cottura sulla funzione COOK CUOCI desiderata la spia luminosa ON si accenderà 4 Ruotare la manopola del timer in senso orario sul tempo di cottura desiderato le spie luminose lEFT SINISTRA e o RIGHT DESTRA adeguate si accenderanno a indicare quali elementi sono stati selezionati e pertanto si scalderanno AVVISO Figura 12 Utilizzo del fornello po...

Page 54: ...l funzionamento degli apparecchi hatco in condizioni di sicurezza questa unità non contiene parti su cui l utente può intervenire Se l unità richiede un intervento di assistenza mettersi in contatto con un Agente di assistenza autorizzato di hatco o con il Reparto di assistenza di hatco al numero telefonico 414 671 6350 fax 414 671 3976 AVVERTENZA Pulizia Per preservare la finitura oltre che mante...

Page 55: ... all alimentazione Unità spenta Rivedere il paragrafo Utilizzo del fornello portatile nella sezione FUNZIONAMENTO di questo manuale Interruttore di circuito scattato Resettare l interruttore di circuito Se l interruttore di circuito continua a scattare contattare un centro di assistenza autorizzato Hatco o Hatco per ricevere assistenza Interruttore della modalità di riscaldamento o timer difettosi...

Page 56: ...cumulo di sedimentazione agenti chimici o congelamento uso scorretto del prodotto manomissione o applicazione errata installazione non corretta o applicazione di tensione errata 2 LIMITI DEGLI OBBLIGhI DI RIPARAzIONE E DI RISARCIMENTO DANNI la responsabilità di Hatco e l esclusivo rimedio spettante all acquirente per quanto riportato di seguito saranno limitati esclusivamente alla sostituzione del...

Page 57: ...en of gebruiken van een eenheid alle voorschriften rond de installatie de veiligheid en het gebruik die in deze handleiding opgenomen zijn leest Belangrijke Informatie Voor De Eigenaar 57 Inleiding 57 Belangrijke Veiligheidsinformatie 58 Modelbeschrijving 59 Modelaanduiding 59 Specificaties 60 Tabel met elektrische gegevens 60 Afmetingen 60 Installatie 61 Algemeen 61 Installatie op het werkblad 61...

Page 58: ... elektrische schok brandwonden beschadigingen aan het apparaat en of de omgeving Voor eenheden geleverd zonder elektrische stekker dient er ter plaatse een gepaste stekker geïnstalleerd te worden De stekker moet naar behoren geaard worden en een juiste voltage grootte en configuratie hebben in functie van de elektrische specificaties van de eenheid Neem contact op met een bevoegd elektricien om de...

Page 59: ...De verwarmingselementen zijn zo in de beweegbare bovenste behuizing geplaatst om hitte uitstraling naar de omgeving te verminderen De Warmhoudfunctie op de TMS 1H modellen is ideaal om voedsel warm te houden of om voedsel op te warmen Een wegneembaar braadrooster en druipbak verzekeren een gemakkelijke reiniging De unieke eigenschappen van de THERM MAX Salamander maken hem gemakkelijk te bedienen ...

Page 60: ...380 mm 15 540 mm 21 1 4 365 mm 14 5 16 50 to 212 mm 2 to 8 1 4 Model Spanning hertz Fase Watts Ampère Verzendgewicht TMS 1H 230 50 60 1 4000 17 4 72 kg 159 lbs TMS 1 230 50 60 1 4000 17 4 72 kg 159 lbs 230 400 50 60 3 4000 8 7 72 kg 159 lbs Formulier nr TMSCEM 0911 60 SPECIFICATIES Tabel met elektrische gegevens OPMERKING Verzendgewicht is inclusief verpakking Afmetingen Vooraanzicht Zijaanzicht A...

Page 61: ... zijn om te voorkomen dat het apparaat of de inhoud ervan per ongeluk zou vallen en moet sterk genoeg zijn om het gewicht van het toestel en de inhoud te kunnen dragen Plaats niets bovenop het toestel dit kan verwondingen veroorzaken of het toestel beschadigen OPMERKING Een gekwalificeerd persoon moet de mogelijke plaatsing van de Salamander nakijken om zeker te zijn dat een goede elektrische leid...

Page 62: ...tie van de elektrische specificaties van de eenheid Raadpleeg een bevoegd elektricien om de juiste elektrische aansluiting te bepalen en te installeren Bevestigingssleuven WAARSCHUWING Bij het installeren van een toestelaansluiting met vaste bedrading moet een tweepolige of een driepolige schakelaar afhankelijk van het type toestel geïnstalleerd worden tussen het toestel en het elektriciteitsnet D...

Page 63: ...verwarmingsstand bepaalt de functie van de bovenste verwarmingselementen in de Salamander De bediening van deze knop verschilt enigszins voor de verschillende modellen TMS 1h modellen De keuzeschakelaar voor de verwarmingsstand heeft vijf posities en twee functies BRADEN en WARM HOUDEN Hierna volgt de beschrijving van de vijf posities OFF UIT geen elementen geselecteerd De elementen zullen niet op...

Page 64: ...raadrooster 3 Draai de keuzeschakelaar voor de verwarmingsstand naar de gewenste BRAAD functie De ON controlelamp zal oplichten 4 Draai de timerknop in wijzerzin naar de gewenste braadtijd De passende lINKSE en of RECHTSE controlelamp en zal zullen oplichten om aan te duiden welke elementen er geselecteerd zijn voor het braden ATTENTIE Illustratie 12 Bediening van de Salamander 5 Wanneer de tijd v...

Page 65: ...of generieke vervangingsonderdelen hebben niet de vereiste eigenschappen om veilig te kunnen werken in apparaten van hatco Dit apparaat bevat geen onderdelen die door de gebruiker kunnen worden vervangen Als het apparaat moet worden hersteld neemt u contact op met een erkend hatco servicevertegenwoordiger of de hatco serviceafdeling op het nummer 1 414 671 6350 fax 1 414 671 3976 WAARSCHUWING Rein...

Page 66: ...oestel niet ingeschakeld Kijk De Salamander bedienen na in de rubriek BEDIENING van deze handleiding Stroomonderbreker uitgeschakeld Stel de stroomonderbreker opnieuw in Als de stroomonderbreker blijft vastlopen neem dan contact op met een erkend Hatco vertegenwoordiger of met Hatco voor ondersteuning Timer of keuzeschakelaar voor de verwarmingsstand defect Neem contact op met een erkend Hatco ver...

Page 67: ...latie of het gebruik van een verkeerd voltage 2 BEPERkING VAN REMEDIES EN SChADE De aansprakelijkheid van Hatco en de exclusieve rechtsmiddelen van kopers hieronder zullen enkel en alleen beperkt zijn tot vervanging van onderdelen of productgebruik naar keuzen van Hatco nieuwe of opgeknapte onderdelen of producten of een door Hatco geautoriseerd servicebedrijf met betrekking tot enige claims die i...

Page 68: ... Ihr Gerät online Einzelheiten finden Sie im Abschnitt WICHTIGE BESITZERINFORMATIONEN Registrare l unità online Per i dettagli consultare la sezione INFORMAZIONI IMPORTANTI PER Il PROPRIETARIO Registreer uw eenheid online Zie het hoofdstuk BElANGRIJKE INFORMATIE VOOR DE EIGENAAR voor de bijzonderheden S inscrire en ligne Lisez la section INFORMATIONS IMPORTANTES POUR LE PROPRIETAIRE pour plus de i...

Reviews: