background image

Page 4

For technical questions, please call 1-888-866-5797.

Item 66907 


Operating Instructions

Park vehicle on a flat, level, solid, surface safely away from oncoming traffic.  Turn off the vehicle’s 

engine.  Place the vehicle’s transmission in “PARK” (if automatic) or in its lowest gear (if manual).  

Set the vehicle’s emergency brake.  Then, chock the wheels that are not being lifted.

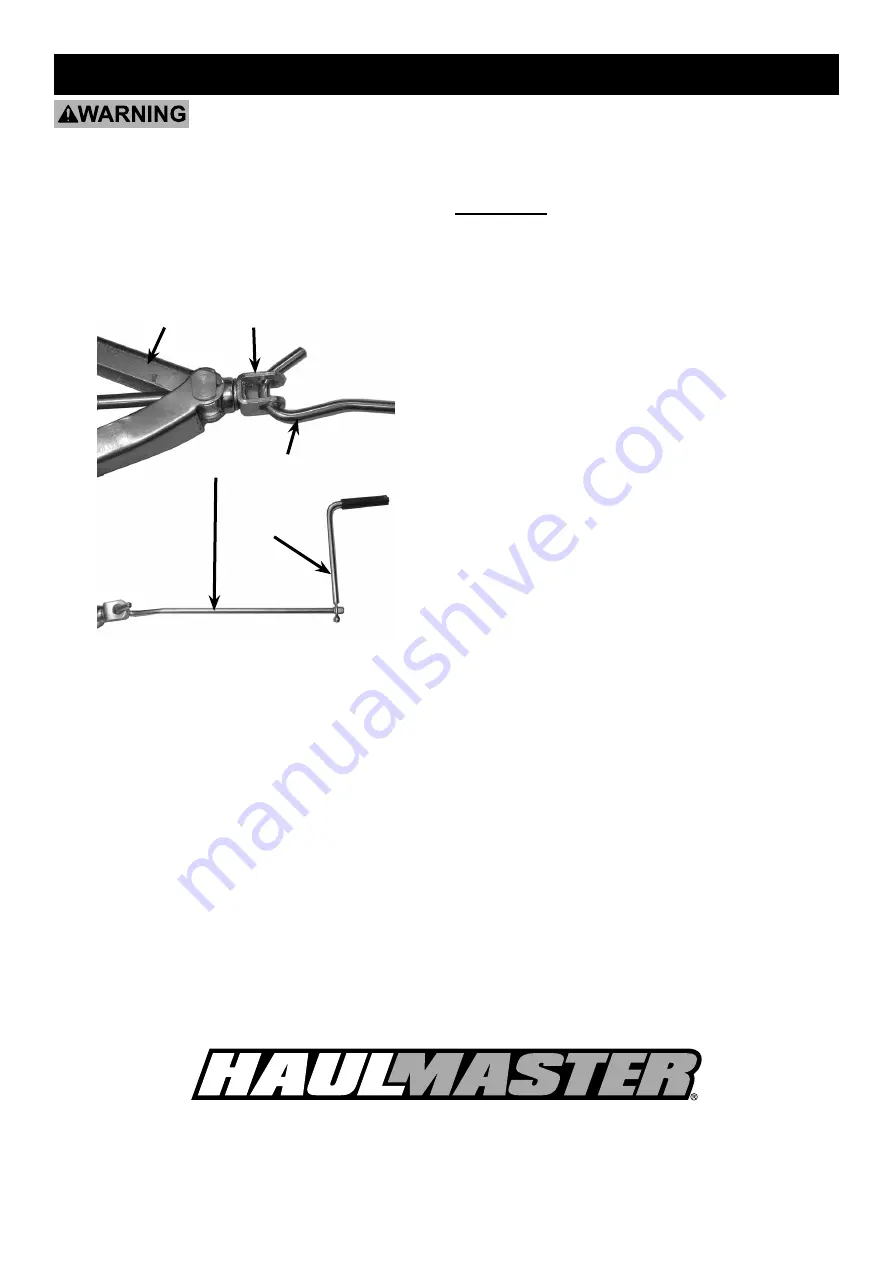
1.  Assemble the Handle (15) and Rocker Bar (14). 

2.  Slide the hooked end of the Rocker Bar 

into the holes in the Rocker Head (13).

3.  Attach Handle to the flat end of the Rocker Bar.

Rocker Bar (14)

Rocker Head (13)

Handle (15)

Jack

4.  If the Jack is not fully collapsed, lower the Jack 

so that it will easily slide under the vehicle.

5.  Chock the wheels opposite the wheel to be removed.

6.  To make it easier to remove the wheel’s lug nuts. 

Slightly loosen the lug nuts prior to raising the wheel. 

7.  Slide the Jack under the vehicle near 

the wheel being removed. 

IMPORTANT:

 The Scissor Jack is designed for use on 

vehicle’s with frame seams capable of sustaining rated 

capacity loads. Carefully position the Scissor Jack under 

the vehicle manufacturer’s recommended lift point.  

8.  Rotate the Handle clockwise, raising the 

Jack. Continue rotating the Handle until 

the vehicle is raised enough so the wheel 

is approximately 1″ off the ground.

9.  Remove the lug nuts from the vehicle’s wheel. 

Remove the wheel, and replace it with the 

spare wheel (not included). Replace and 

tighten all the lug nuts onto the wheel.

10. Remove the old wheel, tools and any 

other objects from under the vehicle.

11.  Rotate the Handle counterclockwise 

to lower the Jack. 

12. Continue rotating the Handle until the Jack 

is completely collapsed to the ground.

13. Double check and re-tighten the wheel lugs.

14. Remove the Jack.

Summary of Contents for 66907

Page 1: ...eference 22l When unpacking make sure that the product is intact and undamaged If any parts are missing or broken please call 1 888 866 5797 as soon as possible Copyright 2022 by Harbor Freight Tools All rights reserved No portion of this manual or any artwork contained herein may be reproduced in any shape or form without the express written consent of Harbor Freight Tools Diagrams within this ma...

Page 2: ...mounting tire chains 12 Do not get beneath the vehicle when it is supported by the jack 13 If vehicle is pushed off jack discard jack Do not reuse 14 Do not use for aircraft purposes 15 Wear ANSI approved safety goggles and heavy duty work gloves during use 16 Keep clear of load while lifting and lowering 17 Apply parking break and chock tires before using 18 Lift vehicle only at manufacturer reco...

Page 3: ...tions Jack Capacity 3000 lb extended 14 or more 1800 lb extended 10 or more 1200 lb extended 8 or more 900 lb extended 6 or more Height Range 3 3 4 to 15 1 8 500 900 900 1000 1200 1200 1500 2000 2500 1800 1800 3000 3000 3000 Weight Capacity in pounds 6 8 10 12 14 Height in inches ...

Page 4: ...ove the wheel s lug nuts Slightly loosen the lug nuts prior to raising the wheel 7 Slide the Jack under the vehicle near the wheel being removed IMPORTANT The Scissor Jack is designed for use on vehicle s with frame seams capable of sustaining rated capacity loads Carefully position the Scissor Jack under the vehicle manufacturer s recommended lift point 8 Rotate the Handle clockwise raising the J...

Page 5: ... loose hardware misalignment or binding of moving parts cracked or broken parts any other condition that may affect its safe operation lubricate moving parts of the Jack with lubricating oil Note Lubricate the threads of the Spindle Rod with high quality light weight oil not included Keeping the Screw Rod well oiled and free of rust will avoid the jack binding during use Note Do not use motor oil ...

Page 6: ... 4 Part Description Qty 9 Supporting Axle 1 10 Bearing 1 11 Washer 3 12 Spindle Rod 1 13 Rocker Head 1 14 Rocker Bar 1 15 Handle 1 Record Product s Serial Number Here Note If product has no serial number record month and year of purchase instead Note Some parts are listed and shown for illustration purposes only and are not available individually as replacement parts Parts may not be interchangeab...

Page 7: ...Page 7 For technical questions please call 1 888 866 5797 Item 66907 Assembly Diagram ...

Page 8: ...t accompany the merchandise If our inspection verifies the defect we will either repair or replace the product at our election or we may elect to refund the purchase price if we cannot readily and quickly provide you with a replacement We will return repaired products at our expense but if we determine there is no defect or that the defect resulted from causes not within the scope of our warranty ...

Reviews: