


11
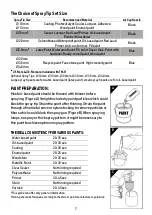
CLEANING UP
After the project has been completed or when you are going to take a longer rest, it is
necessary to clean up the sprayer to prevent the paint from dried out and causing damage
to the unit.
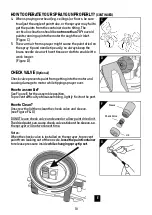
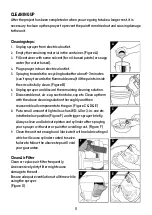
Cleaning steps:
1.
Unplug sprayer from electrical outlet.
2.
Empty the remaining material in the container. (Figure A)
3.
Fill container with some solvent (for oil-based paints) or soapy
water (for water based).
4.
Plug sprayer into an electrical outlet.
5.
Spraying towards the recycling bucket for about 1~3 minutes
(can’t spray towards the flammable area) till the paints inside
the circuit is fully clean. (Figure B)
6.
Unplug sprayer and discard the remaining cleaning solution.
7.
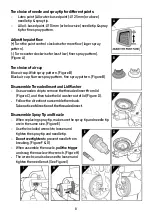
Disassemble nut, air-cap, suction tube, cup etc. Clean up them
with the above cleaning solution thoroughly and then
reassemble all components to the gun. (Figure C & D & E)
8.
Put a small amount of light oil such as WD-40 or 3-in-one etc.
into the below position (Figure F) and trigger sprayer briefly.
Always clean and lubricate piston and cylinder after spraying
your sprayer with water or paint for avoiding rust. (Figure F)
9.
Clean the unit not enough and lubricate it with no lubricating oil
which will cause cylinder rusted to seize,
failure to follow the above steps will void
your guarantee.
Clean Air Filter
Clean or replace air filter
frequently.
An excessively dirty filter might cause
damage to the unit.
Ensure adequate ventilation at all time while
using the sprayer.
(Figure G)
A
B
C
D
E
G
F


