

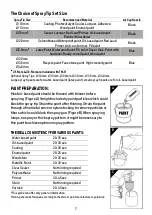


3
Read instruction manual before operating and observe all warning.
WARNING:
DO NOT
aim sprayer at yourself or anyone else at all times, in the event of an injury
occurring seek expert medical consultant immediately.
DO NOT
allow any part of the body to come in contact with the fluid stream.
DO NOT
cover the nozzle with any part of your body, high velocity jet could cause
accidental injuries.
DO
NOT
spray any hazardous materials (for example: easy flammable, very toxic, toxic,
less toxic, corrosive or irritating substances).
DO
NOT
spray any textured materials containing particles or fibers such as asbestos
fibers.
DO
NOT
spray flammable liquid.
DO
NOT
clean guns with flammable solvents.
DO
NOT
spray any material where the hazard is not known.
DO
NOT
use the spray gun outside when it is raining to reduce the risk of electric shock.
DO
NOT
use the spray gun at any stuffy area. Ensure adequate ventilation at all time when
using the unit.
DO
NOT
disassemble the sprayer without skill’s direction for avoiding danger.
DO
NOT
tamper with electrical motor, switch wiring or plug.
DO
NOT
leave your sprayer unclean or allow paint to dry in the gun. An unclean sprayer
will not work next time and you could void the one-year warranty.
DO
NOT
use the power tool if the switch does not turn it on and off.
NEVER
immerse the sprayer into water or other liquids for preventing electric shock.
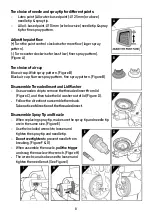
ALWAYS
place the sprayer upright (do not place the sprayer upside down or on its side) to
prevent liquid or paints flow into motor.
ALWAYS
wear mask, goggles, ear protectors and eye protectors while operating the
sprayer.
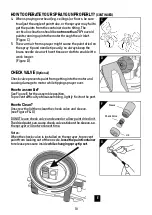
ALWAYS
unplug the cord to prevent accidental spraying when you stop spraying or
servicing.
ALWAYS
keep children and bystanders away.
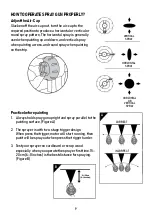
USE
fluids with a flashpoint above 40 degrees C.


