background image


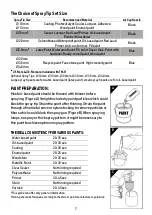
The choice of needle and spray tip for different paints:


-


Latex paint (All water-based paint): 

Ø

 2.5mm (or above) 

needle tip & spray tip.   

-


All oil-based paint: 

Ø

 1.5mm (or below size) needle tip & spray 

tip for fine spray pattern. 


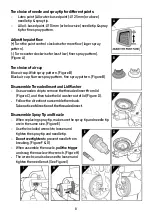
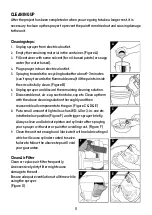
Adjust the paint flow


(+) Turn the paint control clockwise for more flow (lager spray 
pattern). 
(-) Turn counterclockwise for less flow (finer spray pattern). 


(Figure A) 


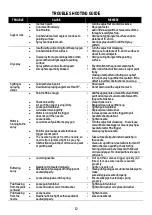
The choice of air cap 

Blue air cap: Wide spray pattern. (Figure B) 
Black air cap: Narrow spray pattern, fine spray pattern. (Figure B)


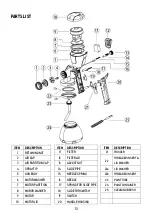
Disassemble Threaded Insert and Lid Washer 

-


Use a wooden chip to remove the threaded insert from lid 
(Figure C), and then take the lid washer out of lid (Figure D).   

-


Follow the direction to assemble them back. 


Take notice of direction of the threaded insert


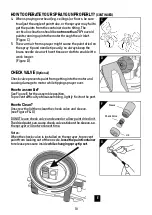
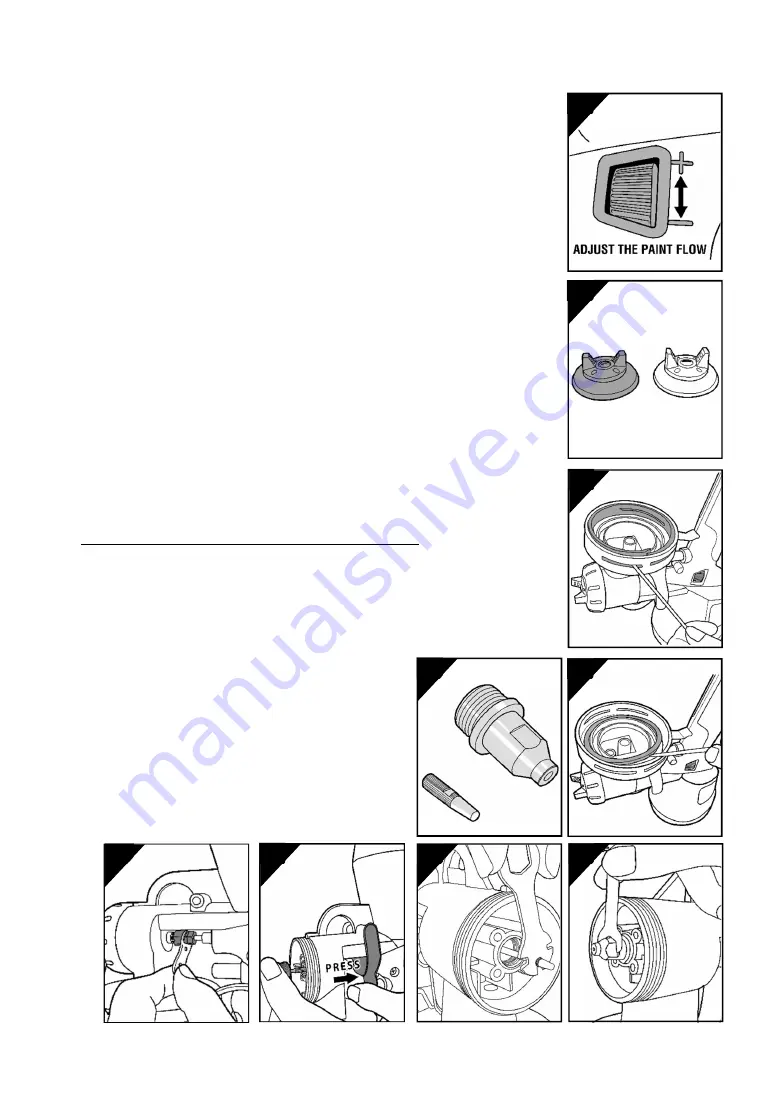
Disassemble Spray Tip and Nozzle 

-


When replacing spray tip, make sure the spray tip and needle tip 
are in the same size. (Figure E) 

-


Use the included wrench to loosen and 
tighten the spray tip and needle tip.   

-


Do not overtighten

 to prevent needle from 

breaking. (Figure F & G)


-


When assemble the nozzle, 

pull the trigger


and snug the nozzle with wrench. (Figure H) 

-


The wrench can also be used to loosen and 
tighten the needle nut. (See Figure I) 


Summary of Contents for TM-71

Page 1: ...NT SPRAYER TM 71 PLEASE READ AND SAVE THIS INSTRUCTION MANUAL ENGLISH WARNING TO REDUCE THE RISK OF INJURY USER MUST READ AND UNDERSTAND INSTRUCTION MANUAL KEEP CHILDREN AWAY FROM WORKING AREA MADE IN...

Page 2: ...watts Amps 4 0 Amps Airsupply 67cu ft min 1 9 m3 min Container capacity 40 oz 1 10 L Weight 2 76 lbs 1 25 kg Motor speed 34 000rpm PSI 2 7 Maximum Flow 740 760 ml min Component Introduction Motor Lid...

Page 3: ...ining to reduce the risk of electric shock DONOTuse the spraygun at any stuffy area Ensure adequate ventilation at all time when using the unit DONOTdisassemble the sprayer without skill s direction f...

Page 4: ...hich it was intended 6 Dress properly Rubbergloves and non skid footwear are recommended when working outdoors 7 Do not abuse the cord Never carry the tool bythe cord or yank it to disconnect it from...

Page 5: ...g conditions and the work to be performed How to Use This Product TM 71sprays an even modern factory like finish on any surface Perfect for refinishing repainting restyling renewing revamping and refr...

Page 6: ...lade is wider than the other This plug will fit in a polarized outlet only one way If the plug does not fit fully in the outlet reverse the plug If it still does not fit contact a qualified electricia...

Page 7: ...PAINTS This guide can offer only general information Thinning should be followed according to the stainor paint manufacturer s guideline Spray Tip Size RecommendedMaterial Air Cap Nozzle 1 0mm 1 3mm C...

Page 8: ...Disassemble Threaded Insert and LidWasher Use a wooden chip to remove the threaded insert from lid Figure C and then take the lid washer out of lid Figure D Follow the direction to assemble them back...

Page 9: ...on the strip Practice before painting 1 Always hold spraygun upright and spray parallel to the painting surface Figure A 2 The sprayer is with two stage trigger design When press the trigger motor wi...

Page 10: ...nger Figure D CHECK VALVE Optional Check valve prevents paint from getting into themotor and causing damage to motorwhile tipping sprayerover How to assemble See Figure E for the assemble position To...

Page 11: ...d discard the remaining cleaning solution 7 Disassemble nut air cap suction tube cup etc Clean up them with the above cleaning solution thoroughlyand then reassemble all components to the gun Figure C...

Page 12: ...eedle Lowvolumeofpaintfromspraygun Paintorgluecausesneedletostick so triggercannotpullit The needle tip drops from the needle so needle tip is jammedtight in spray tip Obstructiononpainttipordirtonair...

Page 13: ...OTOR 10 MOTOR LID ITEM DESCRIPTION 11 FILTER 12 FILTER LID 13 ADJUSTNUT 14 SLIDE PIPE 15 NEEDLE SPRING 16 NEEDLE 17 SPRING FOR SLIDE PIPE 18 SLIDE FOR SWITCH 19 SWITCH 20 HANDLE HOUSING ITEM DESCRIPTI...

Page 14: ...E SPRAYER UPSIDE DOWN ALWAYSplace the sprayer upright to prevent liquid from entering internal wiring or motor and causing electric shock or damage Use the cleaning brush to clean the inlets do not al...

Page 15: ...s hazardous substances can leak into the groundwater and get into the food chain damaging your health and well being When replacing old appliances with new ones the retailer is legally obligated to ta...

Page 16: ...Website YouTube Tsung Mao Ind Co Ltd tsungmao haupon com tw MADE IN TAIWAN Rev H 20190813...

Reviews: