– 28 –
1. Remove the blade guard, blade, rip fence, mitre
gauge and stand assembly from the table saw.
2. Lower the blade height to its minimum setting. This
will make the brushes’s location easier to access.
3. Place cardboard or an old blanket on the floor to
protect the saw table surface.
4. Place the saw upside down on the protective
material.
5. Tilt the blade tilting handwheel to the 45° position.
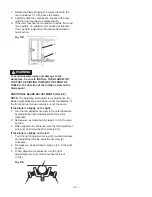
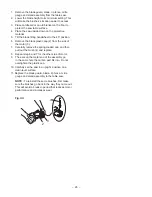
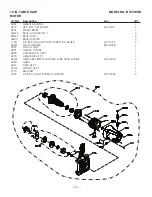
6. Remove the black plastic cap (2) from the side of
the motor (3).
7. Carefully remove the spring-loaded cap, and then
pull out the brush (4) and replace.
8. Repeat step 6 and 7 for the other side of motor.
9. The ears on the metal end of the assembly go
in the same hole the carbon part fits into. Do not
overtighten the plastic cap.
10. Carefully set the saw in a upright position on a
clean level surface.
11. Replace the blade guard, blade, rip fence, mitre
gauge and stand assembly to the table saw.
NOTE :
To reinstall the same brushes, first make
sure the brushes go back in the way they came out.
This will avoid a break-in period that reduces motor
performance and increases wear.
Fig. UU
2
3
4


