background image

10

EMM104

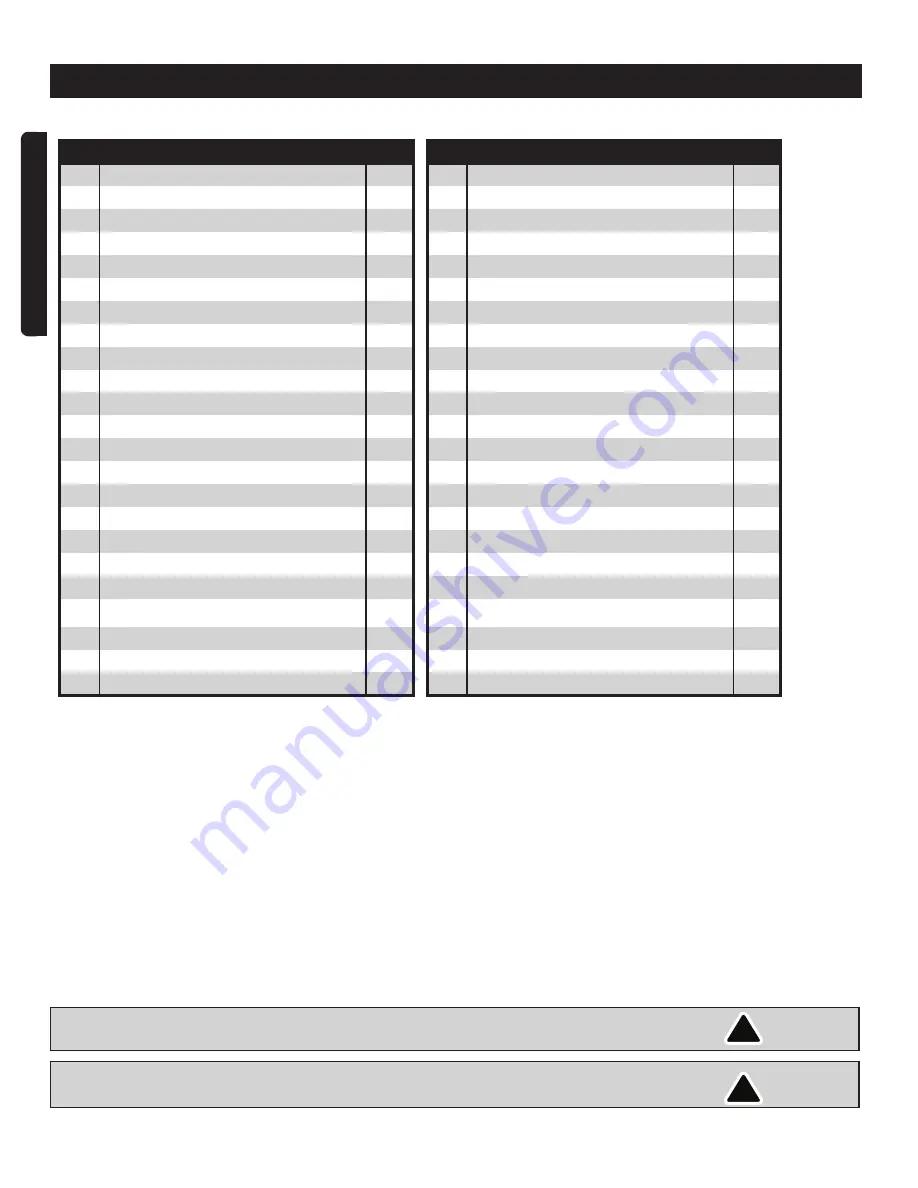
Please refer to the Schematic Drawing, on the preceding pages.

PARTS LIST

ENGLISH

NO

DESCRIPTION

QTÉ

1
2
3
4
5
6
7
8
9

10
11
12
13
14
15
16
17
18
19
20
21
22
23

1
1
1
1
1
1
1
8
1
1
1
1
1
1
1
1
1
2
3
1
1
1
1

Checking ring
Anti-dust board
Ball bearing
Spindle
Checking ring
Ball bearing
Washer
Tapping screw
Gear
Checking ring
Headgear
Aluminum gear box
Column pin
Knob clamp
Fixation pin
Spring
Knob
Tapping screw
Ball bearing
Guide shaft
Adjustable board
Gear assembly
Gear shaft

NO

DESCRIPTION

QTÉ

24
25
26
27
28
29
30
31
32
33
34
35
36
37
38
39
40
41
42
43
44
45
46

1
1
1

12

1
1
1
1
1
1
2
1
2
1
1
1
1
1
1
2
2
2
1

Needle bearing
Center support
Gear shaft assembly
Tapping screw
Down housing
Ball bearing
Armature assembly
Ball bearing
Vibration-proof washer
Fan guard cover
Tapping screw
Stator assembly
Tapping screw
Cable clamp
Cable sleeve
Cable and plug
Variable speed board assembly
Switch
Upper housing
Brush holder
Copper sleeve
Carbon brush
Rear cover

!

!

WARNING:


Repairs should be made by an authorized repair centre. Opening this 

tool could invalidate your warranty.

NOTE: 

Due to continuous product improvement, we reserve the right to change the 

product specification without prior notice.

Summary of Contents for EMM104

Page 1: ...st disponible pour vous aider Pour obtenir de l aide pour le montage de votre produit pour signaler des pièces endommagées ou manquantes ou pour toute autre information veuillez composer notre numéro sans frais 1 866 206 0888 Enregistrez votre produit Nous vous invitons à enregistrer votre produit en ligne afin de faciliter les communications pour ce faire veuillez visiter le www outilshaussmann c...

Page 2: ...st nécessaire SÉCURITÉ EN ÉLECTRICITÉ 4 Les outils à isolation double sont équipés d une fiche polarisée une broche plus large que l autre Cette fiche ne s insère dans une prise polarisée que dans un seul sens Si la fiche ne s insère pas complètement dans la prise insérez la dans l autre sens Si elle ne s insère toujours pas communiquez avec un électricien qualifié pour installer une prise polaris...

Page 3: ...lus de sûreté 16 N utilisez pas l outil si le bouton marche arrêt ne fonctionne pas Tout outil qui ne peut pas être contrôlé avec le bouton marche arrêt est dangereux et doit être réparé 17 Débranchez la fiche de la prise de courant avant de procéder au réglage au remplacement d accessoires ou au rangement de l outil Ces mesures de sécurité préventives réduisent les risques de démarrage accidentel...

Page 4: ... opérations N approchez pas vos mains ou les objets dans le récipient de mélange lorsque le mélange est en cours Portez des protections auditives si le niveau de bruit en milieu de travail dépasse 85 dB A Il est conseillé de porter des gants et des lunettes de protection pendant les opérations de mélange Il est toutefois obligatoire de porter des vêtements bien ajustés Tension 120 volts CA 60 Hz C...

Page 5: ...vants 1 Cet accessoire est idéal pour le mélange des matériaux collants et visqueux par exemple la colle à carrelage le mortier de collage de la pâte à joint le plâtre prêt à l emploi la chape les charges etc Fig 4 2 Cet accessoire est idéal pour les matériaux liquides ou fibreux en grandes quantités par exemple la peinture murale le vernis la glaçure le composé à joints d étanchéité la chaux le p...

Page 6: ...2 L outil s arrêtera automatiquement lorsque la gâchette est relâchée AJUSTEMENT DE LA VITESSE Fig 8 L outil a un sélecteur de vitesse C afin de choisir la meilleure vitesse pour vos besoins 1 Position 1 désigne 100 400 tr min 2 Position 2 désigne 150 700 tr min FONCTIONNEMENT ENTRETIEN Débranchez l appareil avant d effectuer tout entretien Gardez l outil propre le nettoyage de pièces en plastique...

Page 7: ...serve le droit de réparer ou remplacer l outil défectueux à sa discrétion Ce produit est garanti durant 36 mois s il est utilisé de façon normale Toute garantie est invalide si le produit a été utilisé en surcharge ou de façon non recommandée ou a fait l objet de négligence ou de réparations non effectuées par un agent autorisé L usage professionnel au quotidien et l usage intensif ne sont pas gar...

Page 8: ...au de contrôle Harnais Boîte de vitesses en aluminium Broche de colonne Pince du bouton Broche de fixation Ressort Bouton Vis à taraudeuse Roulement à billes Axe de guidage Panneau réglable Ens de engrenage Arbre de engrenage NO DESCRIPTION QTÉ 24 25 26 27 28 29 30 31 32 33 34 35 36 37 38 39 40 41 42 43 44 45 46 1 1 1 12 1 1 1 1 1 1 2 1 2 1 1 1 1 1 1 2 2 2 1 Roulement à aiguilles Support central E...

Page 9: ...9 SCHÉMA SCHEMATIC DRAWING FRANÇAIS ENGLISH ...

Page 10: ...ION QTÉ 24 25 26 27 28 29 30 31 32 33 34 35 36 37 38 39 40 41 42 43 44 45 46 1 1 1 12 1 1 1 1 1 1 2 1 2 1 1 1 1 1 1 2 2 2 1 Needle bearing Center support Gear shaft assembly Tapping screw Down housing Ball bearing Armature assembly Ball bearing Vibration proof washer Fan guard cover Tapping screw Stator assembly Tapping screw Cable clamp Cable sleeve Cable and plug Variable speed board assembly Sw...

Page 11: ...lug will fit in a polarized outlet only one way If the plug does not fit fully in the outlet reverse the plug If it still does not fit contact a qualified electrician to install a polarized outlet Do not change the plug in any way Double Insulation eliminates the need for the three wire grounded power cord and grounded power supply system 5 Avoid body contact with grounded surfaces such as pipes r...

Page 12: ...d and are easier to control Do not use a damaged tool Tag damaged tools Do not use until repaired 20 Check for misalignment or binding of moving parts breakage of parts and any other condition that may affect the tool s operation If damaged have the tool serviced before using Many accidents are caused by poorly maintained tools 21 Use only accessories that are recommended by the manufacturer for y...

Page 13: ...For standard M14 mixing bar Fig 2 Screw the mixing bar 2 with the M14 external thread into the mixer spindle 1 with two 24mm open end wrench 2 For other size mixing bars Fig 3 a Screw the M14 mixing connection 2 with the M14 external thread into the mixer spindle 1 b Connect the 5 8 13 mm chuck 3 with the mixing connection 2 c Insert the mixing bar 4 into the 5 8 13 mm chuck 3 then screw the 5 8 1...

Page 14: ...nd cement Fewer air inclusions in the material and higher shear forces prevent the formation of lumps Fig 7 APPLICATION The HAUSSMANN XPERT electric mixer is designed for mixing building materials in liquid powder form such as mortars filler glues as well as paints and varnishes exempt of solvents or for the mixing of similar materials SWITCHING ON AND OFF Fig 8 Warning Make sure that the voltage ...

Page 15: ...hese products have been made to demanding high quality standards and are guaranteed for domestic use against manufacturing faults for a period of 36 months from the date of purchase This guarantee does not affect your statutory rights In case of any malfunction of your tool failure missing part etc please contact one of our service technicians at our toll free service line at 1 866 206 0888 from 8...

Reviews: