A
OPERATING INSTRUCTIONS
17
Note:
Be careful not to lose the spring.
b) Insert the replacement trimmer lines
through the holes in the spool. Trimmer
line should be no longer than 10’ (3m) in
length(see Fig. 14).
c) Snugly and evenly wind the trimmer line
onto the spool in the direction of the arrow
located on the spool (see Fig. 15).
d) Insert the trimmer line through the line
retaining slots located on the side of the
trimmer spool to hold the line in place (see Fig
16). This trimmer uses 2 lines.
e) To reconnect the spool into the spool head
cover, insert the trimmer lines through the
brass eyelets on the spool holder and pull the
lines out (see Fig 17).
f) Push the spool inwards against the
spring and then push the spool cover firmly
downwards until it locks in position.
Follow the instructions under the section
“Preparing the Trimmer for Use” to set the
nylon line to the correct length.
OPERATION
Fig 18
Fig 19
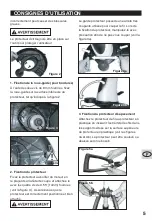
1. On/Off Switch
The trimmer comes equipped with an on/off
switch that is combined with a safety lock-off
feature (see Fig 18 and FIG 19). To operate
the trimmer depress the safety lock-off button
(1) and pull it backwards while squeezing the
on/off Switch (2). The trimmer will operate as
long as the on/off switch (2) is squeezed. To
turn the trimmer off, simply release the on/off
switch. The trimmer will automatically return to
the locked-off position after the on/off switch
is released.
Allow 5 seconds or more for the trimmer head
to stop rotating after releasing the on/off
switch. Do not invert the grass trimmer or
place hands under the guard until the grass
trimmer has come to a complete stop and the
power cord has been disconnected from the
power supply.
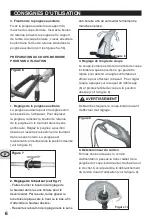
Fig 20
Fig 21
Fig 22

