!
21
ENGLISH
ASSEMBLY
OPERATION
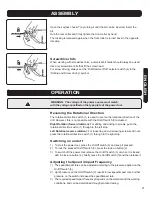
Open the keyless chuck (7) by turning it until the bit can be inserted. Insert the
Screwdriver bits
When working with screwdriver bits, a universal bit holder should always be used
.
Use only screwdriver bits that fit the screw head.
For screw driving, always set the “Drill/Hammer Drill” selector switch (4) to the
“Drilling and Screw driving” symbol.
bit.
Grip the rear collar and firmly tighten the front collar by hand.
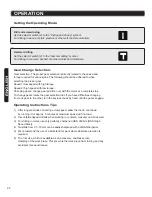
The locking is released again when the front collar is turned back in the opposite
direction.
The voltage of the power source must match
with the voltage specified on the type plate of the power tool.
Reversing the Rotational Direction
The rotational direction switch (1) is used to reverse the rotational direction of the
drill. However, this is not possible with the On/Off switch (3) actuated.
Right Rotation (forward rotation)
: For drilling and driving in screws, push the
rotational direction switch (1) through to the left stop.
Left Rotation (reverse rotation)
: For loosening and unscrewing screws and nuts,
press the rotational direction switch (1) through to the right stop.
Switching on and off
1) To start the power tool, press the On/Off switch (3) and keep it pressed.
2) To lock the pressed On/Off switch (3), press the lock-on button (2).
3) To switch off the power tool, release the On/Off switch (3) or when it is locked
with the lock-on button (2), briefly press the On/Off switch (3) and then release it.
Adjusting the Speed /Impact Frequency
1) The speed/impact rate can be adjusted according to the pressure applied on the
On/Off switch (3).
2) Light pressure on the On/Off switch (3) results in low speed/impact rate. Further
pressure on the switch increases the speed/impact rate.
3) The required speed/impact frequency depends on the material and the working
conditions, and can be determined through practical testing.
WARNING.
Summary of Contents for PT100321
Page 2: ...A 1 2 3 5 6 4 7 1 ...
Page 14: ......


