background image

2

www.havaco.pl

1. PRODUCT INTRODUCTION

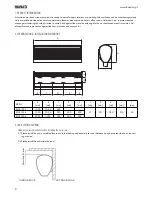
2. IDENTIFICATION & INSTALLATION DIMENSIONS

3. INSTALLATION CAUTION

Air curtains are the new top-class products used as a part of modern interiors, cooperating with ventilation and air conditioning systems. 
Units are installed at the entrances of supermarkets, theatres, meeting rooms, hotels, of

fi

 ce rooms, storerooms, etc. to protect heated 

areas against entering the cold air inside (in winter) and against the warm air entering into the air conditioned areas (in summer). Ad-
ditional function is prevention against the dust, mosquito and nocuous air.

Follow below recommendations when installing the air curtain:

3.1  Please install the unit in a stable place to avoid the shaking and ensure its security (because it maybe causes vibrations, loosen-

ing or noise).

3.2 Please install the unit inside the room.

MODEL

A

[mm]

B

[mm]

C

[mm]

D

[mm]

E

[mm]

F

[mm]

G

[mm]

H

[mm]

I

[mm]

J

[mm]

DELTA 100-A

1000

102,5

695

--

--

91

90

280

215

56

DELTA 150-A

1500

105,0

390

505

390

DELTA 200-A

2000

107,5

500

500

500

More then 50 mm

OUTDOOR ZONE

INDOOR ZONE

A

H

I

J

B

C

D

E

B

F

G

Summary of Contents for DELTA 100-A

Page 1: ...Air Curtains Installation manual DELTA 100 A DELTA 150 A DELTA 200 A Thanks for purchasing this Air Curtain Please read these instructions carefully before use...

Page 2: ...inst the warm air entering into the air conditioned areas in summer Ad ditional function is prevention against the dust mosquito and nocuous air Follow below recommendations when installing the air cu...

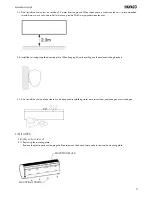
Page 3: ...the unit using supplied mounting plate When hanging it from the ceiling use the enclosed ceiling brackets 3 5 Don t install the unit in a place where it can be exposed to splashing water excessive ste...

Page 4: ...he mounting plate use dowels or plugs for concrete washers and nuts according to the below drawing 4 1 4 Install the main body Set the main body onto the upper part of the mounting plate and clamp it...

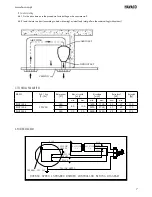
Page 5: ...ositions with tapping screw 4 3 1 Remove the mounting plate from main body look at the step 4 1 1 4 2 2 Follow according to the step 4 of part A B Installing on the wooden wall C Hanging from the ceil...

Page 6: ...kets which are not a part of a delivery as shown below 4 3 3 Set and tighten the mounting plate on the ceiling brackets 4 3 4 Install the main body according to part A of such manual WASHER SPRING WAS...

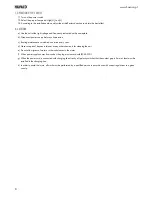
Page 7: ...ing 5 TECHNICAL PARAMETERS 6 WIRING DIAGRAM MODEL Volt Freq V Hz Motor power W Max air speed m s Air volume m3 h Noise level dB Net weigh Kg min max min max min max DELTA 100 A 230 50 180 8 0 10 0 140...

Page 8: ...maintenances must be done twice every year d Never use petrol benzene thinner or any other chemicals for cleaning the unit e Do not allow igress of water or other substances to the motor f When power...

Reviews: