background image


Prieš paleisdami įrenginį, atlikite šiuos veiksmus:


Before starting up the machine, make sure that:


Patikrinkite  ventiliatoriaus  pritvirtinimą  ir  ar  elektros  instaliacija  yra  tinkamai 

įrengta.


Patikrinkite,  ar  instaliacijoje  nėra  montavimo  medžiagų  likučių  ar  pašalinių 

objektų, kurie galėtų būti įtraukti į ventiliatoriaus vidų.


The apparatus is well secured and the electrical connections have been 
carried out correctly. 
No loose material or fitting remains can be sucked up by the ventilator, If the 
ventilator has been mounted in a duct, make sure it is clear of loose material. 


Patikrinkite, ar įrenginys įžemintas.


Patikrinkite, ar elektrinės apsaugos yra tinkamai prijungtos ir pritvirtintos.


Patikrinkite kabelių pralaidų ir elektros jungčių sandarumą.


The earth fittings are adequately 

connected.


The electrical safety devices are correctly connected, adjusted and ready 

for 

use.


The wire and electrical connections inputs are correctly sealed and water-

tight. 


Paleidę įrenginį, atlikite šiuos veiksmus:


When starting up the machin

e

, make sur

that

:


• 

Patikrinkite sparnuotės sukimosi kryptį.


• 

Patikrinkite, ar nėra nenormalių vibracijų.


• 

The propeller turns in the correct direction. 


• 

There are no abnormal vibrations..


• 

Jei  įsijungia  kokia  nors  elektrinė  apsauga,  nedelsdami  atjunkite 

įrangą  nuo  maitinimo  šaltinio.


Prieš  paleisdami  iš  naujo,  būtinai 

patikrinkite instaliaciją.


•  If any of  the electrical safety devices blow, the apparatus must be 

quickly disconnected from the mains supply. The whole installation 
should be carefully checked before trying to start up the machine 
again

.


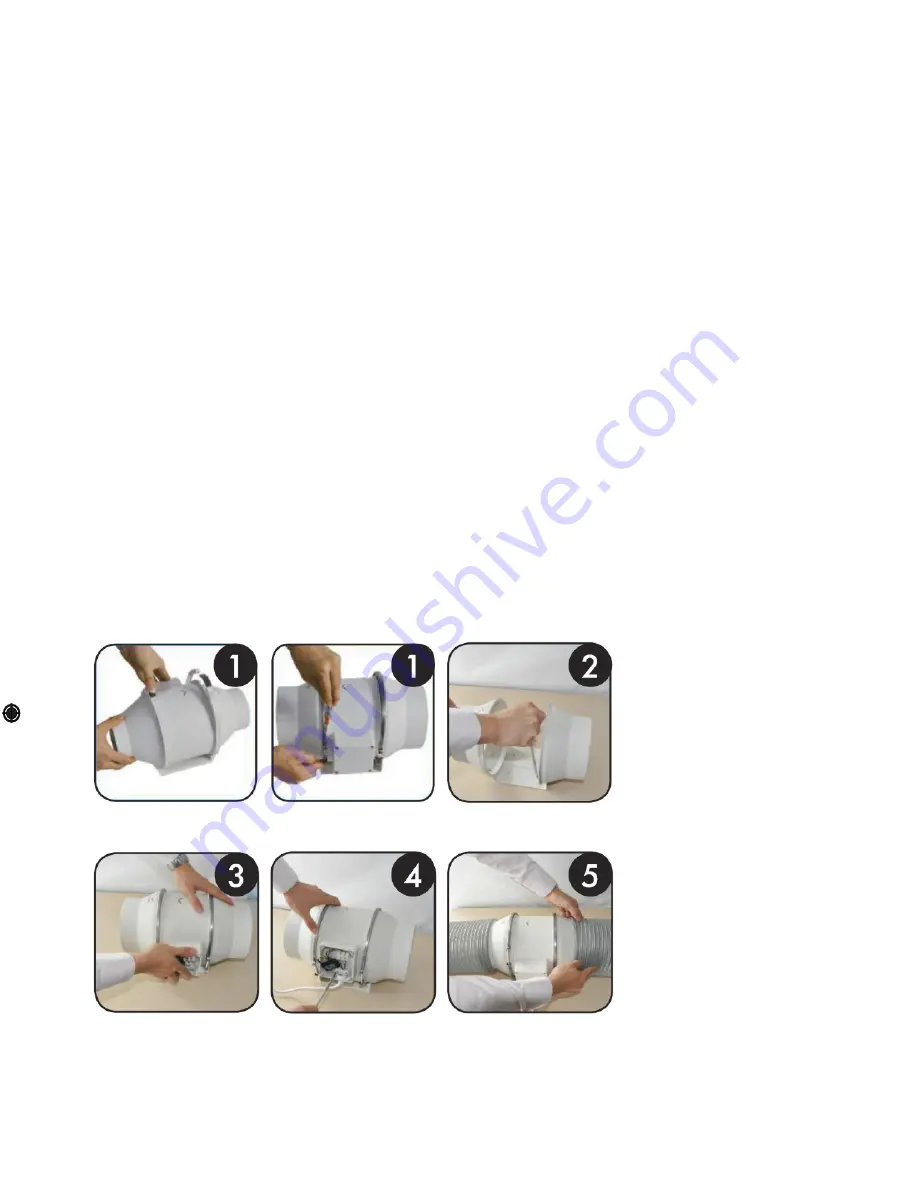
1. 

Atsekite / atsukite 

spaustukus.


Unlock/unscrew 

the clip

s


2. 

Pritvirtinkite įrenginio pagrindą


Attach 

the 

base unit


3. 

Pritvirtinkite variklio modulį prie 

įrenginio pagrindo 


Place the motor unit to the base


4. 

Įrenkite elektros jungtis


Carry 

fhe 

connections 

out


5.


Prijunkite vėdinimo kanalus


Connect fhe ducts


Summary of Contents for ICM-100/200M

Page 1: ...AGONALNE DO KANAŁÓW OKRĄGŁYCH DIAGONAL IN LINE DUCT FANS INSTRUKCJA OBSŁUGI I WARUNKI GWARANCJI USER S MANUAL AND TERMS OF WARRANTY ICM 100 200M ICM 125 290M ICM 150 160 530M ICM 200 840M ICM 250 1410M ICM 315 2210M ...

Page 2: ...hich supports it is resistant enough to bear its weight at full functioning power Before manipulating the apparatus make sure the mains supply is disconnected even if the machine is switched off Draudžiama naudoti įrenginį patalpose kuriose yra potencialiai sprogi aplinka ar korozijos pavojus Jei ventiliatorius sumontuotas kaip įrenginys orui šalinti iš patalpos kurioje įrengtas katilas ar kitas d...

Page 3: ...ted adjusted and ready for use The wire and electrical connections inputs are correctly sealed and water tight Paleidę įrenginį atlikite šiuos veiksmus When starting up the machine make sure that Patikrinkite sparnuotės sukimosi kryptį Patikrinkite ar nėra nenormalių vibracijų The propeller turns in the correct direction There are no abnormal vibrations Jei įsijungia kokia nors elektrinė apsauga n...

Page 4: ...VARA LOW SPEED LA AUKŠTA PAVARA HIGH SPEED C HRS PAVARŲ JUNGIKLIS HRS SWITCH SPEED mėlynas blue balta s N O rudas brown L O rudas brown juoda s LB Prijungimo schema su HRX sūkių reguliatoriumi Wiring diagram with HRX speed cotrol Prijungimo schema su HRS pavarų jungikliu Wiring diagram with HRS switch control juodas O rudas black brown baltas O mėlynas white blue PRIJUNGIMO SCHEMA WIRING DIAGRAM ...

Page 5: ...E TECHNICZNE TECHNICAL DATA Tipas Type Pavara Fanspeed m3 h rpm W A V Hz dB A kg ICM 100 200M HS LS 198 165 2200 1850 26 23 0 12 0 11 230 50 31 26 2 0 ICM 125 290M HS LS 284 248 2250 1850 33 28 0 14 0 13 230 50 31 26 1 8 ICM 150 160 530M HS LS 530 410 2550 1850 54 48 0 24 0 21 230 50 33 29 2 7 ICM 200 840M HS LS 840 690 2450 1950 128 123 0 57 0 52 230 50 63 55 4 9 ICM 250 141OM HS LS 1405 1064 245...

Page 6: ...ązany do przedstawienia wypełnionego i podpisanego formularza ZGŁOSZENIA SERWISOWEGO którego szablon znajduje się na stronie www ventia pl lub jest dostępny w siedzibie Ventia Sp z o o 7 Zgłaszający jest zobowiązany do zapewnienia swobodnego dostępu do urządzania w celu przeprowadzenia prac serwisowych Serwisant ma prawo odmówić naprawy gwarancyjnej lub pogwarancyjnej jeżeli miejsce lub sposób mon...

Page 7: ...URY VAT 3 NAZWA URZĄDZENIA I MODEL 4 NR FABRYCZNY 5 DANE KUPUJĄCEGO IMIĘ I NAZWISKO FIRMA TELEFON KONTAKTOWY MIEJSCE MONTAŻU KUPUJĄCY POTWIERDZA ŽĘ PRZYMUJE WŁAŚCIWY MONTAŻ POWYŻSZEGO URZĄDZENIE BEZ ZASTRZEŻEŃ POTWIERDZA FAKT ZAPOZANANIA SIĘ Z ZASADAMI OBSŁUGI URZĄDZENIA ORAZ WARUNKAMI UDZIELENIA GWARANCJI KTÓRE W PEŁNI AKCEPTUJE PODPIS KUPUJĄCEGO ADNOTACJE PRZEGLĄDÓW OKRESOWYCH ORAZ NAPRAW GWARAN...

Page 8: ...Wyłączny przedstawiciel na terenie Polski Vent a Sp A ...

Reviews: