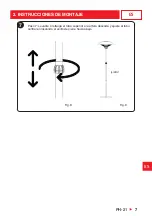
background image

EN

EN

PH-21   


15


SAFETY NOTES

• Please read these instructions carefully.

• Only use the halogen heater on a firm solid horizontal area 

where  all  the  feet  on  the  base  are  in  contact  with  the  floor 

(should  the  heater  be  tilted  or  fall  over  the  auto  cut  off 

switch will activate).

• Place the heater outside or in a large open area and well away 

from any obstructions such as branches or where the heater 

is near any objects can be affected by heat, such as furniture, 

curtains  or  other  inflammable  objects  (minimum  distance  1 

meter).

• Do not use in unventilated areas.

•  Do  not  use  where  gas,  petrol,  paint  or  other  inflammable 

goods are stored.

• Do not push any items through, obstruct or cover the grill of 

the heater head.

•  Do  not  leave  turned  on  and  unattended  especially  when 

children and or animals are in the vicinity.

• The indication of the different positions of the switches shall 

be visible from a distance of 1m.

•  The  unit  must  be  securely  placed  on  a  horizontal  and  flat 

surface.

DANGER: 

The unit is at a high temperature during 

operation. It stays hot for a while after switching off. Potential 

danger can occur when touching it during this period.

DANGER: 

Don’t place the unit close to a curtain and/

or other flammable objects. Otherwise there will be danger of 

catching fire.

DANGER: 

Don’t cover the unit with anything during 

operation or a short time after it’s been switched off.

• Don’t wrap the power supply cord around the unit.

• The unit must be handled with care, and avoid vibration or 

knocking.

• The unit must be securely grounded during operation.

• When assembling, keep clear from any board or flammable 

Summary of Contents for PH-21

Page 1: ...nstalaci n y uso Manual de instala o e uso Instructions installation manual Manuel d installation et utilisation www haverland com English www haverland co uk Portugu s Fran ais PH 21 PH21_V1 2_020620...

Page 2: ...2 Instala o e montagem 3 Funcionamento 4 Manuten o 9 11 14 14 Portugu s 1 Safety Notes 2 Assembling process 3 Operation 4 Maintenance 15 17 20 20 English 1 Avertissements g n raux 2 Processus D assem...

Page 3: ...a obstruya o cubra su rejilla No la deje encendida y desatendida especialmente cuando haya cerca ni os o animales Las indicaciones de las diferentes posiciones de los interruptores debe ser visible de...

Page 4: ...su encendido Esto es normal y no afectar al rendimiento del aparato Los ni os de menos de 3 a os deben mantenerse alejados del aparato a menos que est n permanentemente controlados Los ni os de entre...

Page 5: ...E MONTAJE 1 Paso 1 Atornille el tubo inferior a la base 2 Paso 2 Atornille el tubo medio con el tubo inferior 3 Paso 3 Pase el cable de alimentaci n a trav s de la base y del tubo inferior del tubo ce...

Page 6: ...imentaci n a la toma del cabezal de la estufa 5 Paso 5 Empuje el cabezal de la estufa sobre el tubo hueco superior y f jelo en su posici n utilizando los 2 tornillos M4 8 suministrados 6 Paso 6 Tire d...

Page 7: ...ES ES PH 21 7 7 Paso 7 Levante o retraiga el tubo superior a la altura deseada y ajuste al tubo central enroscando el anillo de cierre hacia abajo Fig 8 Fig 9 Listo 2 INSTRUCCIONES DE MONTAJE...

Page 8: ...bot n dos veces para operar la estufa a media media 1200 W 4 Presione el bot n tres veces para operar la estufa a potencia m xima 2100 W 5 Presione el bot n cuatro veces para apagar las resistencias y...

Page 9: ...os produtos inflam veis N o empurre nenhum item com a cabe a do aquecedor nem obstrua ou cubra a sua grade N o o deixe ligado e sem supervis o especialmente quando crian as e ou animais estiverem pres...

Page 10: ...ja facilmente vis vel e acess vel Podem existir pontos escuros na superf cie dos elementos de aquecimento durante os primeiros minutos ap s a liga o Isso normal e n o ir afetar o desempenho da unidade...

Page 11: ...o tubo inferior base parafusando os juntos 2 Passo 2 Enrosque o tubo do meio com o tubo inferior 3 Passo 3 Passe o cabo de alimenta o atrav s da base e do tubo inferior tubo m dio e puxe cerca de 2 m...

Page 12: ...o cabo de alimenta o tomada na cabe a do aquecedor 5 Passo 5 Empurre a cabe a do aquecedor no tubo oco superior e fixe o na posi o usando os 2 parafusos M4 8 fornecidos 6 Passo 6 Puxe o cabo de alimen...

Page 13: ...PT PT PH 21 13 2 INSTALA O E MONTAGEM 7 Passo 7 Levante ou retraia o tubo superior at a altura desejada e ajuste o no tubo meio aparafusando o anel de fecho Fig 8 Fig 9 Pronto...

Page 14: ...Pressione o bot o duas vezes para operar o aquecedor a pot ncia m dia 1200W 3 Pressione o bot o tr s vezes para operar o aquecedor a pot ncia alta 2100W 4 Pressione o bot o quatro vezes para desligar...

Page 15: ...ter head Do not leave turned on and unattended especially when children and or animals are in the vicinity The indication of the different positions of the switches shall be visible from a distance of...

Page 16: ...his is normal and will not affect the performance of the unit Children less than 3 years old should be kept away unless continuously supervised Children from 3 to 8 years old shall only switch on off...

Page 17: ...G PROCESS 1 Step 1 Screw the bottom tube onto the base 2 Step 2 Screw the middle tube with the bottom tube 3 Step 3 Feed the Power Cord through the Base and the Bottom Tube middle tube and pull throug...

Page 18: ...to the socket in the heater head 5 Step 5 Fit the heater head to the top hollow tube and fix it in position using the supplied 2 X M4 8 screws 6 Step 6 Pull the power cord gently out of the base as m...

Page 19: ...EN EN PH 21 19 7 Step 7 Extend or retract the top tube to the desired height and tighten to the middle tube by screwing down the locking ring Fig 8 Fig 9 Complete ASSEMBLING PROCESS...

Page 20: ...NTENANCE NEVER USE SOLVENTS OR ABRASIVE PRODUCTS OPERATION Plug the Patio Heater into a grounded 220V 240V 50 60Hz power outlet IMPORTANT The heater must be properly installed before it is used This u...

Page 21: ...objet avec le corps de l appareil ne l obstruez pas et ne couvrez pas la grille de la t te de chauffage Ne le laissez pas allum et sans surveillance en particulier lorsque des enfants et ou des animau...

Page 22: ...est facilement visible et accessible Il peut y avoir deux points noirs sur la surface des l ments chauffants pendant les premi res minutes apr s sa connexion Ceci est normal et n affecte pas la perfor...

Page 23: ...accorder le tube inf rieur avec la base en les vissant ensemble 2 tape 2 Vissez le tube central avec le tube inf rieur 3 tape 3 Faites passer le cordon d alimentation travers la base et le tube inf ri...

Page 24: ...courant dans la t te du parasol chauffant 5 tape 5 Emboitez la t te du parasol chauffant dans le tube creux sup rieur et fixez la dans sa position l aide des 2 vis M4 8 fournies 6 tape 6 Tirez le cor...

Page 25: ...FR FR PH 21 25 7 tape 7 Soulevez ou r tractez le tube sup rieur la hauteur d sir e et serrez au tube central en vissant la bague de fermeture vers le bas Fig 8 Fig 9 Compl t PROCESSUS D ASSEMBLAGE...

Page 26: ...et utilisez l emballage d origine pour remballer l appareil 4 MAINTENANCE Branchez votre parasol chauffant dans une prise de courant 220V 240V 50 60Hz mise la terre IMPORTANT Faire seulement fonctionn...

Page 27: ...equipamento el ctrico Se assim o fizer contribui para a protec o ambiental Where you see this symbol on any of our electrical products or packaging it indicates that the relevant electrical products...

Page 28: ...nal no autorizado por MARSAN INDUSTRIAL S A Esta garant a no debe ser modificada alterada ni extendida y el Fabricante NO autoriza a nadie a actuar en su nombre en la modificaci n alteraci n o extensi...

Page 29: ...torizado pela MARSAN INDUSTRIAL S A Esta garantia n o deve ser modificada alterada nem ampliada e o Fabricante n o autoriza ningu m a agir em seu nome para a modifica o altera o ou amplia o da mesma E...

Page 30: ...tions transporting the device or problems caused by the device being handled by persons not authorised by MARSAN INDUSTRIAL S A This warranty must not be modified altered or extended and the Manufactu...

Page 31: ...un personnel non agr par MARSAN INDUSTRIAL S A Cette garantie ne doit tre ni modifi e ni alt r e ni tendue et le Fabricant n autorise personne agir en son nom dans la modification l alt ration ou l e...

Page 32: ...PH 21 900 1200 2000 230 V 50 Hz CLASE I CLASS I CLASSE I IP 44 W...

Reviews: