background image

www.havis.com   •   1-800-524-9900

2

7

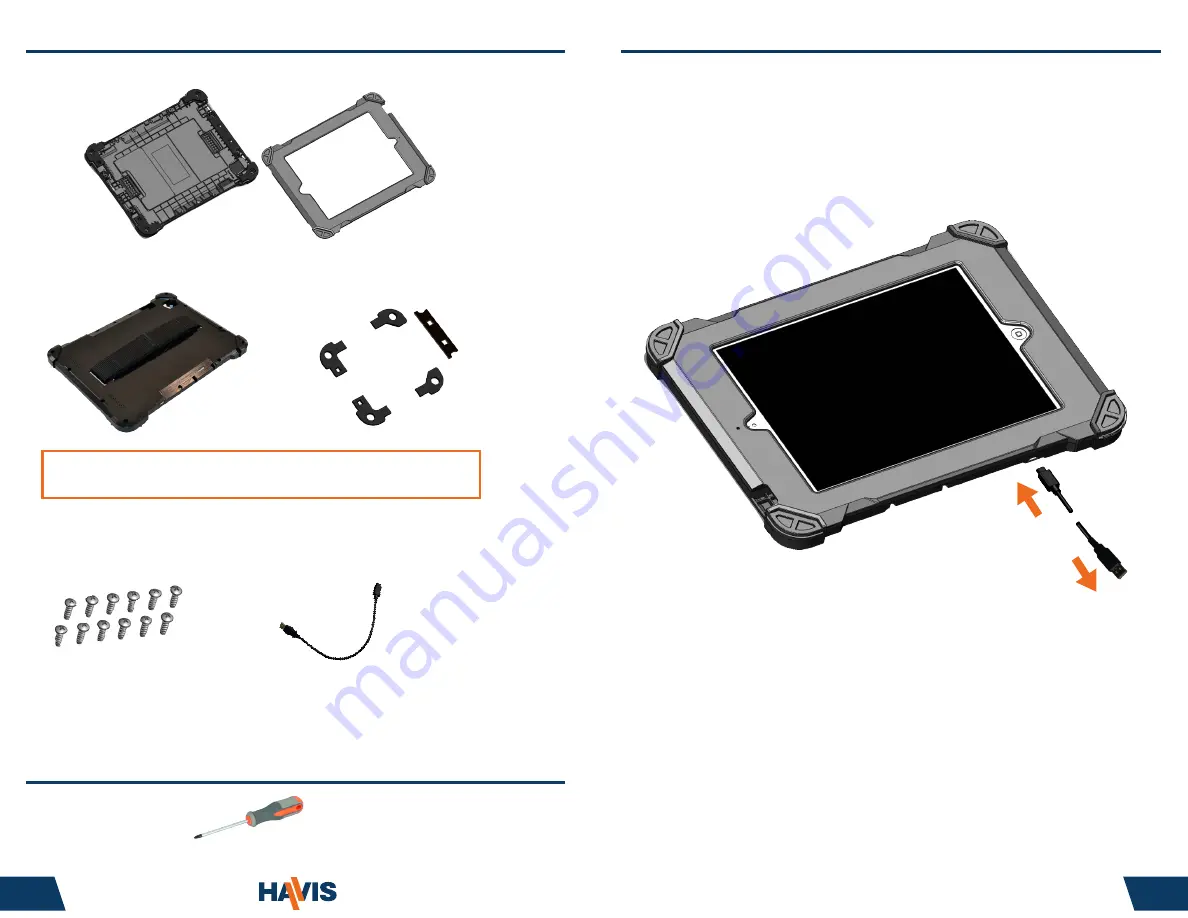
Charging Your Tablet

NOTE:  This iPad case is designed to be charged using a designated

              Havis Docking Station (Part # DS-APP-102).  

If you have the need to chargeyour tablet when not docked, use the supplied

Micro-USB cable.  Simply connect the Micro-USB cable to the Protective Case,

then insert the other end of the cable into a 5V (10Watt) power source.

•  #1 Phillips Screwdriver

•  Protective Case

    (Back and Front pieces)

•  Micro-USB Power Cable (1)

•  #4-20 x 3/8” Plastite 

Screws (12)

•  Rubber Corners/Edge (5)

Parts Included

Tools Required

(Original Instructions)

Micro-USB into

Protective Case

USB into

5V (10 Watt)

Power Source

•  Hand Strap (1)

NOTE:  The Hand Strap comes pre-attached to the back of the Protective Case.  

               If the Hand Strap will not be utilized, remove prior to assembly.

Summary of Contents for DS-DA-700

Page 1: ...ful interference and 2 This device must accept any interference received including interference that may cause undesired operation NOTE This equipment has been tested and found to comply with the limits for a Class B digital device pursuant to part 15 of the FCC Rules These limits are designed to provide reasonable protection against harmful interference when the equipment is operated in a commerc...

Page 2: ...e Protective Case then insert the other end of the cable into a 5V 10Watt power source 1 Phillips Screwdriver Protective Case Back and Front pieces Micro USB Power Cable 1 4 20 x 3 8 Plastite Screws 12 Rubber Corners Edge 5 Parts Included Tools Required Original Instructions Micro USB into Protective Case USB into 5V 10 Watt Power Source Hand Strap 1 NOTE The Hand Strap comes pre attached to the b...

Page 3: ... Apple iPad from the Havis Protective Case simply remove the twelve screws turn the case over and lift the Front piece of Protective Case off the Back piece Unplug the connector and remove tablet Installation continued 1 Remove Protective Case from packaging and seperate the Back piece from the Front piece 2 Insert the connector from the Protective Case into the Apple iPad ...

Page 4: ...tinued 3 Place the iPad into the Back piece of Protective Case ensuring the connector cable is routed as shown 4 Place the five 5 Rubber Corners Edge onto the Back piece of Protective Case ensuring each one aligned properly or they will not fit securely in place Insert Rubber Edge piece 5 below with short edge along outside edge of Protective Case Some slight warping will be evident if inserted in...

Reviews: