background image

8

Set-Up Instructions (continued)

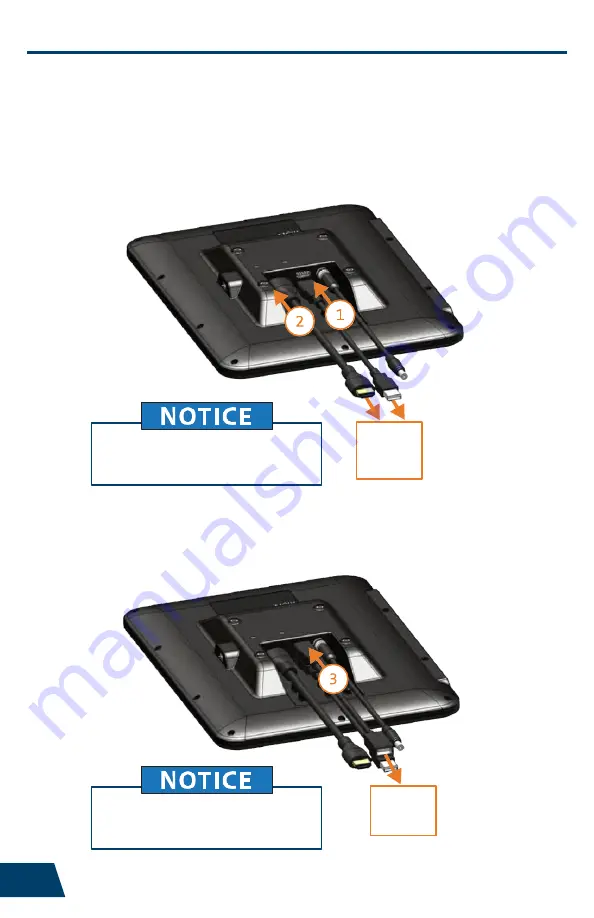
Connecting to Vehicle Docking Station and Optional Keyboard

(not included with TSD-101)

1)

Connect one end of the USB 2.0 cable (male-male) to Touch Screen Display and  
the other end to the vehicle docking station.

2)

Connect one end of the HDMI cable (male-male) to Touch Screen Display and  
the other end to the vehicle docking station.

3) 

Connect one end of the USB 2.0 cable (male-female) to Touch Screen Display  

and the other end to the optional keyboard (not included).

Vehicle

Docking
Station

Optional  

Keyboard

BE CERTAIN TO CONNECT USB CABLES TO

THE CORRECT USB PORT ON THE TSD-101
AS OUTLINED IN SIDE VIEW ON PAGE 6.

BE CERTAIN TO CONNECT USB CABLES TO

THE CORRECT USB PORT ON THE TSD-101
AS OUTLINED IN SIDE VIEW ON PAGE 6.

Summary of Contents for TSD-101

Page 1: ...Owner s Manual 11 6 Capacitive Touch Screen Display www havis com 1 800 524 9900 TSD 101...

Page 2: ...PLIED LIND POWER SUPPLYWITH CABLES PROVIDED DO NOT OPERATE TOUCH SCREEN DISPLAY WITH SHARP OBJECTS OR DAMAGE TO DISPLAY MAY OCCUR ONLY CLEAN TOUCH SCREEN DISPLAY WITH NON ABRASIVE NON HARSH CLOTHS CLE...

Page 3: ...anumeric characters which describe product options Product Options This declaration covers all options of the above product which bear the CE Marking Is in conformity with the following standardsor ot...

Page 4: ...s Included 11 6 LCD Screen Power Button VESA 75 Mounting 4x M4 thread Strain Relief Anchor Points Power Indicator Speaker left Volume Control and Brightness Control and 2 Point Multi Touch Capacitive...

Page 5: ...d Screws 5 3 Split Lock Washers M4 5 4 Washers M4 5 Tools required for installation 2 Phillips For M4 Pan Head Screws Power Supply Hardware includes 1 Zip Ties 2 2 10 16 x 3 4 long Drill Point Hex Hea...

Page 6: ...ility Side view USB 3 0 USB 3 0 to Optionial Keyboard Power 12 0VDC IN USB 3 0 to Vehicle Docking Station HDMI 1 3 to Vehicle Docking Station BE CERTAIN TO CONNECT USB CABLESTO THE CORRECT USB PORT ON...

Page 7: ...other end to the Lind Power Supply 2 Connect one end of the cigarette lighter power cable to the Lind Power Supply 3 Plug into cigarette lighter receptacle connected to vehicle power 4 The LED on the...

Page 8: ...able male male to Touch Screen Display and the other end to the vehicle docking station 3 Connect one end of the USB2 0 cable male female to Touch Screen Display and the other end to the optional keyb...

Page 9: ...secure each cable at both strain relief points Vehicle Mounting 1 Havis provides vehicle specific mounting solutions for the TSD 101 To check availability of a mounting solution for your vehicle go to...

Page 10: ...rom the system and displays the output on the screen If Power Indicator illuminates amber Touch Screen Display has power Standby Mode but is not receiving signal from source device Verify Settings on...

Page 11: ...nts 3 Press both the and Brightness buttons simultaneously to deactivate Night Mode Operating Basics continued Using Control Buttons 1 Volume Press and hold either button VOL or VOL until the volume O...

Page 12: ...Mounting Solutions Havis offers a variety of mounting solutions including light weight motion devices and vehicle specific mounting solutions for the TSD 101 Visit www havis com or call 1 800 524 990...

Reviews: