
Removing the Sonar Sensor Float
If you find that you do not have a need for the sonar sensor float,
it can be removed as follows:
1. Remove the rubber stopper from the cable by sliding the safe-
ty strap toward the headphone-style plug and gently working
it over plug.
2. Slide the cable through the center of the float toward the plug
and gentle work the plug through the center of the float in a
rocking motion.
F
ISHING
T
IP
By attaching the SideScan
TM
Adapter
to an ordinary broom stick or paint
roller handle purchased from a local
hardware store, you can scan for fish
suspended in the water column with-
in 99.9 Ft (30.4 M) of your location.
Attach the sensor to a handle, lower
the sensor into the water as per figure
10, and slowly move the sensor in a manner that will allow
the signal to search the desired location (a sweeping motion
similar to using a flashlight is most effective). Keep in mind
the sonar signal is emitted from the base of the sensor. Scan
down, sideways, or any combination of the two. Remember,
to get depth and bottom contour and composition readings
you will have to aim the signal at a solid object within 99 Ft
(30.4 M), however FISH readings will be accurate, even if
the depth readings is “---”.
Using The Sonar Sensor From A Boat
There are four methods that the fish finder can be used from a
boat.
1. Toss the sensor and float into the water as per the previous
instructions.
2. “Shoot Thru” the hull as per the instructions in the next section.
3. Attach the SideScan
TM
adapter to handle and scan for fish as
per the fishing tip below.
4. Attach the SideScan
TM
Adapter to the boat hull using the mount-
ing tabs.
NOTICE:
Using method 4 will make the fish finder inop-
erable at boat speeds over 5 mph (8 kph).
Using The SideScan
TM
Adapter
Your fish finder includes a combination SideScan
TM
adapter,
mounting bracket for the Sonar Sensor (Figure 9).
(A)
The Adapter is threaded to easily attach it to a standard broom
stick or paint roller handle purchased from a local hardware
store.
(B)
The Adapter includes mounting taps so that you can attach it
to any flat surface or boat hull.
(C)
The Adapter is removable and adjustable up to 180 Degrees.
F
ISHING
T
IP
Here are Some Ideas for Maximizing the Usefulness of the
SideScan
TM
Adapter: • Attach it to a dock piling and scan
sideways for fish swimming by. • Attach it to a boat, kayak,
or canoe hull and slow troll for fish, all the while keeping a
look out for fish behind or in front of you. • Attach it to a
broom stick handle and search for the best fishing location.•
Attach it to a broom stick and seek out the fish hiding away
from your fishing hole while ice fishing.
(a)
(b)
(c)
Figure 9:
Figure 10:
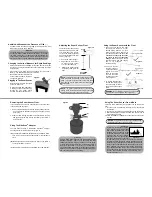
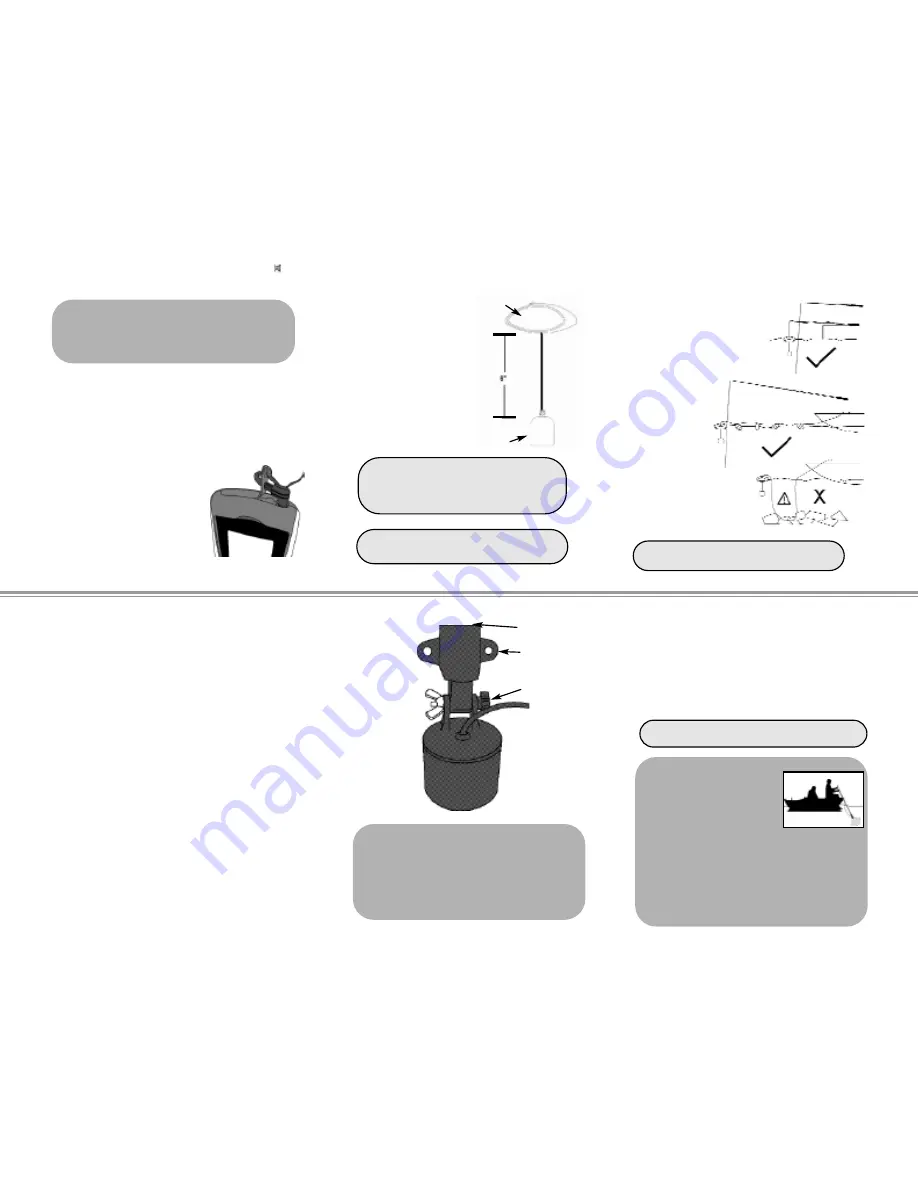
Adjusting the Sonar Sensor Float
The Sonar Sensor float must be
adjusted so that it is a minimum
of 6 inches away from the sen-
sor (it can be further depending
upon water conditions see Note
below) (Figure 5).
1. Pull out the rubber stopper.
2. Adjust float so that it is 6 to
10 inches from the sensor,
or at your desired depth.
3. Replace the rubber stopper
by pressing it firmly into the
float.
Using the Sonar Sensor with the Float
1. Toss the sonar sensor and float
assembly into the water at your
desired fishing location. To toss,
place the sonar sensor and float in
your hand, and pitch underhand.
Do
not throw the sensor by the cable
as this will cause unrepairable
damage.
Before tossing, be certain
that the cable is free from tangles
and is not wrapped
around anything.
2. Use a pole to guide
the sonar sensor to
a desirable position
(Figure 6) or add
floats on the cable
to allow the cable
to float on top of the
water (Figure 7).
3. To retrieve the sonar sen-
sor and float simply pull in
the cable being certain to
neatly wind up the excess
cable.
Figure 5:
Figure 7:
Figure 8:
WARNING:
Do not allow the cable to sink to the bottom
as it may become entangled in debris (Figure 8).
Float
Sonar
Sensor
NOTE:
In calm water the sonar sensor can be set at
which will provide the maximum amount of sonar cov-
erage. In rougher water, the sonar sensor may need
to be lowered into the water further to provide stabi-
lized readings.
NOTE:
To prevent accidental loss of the stopper
always press the rubber stopper firmly into the float
before tossing the sonar sensor into the water.
Figure 6:
Audible Notification of the Presence of Fish
( )
• An audible alarm sounds when a
group
of fish are detected. It will
NOT sound if just one fish is detected.
Changing the Units of Measure for Depth Readings
• Press and Hold SETUP and ENTER (at the same time) for more than
5 seconds. The display will flash the current units setting next to the
depth readout.
• Press either key to toggle the unit of measure (Ft = Feet or M =
Meters). The selected unit of measure will blink.
• The screen will automatically return to
normal operation after 5 seconds if
no keys are pressed.
Plugging In The Sonar Sensor
• Insert the Senor Plug into the socket
on the top of the unit.
• To prevent the plug from inadvertent-
ly coming out you can feed the plug
through the plug holder before
inserting into the socket (Figure 4).
F
ISHING
T
IP
Leave the alarm on if you are using a crank bait so that you do
not have to steadily watch for fish on the screen. If you hear
the alarm, gently toss your bait at least 20 feet beyond the
sonar sensor, allow the bait to drop to the depth of the fish
alarm, and retrieve as recommended for the targeted species.
Figure 4: