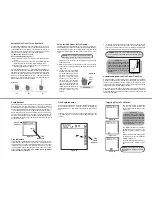
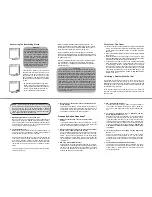


Depth Readout
The depth readout on the upper left corner (Figure 14) will appear
after the power is turned ON and the sonar sensor is placed in
water between 1.5 feet and 99.9 feet (.5 to 30.4 Meters). If the
depth exceeds these parameters, the depth meter will indicate “---
”. This reading may also occur in water that is extremely dirty, or
where there are heavy silt or mud bottoms. Sonar is a sound sig-
nal that travels through water. Sonar will not travel through air.
Keep this in mind when using the fish finder, as the smallest air bub-
ble between the sonar sensor and the water, will cause the unit to
not operate correctly.
Fish Indicators
If the fish finder determines that sonar has detected a fish, the dis-
play will show a fish shaped icon (Figure 14). The first column of
fish indicators on the right of the display shows the most current
information. This column is then moved to the left as a new read-
ing is displayed. That is, fish indicators “swim” away from the right
to the left at a constant speed.
This motion in no way reflects
actual movement of the fish.
Fish Depth Indicator
Use the Fish Depth Indicator to measure the fish’s depth from the
Sonar Sensor (Figure 15). This can be done by dividing the
depth reading by 10. This number represents the value of each
box.
(example, the depth is 70.0 feet, the fish symbol appears in the
5
th
box from the top. This means the fish is 35 feet from the the
surface)
Fish
Depth
Indicator
Depth
Readout
Fish
Indicators
Figure 14:
Figure 16:
The WeedID
TM
feature incorporated
into the fish finder depicts the
amount of weed at the bottom of the
water body.
The display indicates the presence
of short weeds by turning on the
smallest WeedID
TM
indicator (Figure
16).
Moderately tall weeds are depicted
by turning on the second WeedID
TM
indicators (Figure 17).
Tall weeds are depicted by turning on
the third WeedID
TM
indicator (Figure
18).
Targeting Prey In The Weeds
Figure 15:
Figure 17:
Figure 18:
F
ISHING
T
IP
If the prey that you are targeting
prefers a weed habitat you should
try to fish your bait as close to the
top of the weeds as possible
(installing a weed guard on your
hook will prevent accidental snag-
ging of the weed).
NOTICE:
In an area where tall and
short weeds are present, all 3 icons
will be lit.
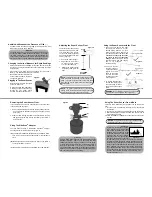
4. To remove the Sonar sensor from the frozen ice, gently tap the
sonar sensor at the base with your hand. If it will not come loose,
spray a small amount of water on the ice surface around the base
and repeat step 4 until the sonar sensor is easily removed.
Understanding How the Fish Finder Finds Fish
Greatly simplified, this fish finder is just a combination of a speaker,
microphone and stopwatch; it transmits as sound pulse from the sonar
sensor, and then measures the time it takes for the “echoes” to return
to the sonar sensor (The fish finder "knows" that the speed of sound
through water is about 4800 feet per second).
Fish, rocks, logs, weed, debris, the bottom, etc all “echo” the pulse at
a different intensity. A built-in computer then organizes all of this infor-
mation and shows it on a display screen in a manner that is easy for
the user to understand.
WARNING:
Never use a blunt object to strike the sonar
sensor as this may cause damage to the sensitive internal
electronics.
F
ISHING
T
IP
Use the fishing tip in the “Using the
Sonar Sensor from a Boat” section
while ice fishing. This method will
give you an accurate indication of
where the best fishing location for
suspended fish is within 99.9 ft
(30.4 M).
Figure 13:
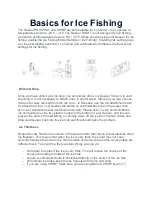
To achieve the best performance for ice fishing, it is highly rec-
ommended that you cut a hole through the ice and place the sonar
sensor directly in the water. If you would like to check the area for
depth or fish before cutting the hole, please follow steps 1 - 4 pre-
cisely.
1. Clear away snow to expose the ice surface, making sure the
surface is smooth.
2. Place a small amount of liquid water on the ice and set the
sonar sensor on the water allowing the unit to freeze to the ice
(Figure 12).
3. If there are any air pockets
between the sonar sensor and
ice, or the water below the ice,
the unit will not work properly
and will require you to try
another spot, or cut a hole in
the ice to use. You can also
use the instructions in sections
(b) or (c) of the “To Shoot-Thru
the Hull of a Boat” section. Be
certain not to allow the water to
freeze around the sensor if you
use the “plastic bag” (c)
method.
Figure 12:
Using the Fish Finder for Ice Fishing
NOTE:
Do to various environmental condi-
tions,this process may not work in all situations.
Figure 11:
(a)
(b)
(c)
Using the Fish Finder Thru a Boat Hull?
The fish finders advanced sonar capabilities allows it to “shoot
thru” the bottom of a boat or canoe. The hull must be made out
of solid fiberglass, or a maximum of 1/8” aluminum, and be in
direct contact with the water, with no air pockets. The unit will
not work thru wood, plastic, or any composite material.
To “Shoot-Thru” the hull of a boat,
do one of the following (Figure 11)
a) place the sonar sensor in .5 inches of water against the hull
bottom.
b) coat the face of the sonar sensor with petroleum jelly and
press it against the hull bottom with a twisting motion.
c) place the sonar sensor in a plastic bag that is full of water
and place against the hull bottom.
If depth readings appear as “---” while using one of these meth-
ods, place the sonar sensor directly in the water to verify that the
fish finder is operating properly. If it operates properly while
directly in the water, reposition the sensor in a new location in
the hull, and repeat methods A, B, or C. These methods DO
NOT work on all hulls and you may have to place the sensor
directly in the water for proper operation.
Spray
Water
Here
Ice Surface